background image

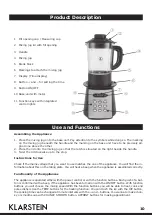
Descrizione del dispositivo

1  Misurino/ tappo del bocchettone di riempimento

2  Coperchio con misurino estraibile

3  Impugnatura

4  Brocca in vetro

5  Gruppo di lame

6  Contrassegno per l’attacco della brocca 

Display (Display del Timer)

8  Tasti [+] e [-] per impostare il Timer

9  Tasto POWER di accensione e spegnimento 

10 Base del dispositivo con blocco motore 

11 Tasti-funzione e spie luminose 

Messa in uso e Funzioni

Assemblare il dispositivo 

1.  Collocare la brocca sulla base del dispositivo, assicurandosi che il contrassegno posto sotto 

l’impugnatura della brocca e il contrassegno sulla base siano perfettamente allineati.

2.  Chiudere la brocca con il coperchio in modo che la linguetta sia posta sulla destra dell’impugnatura. 

3. 

Avvitare il coperchio in senso orario fino a che si sia incastrato perfettamente.

Avviare il dispositivo

Collegare il dispositivo a una presa di corrente dalla potenza conforme a quella richiesta (220-240 V). 

Informazioni dettagliate a riguardo si trovano sull’etichetta del dispositivo.  Dopo l’allaccio alla rete elettrica, 

il dispositivo emette un segnale acustico che indica che l’assemblaggio è stato eseguito correttamente. 

Utilizzo e funzioni

Il tasto POWER e i tasti-funzione permettono l’operatività del dispositivo. Una volta acceso il dispositivo, 

ogni volta che si preme un tasto, viene emesso un segnale acustico di conferma. Con i tasti-funzione 

è possibile impostare la velocità e cuocere, riscaldare e frullare gli alimenti. Con il tasto ICE si avvia la 

funzione trita ghiaccio. Con i tasti [+] e [-] si impostano i tempi di cottura in minuti. Per la preparazione 

di zuppe, si consiglia di selezionare la funzione CHUNKY (a pezzi) o SMOOTH (cremoso). Premere il tasto 

APPOINT per impostare i tempi. 

16

Summary of Contents for 10028105

Page 1: ...Zitruspresse orange 10008166 10008167 10008168 10028105 10028106 Suppenmixer...

Page 2: ...g Motor 420 480 W Fassungsverm gen Suppe 1 4 L Fassungsverm gen Getr nke 1 75 L Einstellbarer Temperaturbereich 60 100 C Gewicht 3 75 kg Lieferumfang 1x Ger tebasis mit Motor 1x Messbecher Kappe f r d...

Page 3: ...weise zum sicheren Gebrauch W hrend des Betriebs k nnen die Glasoberfl chen sehr hei werden Fassen Sie das Ger t daher nur am Griff an und seien Sie extrem vorsichtig wenn Sie den Deckel ffnen Die Mes...

Page 4: ...3 Drehen Sie den Deckel im Uhrzeigersinn bis er einrastet Ger t anschlie en Schlie en Sie das Ger t an eine Steckdose an die der Spannung des Ger ts 220 240 V entspricht Informationen dazu finden Sie...

Page 5: ...ramm k nnen Sie zwischen 3 Temperaturen w hlen Die Programmdauer betr gt je weils 25 Minuten Sie k nnen die Zeit zwischen 1 90 Minuten anpassen indem Sie auf die oder Taste dr cken W hrend des Program...

Page 6: ...n Sie das Ger t aus und benutzen Sie die Kappe um weitere Zutaten in die Einf ll ffnung zu f llen Stecke Sie die Kappe danach wieder auf den Deckel Nachdem das Programm beendet ist dr cken Sie auf die...

Page 7: ...e beschrieben Wir empfehlen Ihnen das Ger t in der Originalverpackung zu verstauen wenn Sie es l nger nicht benutzen Bewahren Sie das Ger t an einem gut gel fteten trockenen Ort au erhalb der Reichwei...

Page 8: ...motor 420 480 W Capacity soup 1 4 L Capacity cool drinks 1 75 L Adjustable temperature range 60 100 C Weight 3 75 kg Packing Content 1x base device with motor 1x cap for the filler opening 1x lid with...

Page 9: ...on when opening the lid Mixer blades are sharp Before replacement of accessories or additional parts which move during operation the device must be switched off and cut off from the mains Don t touch...

Page 10: ...d clockwise up to the stop Instructions for Use Check if the mains voltage that you want to use matches the one of the appliance You will find the in formation about this on the rating plate You will...

Page 11: ...up the soup maker will automatically heat and blend the ingredients to preset programme this process will takes approximately 26 minutes TEMP function Cooking programs HIGH Heating up to 100 C and coo...

Page 12: ...sugar or spices to your mixed drink first switch off the device Remove the cap and fill in through the opening Reinsert the cap into the lid After use turn off the appliance with ON OFF button and dis...

Page 13: ...ou store the device in its original packaging when it is not to be used for a longer period Always store the device at a well ventilated and dry place outside the reach of children Troubleshooting Mal...

Page 14: ...ntazione 220 240 V 50 60 Hz Potenza elemento riscaldante 700 900 W Potenza motore 420 480 W Capacit zuppe 1 4 L Capacit bevande 1 75 L Temperatura impostabile 60 100 C Peso 3 75 Kg Incluso nella conse...

Page 15: ...zionamento le superfici in vetro potrebbero diventare molto calde Prendere il dispositivo solo dall impugnatura e fare molta attenzione quando si apre il coperchio Le lame sono molto taglienti Maneggi...

Page 16: ...orario fino a che si sia incastrato perfettamente Avviare il dispositivo Collegare il dispositivo a una presa di corrente dalla potenza conforme a quella richiesta 220 240 V Informazioni dettagliate a...

Page 17: ...Programma TEMP Con questa funzione possibile selezionare una delle tre temperature di cottura disponibili e ogni programma di cottura dura 25 minuti possibile allungare o abbreviare i tempi di cottur...

Page 18: ...positivo in funzione spegnerlo rimuovere il tappo del coperchio e aggiungere gli ingredienti dal bocchettone di riempimento Ricordarsi di reinserire il tappo del coperchio prima di riavviare il dispos...

Page 19: ...i consiglia di risistemarlo nella sua confezione originale Assicurarsi che il dispositivo sia custodito in un luogo asciutto ben areato e fuori dalla portata dei bambini Identi cazione e risoluzione d...

Page 20: ...220 240 V 50 60 Hz Puissance cuiseur 700 900 W Puissance moteur 420 480 W Capacit soupe 1 4 litre Capacit boissons 1 75 litre Plage de temp rature r glable 60 100 C Poids 3 75 kg Contenu de l emballa...

Page 21: ...rre peuvent devenir tr s chaudes Ne manipuler l appareil que par sa poign e et retirer le couvercle avec prudence Les lames sont tr s tranchantes Avant de retirer les accessoires teindre et d brancher...

Page 22: ...une montre jusqu ce qu il s enclenche Brancher l appareil Brancher l appareil une prise dont la tension correspond celle support e par l appareil 220 240 V Celle ci est indiqu e sur la plaque signal...

Page 23: ...minutes Programme TEMP Avec ce programme il est possible de choisir entre 3 temp ratures diff rentes La dur e du pro gramme est de 25 minutes peu importe la temp rature Il est possible d ajuster le te...

Page 24: ...Pour ajouter des condiments ou du sucre lorsque le mixeur est en fonctionnement teindre l appareil et les introduire par l ouverture en retirant le bouchon Replacer ensuite le bouchon sur le couvercl...

Page 25: ...le nettoyer comme d crit pr c demment Il est conseill de ranger l appareil dans son emballage original s il ne va pas tre utilis pendant une longue p riode Le conserver dans un endroit ayant une bonne...

Page 26: ...ia del motor 420 480 W Capacidad de sopa 1 4 litros Capacidad de l quidos 1 75 litros Rango regulable de temperatura 60 100 C Peso 3 75 kg Contenido del env o Base con motor x1 Vaso medidor tap n para...

Page 27: ...alcanzar temperaturas muy altas Por este motivo agarre el aparato solamente por sus asas y tenga cuidado al quitar la tapa Las cuchillas son muy afiladas antes de retirar los accesorios apague y desen...

Page 28: ...e las agujas del reloj hasta el tope Encender el aparato Enchufe el aparato en una toma de corriente que se adecue a la tensi n del mismo 220 240 V Encontrar m s informaci n relacionada en la placa de...

Page 29: ...tica La duraci n del programa es de 26 minutos Programa TEMP En este programa puede elegir entre tres temperaturas distintas La duraci n de cada programa es de 25 minutos Puede programar el tiempo en...

Page 30: ...car durante el proceso apague el aparato y utilice el tap n para introducir m s alimentos Vuelva a colocar el tap n en la tapa Cuando haya terminado el programa pulse el bot n ON OFF para apagar el ap...

Page 31: ...omendamos guardar el aparato en su embalaje original si no lo utiliza durante un periodo prolongado de tiempo Guarde el aparato en un lugar bien ventilado y seco fuera del alcance de los ni os Detecci...

Reviews: