background image

14

EN

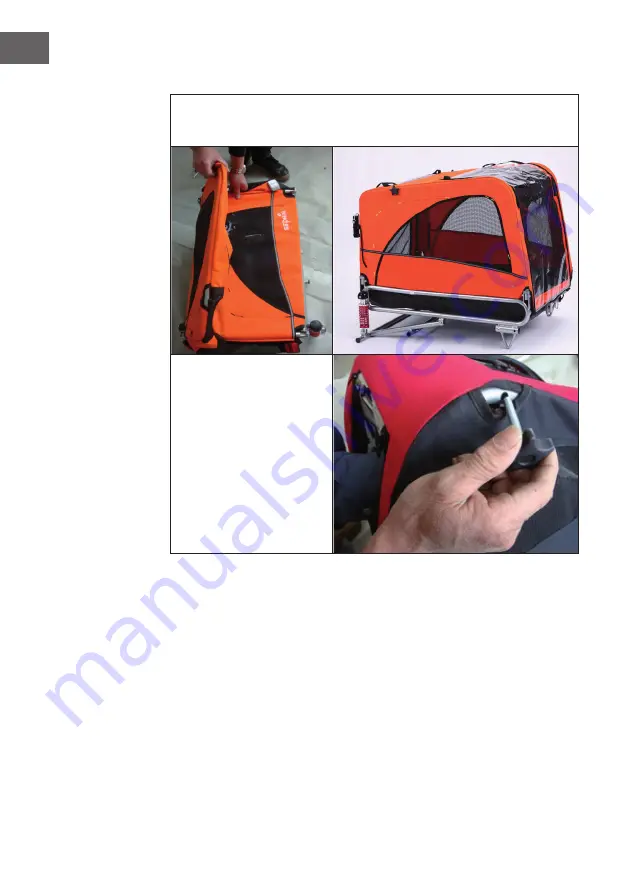
Opening the trailer

If the trailer frame is lying flat, lift the side walls so that they are vertical. 

Position the roll bar so that the holes in the side walls and the holes in the 
ends of the roll bar are aligned.

Insert the button from the 
outside on the side wall and 
then into the thread at the 
end of the roll bar. Repeat 
for the other side and 
tighten both buttons.

Summary of Contents for 10034172

Page 1: ...172 10034173 Husky Vario Hundeanhänger Hundebuggy Dog Trailer Dog Jogger Remolque y carrito para perros Remorque pour chien Jogger pour chien Rimorchio da bici per cani Remorque pour chien Jogger pour chien ...

Page 2: ......

Page 3: ...Haftung Scannen Sie den folgenden QR Code um Zugriff auf die aktuellste Bedienungsanleitung und weitere Informationen rund um das Produkt zu erhalten INHALTSVERZEICHNIS Sicherheitshinweise 4 Zusammenbau 4 Befestigung am Rad 8 Installation von Vorderrad und Handgriff 8 Transport von Haustieren 10 TECHNISCHE DATEN Artikelnummer 10034172 10034173 Gewicht 19 8 kg Zulässige Beladung 40 kg Empfohlene Hö...

Page 4: ... die Herstellergarantie erlischt Tragen Sie immer einen Helm Nutzen Sie den Anhänger nicht auf steinigem unebenem Gelände und in gefährlichen Verkehrssituationen Das ziehende Fahrrad muss in einwandfreiem Zustand sein Die Bremsen sollten perfekt funktionieren Mit Anhänger und Beladung verlängert sich Ihr Bremsweg Beladen Sie den Anhänger nur bis zur Oberkante damit herausfallende Dinge nicht den S...

Page 5: ...5 DE 3 4 Befestigen der Stütze Die Stütze wird hält den Hundekäfig wenn das Vorderrad oder die Anhängerkupplung entfernt wird Montieren Sie die Stütze wie auf den folgenden Bildern dargestellt 1 2 ...

Page 6: ...ehen Positionieren Sie den Überrollbügel so dass die Löcher in den Seitenwänden und die Löcher an den Enden des Überrollbügels ausgerichtet sind Setzen Sie den Knopf von außen an der Seitenwand und dann in das Gewinde am Ende des Überrollbügels ein Wiederholen Sie dies für die andere Seite und ziehen Sie beide Knöpfe fest ...

Page 7: ...en der Anhängerkupplung Zur Befestigung der Anhängerkupplung schieben Sie das runde Ende in die dafür vorgesehene Aufnahme Bild 1 auf der linken Seite Sichern Sie die eingesetzte Deichsel mit dem mitgelieferten Schnellspanner Pos a und dem Sicherungsstift Bild 2 Die Krümmung in der Anhängerkupplung ist nun in Bezug auf die Fahrtrichtung nach rechts gerichtet Hinweis Stellen Sie sicher dass der Sic...

Page 8: ... Sie das männliche Stück in die dafür vorgesehene Öse weibliches Teil siehe Abbildung Sichern Sie die Verbindung mit dem Sicherheitsgurt indem Sie diesen einmal um den Fahrradrahmen wickeln achten Sie darauf dass er nicht in die Speichen gerät und am Hänger Teil der Ziehstange befestigen INSTALLATION VON VORDERRAD UND HANDGRIFF Installation des Vorderrads Vergewissern Sie sich dass die Anhängerkup...

Page 9: ... Kabine aus mit Muttern Ziehen Sie sie die Schrauben und Muttern mit einem Schraubendreher und einem Schraubenschlüssel fest an Schieben Sie die Enden des Lenkers in die Befestigungsrohre richten Sie die Löcher aus setzen Sie die Sicherungsstifte ein und verriegeln Sie sie Anpassen des Handgriffs Drücken Sie die Tasten auf jeder Seite und drehen Sie den Lenker in eine bequeme Position Drücken Sie ...

Page 10: ...em Anhänger vertraut öffnen und schließen Sie die Türen und lassen Sie Ihren Haustier auf Kommando wieder aussteigen In Bewegung Gewöhnen Sie Ihr Haustier an die Bewegung des Anhängers indem Sie das Gespann langsam schieben Sitzt das Haustier ruhig fahren Sie ein kleines Stück Wird es unruhig halten Sie das Gespann an beruhigen Sie es und belohnen Sie es sobald es ruhig ist mit Leckerlies In volle...

Page 11: ...warranty and any liability Scan the QR code to get access to the latest user manual and other information about the product CONTENT Safety Instructions 12 Assembly 12 Attachment to Bicycle 16 Front Wheel and Handle Installation 16 Transport of Pets 18 TECHNICAL DATA Item number 10034172 10034173 Weight 19 8 kg Permissible load 40 kg Recommended maximum speed 16 km h Wheels dimensions 20 x 1 75 80x...

Page 12: ...azards and void the manufacturer s warranty Always wear a helmet Do not use the trailer on stony uneven terrain or in dangerous traffic situations The towing bicycle must be in perfect condition The brakes should work perfectly A trailer and load will increase your braking distance Only load the trailer up to the top edge so that falling objects do not endanger road traffic ASSEMBLY Mount the susp...

Page 13: ...13 EN 3 4 Fastening the support The support will hold the dog cage when the front wheel or trailer hitch is removed Mount the hanger bracket as shown in the following pictures 1 2 ...

Page 14: ...at they are vertical Position the roll bar so that the holes in the side walls and the holes in the ends of the roll bar are aligned Insert the button from the outside on the side wall and then into the thread at the end of the roll bar Repeat for the other side and tighten both buttons ...

Page 15: ...ism on the underside of the axle Attaching the trailer hitch To attach the trailer hitch slide the round end into the holder provided for this purpose Fig 1 on the left side Secure the inserted drawbar with the supplied quick release Pos a and the locking pin Fig 2 The curvature in the trailer coupling is now directed to the right in relation to the direction of travel Note Make sure that the lock...

Page 16: ...ate the male part into the eyelet provided for this purpose female part see illustration Secure the connection to the seat belt by wrapping it once around the bicycle frame make sure it does not get into the spokes and attaching it to the hanger part of the pull rod FRONT WHEEL AND HANDLE INSTALLATION Installing the front wheel Make sure that the trailer hitch is engaged under the frame Fasten the...

Page 17: ... the holes Secure the screws with nuts from the inside of the cabin Tighten the screws and nuts with a screwdriver and a wrench Slide the ends of the handlebars into the mounting tubes align the holes insert and lock the locking pins Adjusting the handle Press the buttons on each side and turn the handlebars to a comfortable position Push the handlebar up or down to make sure it is locked in place...

Page 18: ...ailer Slowly familiarise your pet with the trailer open and close the doors and let your pet get out on command Moving Familiarise your pet with the movement of the trailer by slowly pushing the team If the pet is sitting still drive a little If it gets restless stop the team calm it down and reward it with treats as soon as it is quiet At full speed Make sure that your pet is calm and accepts the...

Page 19: ...iones de seguridad Escanee el código QR para obtener acceso al manual de usuario más reciente y otra información sobre el producto ÍNDICE DE CONTENIDOS Indicaciones de seguridad 20 Montaje 20 Montaje en la bicicleta 24 Montar la rueda frontal y el agarre 24 Transportar mascotas 26 DATOS TÉCNICOS Número de artículo 10034172 10034173 Peso 19 8 kg Capacidad de carga 40 kg Velocidad máxima recomendada...

Page 20: ...l fabricante Lleve siempre un casco No utilice el remolque en un terreno pedregoso e inestable y en situaciones de circulación peligrosas La bicicleta que tirará el remolque debe estar en perfecto estado Los frenos deben funcionar perfectamente El tiempo de frenado es mayor con el remolque y su carga Cargue el remolque sólo hasta el borde superior para evitar que los objetos se caigan del remolque...

Page 21: ...S 3 4 Asegurar el soporte El soporte aguantará el remolque para perros cuando se desmonte la rueda frontal o el acoplamiento del remolque Monte el soporte tal como se ilustra en las siguientes imágenes 1 2 ...

Page 22: ...loque la jaula de seguridad de forma que los orificios de las paredes laterales y los orificios de los extremos de la jaula de seguridad estén alineados Inserte la perilla desde el exterior en la pared lateral y luego en la rosca al final de la jaula de seguridad Repita este paso en el otro lado y apriete las dos perillas ...

Page 23: ...oplamiento del remolque Para fijar el acoplamiento del remolque inserte el extremo redondo en el soporte diseñado para tal fin imagen 1 en la parte izquierda Asegure la barra insertada con el cierre rápido suministrado Pos a y el pasador de seguridad imagen 2 La curvatura en el acoplamiento del remolque está ahora dirigida hacia la derecha con respecto a la dirección de marcha Atención asegúrese d...

Page 24: ...previsto a tal efecto parte femenina véase la ilustración Asegure la conexión al cinturón de seguridad envolviéndolo una vez alrededor del cuadro de la bicicleta asegúrese de que no entre en los radios y fijándolo en la parte del remolque de la barra de tracción MONTAR LA RUEDA FRONTAL Y EL AGARRE Montar la rueda frontal Asegúrese de que el acoplamiento del remolque ha quedado encajado debajo del ...

Page 25: ...nillos con tuercas desde el interior de la cabina Apriete los tornillos y tuercas con un destornillador y una llave Deslice los extremos del manillar en los tubos de montaje alinee los orificios inserte y bloquee los pasadores de seguridad Ajustar la barra de agarre Presione los botones de cada lado y gire la barra de agarre a una posición cómoda Empuje la barra de agarre hacia arriba o hacia abaj...

Page 26: ...y cierre las puertas y deje que su mascota salga cuando se lo ordene El movimiento Familiarice a su mascota con el movimiento del remolque empujando lentamente el equipo Si la mascota está sentada quieta conduzca un poco Si se pone inquieta detenga el equipo cálmela y recompénsela con golosinas tan pronto como esté tranquila En el camino Asegúrese de que su mascota esté tranquila y acepte bien el ...

Page 27: ...uvaise utilisation de l appareil Scannez le QR Code pour accéder à la dernière version du mode d emploi et à d autres informations concernant le produit SOMMAIRE Consignes de sécurité 28 Assemblage 28 Fixation à la roue 32 Installation de la roue avant et de la poignée 32 Transport d animaux domestiques 34 FICHE TECHNIQUE Numéro d article 10034172 10034173 Poids 19 8 kg Charge autorisée 40 kg Vite...

Page 28: ...annulée Portez toujours un casque Ne pas utiliser la remorque sur un terrain pierreux accidenté ou dans des conditions de circulation dangereuses Le vélo de remorquage doit être en parfait état Les freins doivent fonctionner parfaitement Avec la remorque et la charge votre distance de freinage est rallongée Ne chargez pas la remorque plus haut que le rebord pour que les objets ne tombent pas sur l...

Page 29: ...29 FR 3 4 Fixation du support Le support tient la cage du chien lorsque vous retirez la roue avant ou la barre de remorquage Montez le support comme indiqué dans les images suivantes 1 2 ...

Page 30: ...e à la verticale Placez l arceau de manière à aligner les trous des panneaux latéraux et les trous situés aux extrémités de l arceau Insérez le bouton de l extérieur sur la paroi latérale puis dans le filetage à l extrémité de l arceau de sécurité Répétez l opération pour l autre côté et serrez les deux boutons ...

Page 31: ... Fixation de l attelage Pour installer l attelage faites glisser l extrémité arrondie dans le support prévu Fig 1 du côté gauche Bloquez le timon inséré à l aide du dispositif de verrouillage rapide fourni Élément a et de la goupille de verrouillage Figure 2 L attelage de remorque est maintenant courbé vers la droite par rapport au sens de la marche Remarque Vérifiez que la goupille de verrouillag...

Page 32: ...e dans l œillet prévu à cet effet partie femelle voir photo Sécurisez la fixation avec la sangle de sécurité en l enroulant autour du cadre du vélo assurez vous qu elle n entre pas dans les rayons et fixez la à la partie support de la barre de traction INSTALLATION DE LA ROUE AVANT ET DE LA POIGNÉE Installation de la roue avant Vérifiez que l attelage est enclenché sous le cadre Fixation de la rou...

Page 33: ... intérieur de la cabine avec des écrous Serrez les vis et écrous avec un tournevis et une clé Insérez les extrémités du guidon dans les tubes de montage alignez les trous insérez les goupilles de verrouillage et verrouillez les Réglage de la poignée Appuyez sur les touches de chaque côté et tournez le guidon dans une position confortable Poussez le guidon vers le haut ou le bas pour vous assurer q...

Page 34: ...tre animal avec la remorque ouvrez et fermez les portes et faites débarquer votre animal sur ordre En mouvement Habituez votre animal au mouvement de la remorque en la déplaçant lentement Si l animal reste assis tranquillement roulez un peu S il s agite arrêtez vous calmez le et récompensez le avec des friandises dès qu il se calme En route Assurez vous que votre animal est calme et accepte bien l...

Page 35: ...mproprio del dispositivo Scansionare il codice QR seguente per accedere al manuale d uso più attuale e per ricevere informazioni sul prodotto INDICE Avvertenze di sicurezza 36 Assemblaggio 36 Fissaggio alla bicicletta 40 Nstallare la ruota anteriore e l impugnatura 40 Trasporto di animali domestici 42 DATI TECNICI Numero articolo 10034172 10034173 Peso 19 8 kg Carico consentito 40 kg Velocità mass...

Page 36: ...dità della garanzia Indossare sempre un casco Non utilizzare il rimorchio su fondi pietrosi accidentati o in condizioni di traffico pericolose La bicicletta che traina deve essere in perfetto stato I freni devono funzionare perfettamente Lo spazio di frenata aumenta con il rimorchio e il carico Caricare il rimorchio solo fino al bordo in modo che non cadano oggetti causando rischi nel traffico str...

Page 37: ...37 IT 3 4 Fissare il supporto Il supporto tiene la gabbia del cane se la ruota anteriore o il collegamento del rimorchio vengono rimossi Montare il supporto come mostrato nelle immagini seguenti 1 2 ...

Page 38: ...cale Posizionare l asta per arrotolare in modo che i fori delle pareti laterali e i fori dell asta per arrotolare siano in corrispondenza Inserire la manopola dall esterno sulla parete esterna e poi nella filettatura all estremità dell asta per arrotolare Ripetere la procedura sull altro lato e stringere saldamente le manopole ...

Page 39: ... collegamento del rimorchio Per fissare il collegamento del rimorchio inserire l estremità tonda nell apposito attacco immagine 1 sul lato sinistro Bloccare la barra di traino inserita con il tensionatore rapido pos A incluso in consegna e il perno di bloccaggio La curvatura del collegamento deve essere rivolta ora verso destra in relazione alla direzione di marcia Avvertenza assicurarsi che il pe...

Page 40: ...componente maschio nell apposito ugello componente femmina v immagine Mettere in sicurezza il collegamento con la cinghia avvolgendolo una volta intorno al telaio della bici assicurarsi che non finisca nei raggi e fissarlo al componente del rimorchio della barra di traino I NSTALLARE LA RUOTA ANTERIORE E L IMPUGNATURA Installare la ruota anteriore Assicurarsi che il collegamento del rimorchio sia ...

Page 41: ...ori Fissare le viti dall interno della cabina con dadi Stringere viti e dadi con un cacciavite e una chiave inglese Inserire le estremità del manubrio nei tubi di fissaggio orientare i fori inserire i perni di bloccaggio e fissarli Regolare l impugnatura Premere i tasti su ogni lato e ruotare il manubrio in una posizione comoda Premere il manubrio verso l alto o verso il basso per assicurarsi che ...

Page 42: ...onfidenza al vostro animale con il rimorchio aprite e chiudete gli sportelli e date il comando all animale di scendere nuovamente dal rimorchio In movimento Abituate il vostro animale al movimento del rimorchio spingendolo lentamente Se l animale è tranquillo pedalate per un breve tratto Se l animale si agita fermate il rimorchio calmatelo e ricompensatelo con i croccantini che preferisce A piena ...

Page 43: ......

Page 44: ......

Reviews: