background image

22

Using the dishwasher

!

!

The Washing program „ECO“ is „medium“ for the flushing of 

the suitable soiled dishes and most efficient in terms of com-

bined energy and water consumption.

The fair values   of the washing program are a guideline only. Cir-

cumstances that are not dependent on the device, for example 

the temperature of the supplied water, the water pressure, etc., 

may affect the overall duration of the wash cycle.

* Default program, according to the test cycle.

1.  Draw out the lower and upper basket, load the dishes and push 

them back. It is commended to load the lower basket first, then 

the upper one (see the section entitled “Loading the Dish-

washer”).

2.  Pour in the detergent (see the section entitled „Salt, Detergent 

and Rinse Aid“).

3.  Insert the plug into the socket. The power supply is 220-240 VAC 

/50 HZ, the specification of the socket is 10A 250VAC. Make sure 

that the water supply is turned on to full pressure.

4.  Open the door, press the power button, and the light will turn on.
5.  Press the Menu button, then press the P-button, the wash 

program will be changed as follows direction: Auto→intensive 

→normal→ECO→90 Min→glass→rapid→soak→; 


Select a program. Then close the door, the dishwasher begins to 

start.

Make sure that notes from the first section have been complied 

with „before first use“.

4.1 Set up the washing program

Summary of Contents for GSI452ED

Page 1: ...Version 1 0 151203 EN User s manual for your dishwasher Modell GSI452ED...

Page 2: ...us situation You ll find it especially with all descriptions of the steps that might cause danger to persons arising Observe these safety instructions and behave accordingly careful Enter these warnin...

Page 3: ...ent plastic items from contacting with heating element Check that the detergent receptacle is empty after completion of the wash cycle Do not wash plastic items unless they are marked dishwasher safe...

Page 4: ...new dishwasher We recommend that you spend some time to read this Instruction Installation Manual in order to fully understand how to install correctly and operate it For installation please read the...

Page 5: ...ill the rinse aid dispenser 3 5 Adjusting the rinse aid dispenser 3 6 Use of 3in1 Detergent Tabs 3 7 Cutlery basket and fork shelf 4 Wash cycle table 4 1 Starting a washing program 4 2 Changing the pr...

Page 6: ...ng information which can be found on the nameplate Also please note the date of purchase of your device that is on your invoice The rating plate of your dishwasher is located on the right inside of th...

Page 7: ...rproof System Concealed radiator Height adjustable upper basket Tiltable plate holder Adjustable feet Water consumption 2240l Jahr Noise emission low Energy efficiency class A Cleaning performance cla...

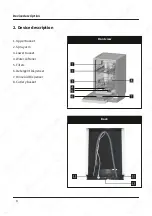
Page 8: ...Device description 2 Device description Front view Back 1 Upper basket 2 Spray arm 3 Lower basket 4 Water softener 5 Filters 6 Detergent Dispenser 7 Rinse Aid Dispenser 8 Cutlery basket 8...

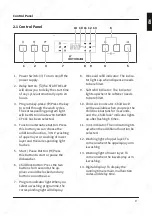
Page 9: ...me remain malfunction codes and delay time 1 Power Switch To turn on off the power supply 2 Delay button The START DELAY will allow you to delay the start time of any cycle automatically up to 24 hour...

Page 10: ...nt kind of salt in particular table salt the water softener is damaged Remove the lower basket and then unscrew and remove the cap from the salt container If you are filling the container for the firs...

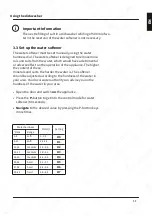
Page 11: ...imental or adverse effect on the operation of the appliance The higher the content of these minerals and salts the harder the water is The softener should be adjusted according to the hardness of the...

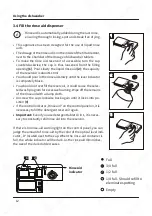
Page 12: ...se aid is on the inside of the tiltable door next to the Chamber of the dosage of dishwasher tablets To make the rinse aid reservoir of accessible turn the cap counterclockwise the cap is thus loosene...

Page 13: ...water spots on the dishes or the dish is not dry enough move the arrow counter clockwise and set it to the next higher number Set the rinse aid dosage to no water stains will last as long a upward If...

Page 14: ...ed dishwashing detergents For this reason when selecting the nor mal wash cycle using dishwasher deter gent the same result as Intensive can be achieved Detergent tablets The detergent tablets of diff...

Page 15: ...tergent packaging Tip When using combination products the rinse aid and salt lights are no longer useful It may be helpful to select the lowest possible setting for water hardness To select 3 in 1 fun...

Page 16: ...tacked securely and can not tip over 4 They do not prevent the spray arms from rotating while washing takes place Removing the Dishes To prevent water dripping from the upper basket into the lower bas...

Page 17: ...i on of the spray arms The shelf can be folded back or removed when not be required for use Loading the Lower Basket We recommend that you place large items which are most difficult to clean in to the...

Page 18: ...ed on the lower basket of your machine are designed in order to let you place big items easier as pots pans etc If requested each part can be folded separately or all of them can be folded and larger...

Page 19: ...fork 7 Gravy ladle Are not suitable Cutlery with wooden horn china or mother of pearl handles Plastic items that are not heat resistant Older cutlery with glued parts that is not tempera ture resistan...

Page 20: ...infor mation from detergent manufacturers Select a programme with a low temperature To prevent damage take glass and cutlery out of the dishwasher as soon as possible after the programme has ended At...

Page 21: ...htly soiled pans standard daily cycle Pre wash Mainwash 46 C Rinse Hot rinse Drying 5 22 g or 3in1 176 min 0 70 8 0 Light Light wash cycle to be used for more delicate items which are sensitive to hig...

Page 22: ...the lower basket first then the upper one see the section entitled Loading the Dish washer 2 Pour in the detergent see the section entitled Salt Detergent and Rinse Aid 3 Insert the plug into the sock...

Page 23: ...we recommend that you wait at least five teen minutes in order to avoid taking out dishes that still may be hot or fragile The dishes are also better dry if you leave it longer in the open dishwasher...

Page 24: ...could cause damage to them Small objects can be placed in the cutlery basket The following items are not suitable for washing The following items are suitable for washing only partially Cutlery with...

Page 25: ...diture on energy and water All filters must be cleaned regularly to ensure that the dishwasher is clean and gets its efficiency After use do not forget to switch off the dishwasher If the unit remains...

Page 26: ...access to the bottom of the dishwasher 1 Coarse filter 2 Flat filter 3 Micro filter Coarse filter Big debris such as bone and glass that could clog the drain will be trapped in the coarse filter To re...

Page 27: ...attached themsel ves to the filter 2 Pull the main filter out and rinse it off under running wa ter to remove all food residues that have been attached to the filter 3 Pull out the fine filter and ri...

Page 28: ...ts may be damaged For indoor and outdoor areas do not use abrasive cleaners as they may damage them Wipe the control panel please only with warm water and a damp clean wiping cloth When cleaning the o...

Page 29: ...leakage occurs E6 Water leakage Water leakage occurs E7 Heating element Abnormal heating E8 Water diversion system Water diversion system malfunction EN Troubleshooting 7 Error code system If your dev...

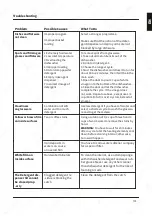
Page 30: ...he drain pump Noise Some audible sounds are normal Sound from detergent cup opening Utensils are not secure in the baskets or something small has dropped into the basket To ensure everything is secure...

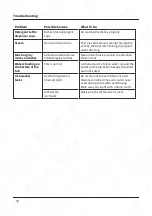
Page 31: ...inegar does not work Repeat as above except use 1 4 cup 60 ml of citric acid crystals instead of vinegar Cloudiness on glassware Combination of soft water and too much detergent Use less detergent if...

Page 32: ...d against dishes Use a mild abrasive cleaner to eliminate those marks Water standing on the bottom of the tub This is normal A small amount of clean water around the outlet on the tub bottom keeps the...

Page 33: ...33 EN...

Page 34: ...f you have technical questions about your device please contact KKT KOLBE Support Tel 09502 925880 Mail info kkt kolbe de www www kkt kolbe de Further information and documents can be found on our web...

Page 35: ...Water pressure flow pressure 0 4 10 bar 0 04 1 0 Mpa Rated voltage frequency ACC 220 240 V 50 Hz Technical Information EN 1 On a scale of A highest efficiency to D lowest efficiency 2 Annual energy c...

Page 36: ...Version 1 0 151203 Thank you for reading We wish you lots of clean dishes...

Reviews: