background image

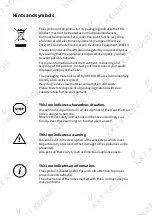
Hints and symbols

!

This icon indicates a hazardous situation.

You will find it in particular in all descriptions of the steps that can 

pose a danger to persons.

Observe these safety instructions and behave accordingly cau-

tiously. Pass these warnings on to other users as well.

This icon indicates a warning.

You will find it in the description of the work steps which must 

be particularly observed so that damage to the appliance can be 

prevented.  

Also pass on these safety instructions to all appliance users.

This icon indicates an information.

This symbol indicates useful tips and calls attention to proper 

procedure and behavior.  

The observance of the notes marked with this icon may save you 

many problems.

This symbol on the product or its packaging indicates that this 

product must not be treated as normal household waste,  

but must be disposed of at a collection point for the recycling 

of electrical and electronic equipment. (European Directive 

2012/19/EU on Waste Electrical and Electronic Equipment (WEEE)). 
The environment and health are endangered by incorrect disposal. 

By ensuring that the appliance is disposed of properly, you help 

to avoid possible hazards.
For more information about the treatment, recovering and 

recycling of this product, contact your local council, your waste 

disposal company or the seller.
The packaging materials used by KKT KOLBE are environmentally 

friendly and can be recycled.

Recycling reduces raw material consumption and waste. 

Please therefore dispose of all packaging material with due  

consideration for the environment.

Summary of Contents for GS6013ED

Page 1: ...Version 2 0 190708 Modell GS6013ED Benutzerhandbuch f r Ihren Geschirrsp ler DE User s manual English language EN...

Page 2: ...Recycling reduziert den Rohstoffverbrauch und Abf lle Bitte entsorgen Sie daher das gesamte Verpackungsmaterial mit angemessener R cksicht auf die Umwelt Hinweise und Symbole Dieses Symbol verdeutlich...

Page 3: ...gungen an Arbeitsplatte Bedienfeld oder im Bo denbereich da innenliegende Maschi nenteile frei zug nglich werden k nnten Schalten Sie das Ger t vor jeder Reini gung und Wartung s ab und trennen Sie es...

Page 4: ...oder Stahlablage rungen gekommen sind ffnen Sie die Ger tet r w hrend des Be triebs nur zu Beginn eines Sp lprogramms sehr vorsichtig Es k nnten sonst hei es Wasser und Sp lmittel austreten Lassen Sie...

Page 5: ...Geschirrk rbe 4 bersicht der Sp lprogramme 19 4 1 Einstellung des Sp lprogramms 4 2 nderung des Sp lprogramms 4 3 Am Ende des Sp lprogramms 4 4 Zus tzliches Einlegen von Geschirr 4 5 Einstellung des...

Page 6: ...ng beschrie bene Produkt liegen s mtliche entsprechenden EG Konformit tserkl rungen vor Die relevanten Unterlagen k nnen durch die zust ndigen Beh rden ber den Produktverk ufer angefordert werden 11 0...

Page 7: ...tem Turbo Hei luft Trocknungssystem zur Vermeidung von Wasserflecken durch Dampfabf hrung Verdeckter Heizk rper H henverstellbarer oberer Korb Kippbare Tellerhalter Verstellbare F e Wasserbedarf 10 Li...

Page 8: ...r ts 2 Beschreibung des Ger ts 1 Oberer Geschirrkorb 2 Unterer Geschirrkorb 3 Besteckschublade 4 Tassenablage 5 Spr harme 6 Salzbeh lter Wasserenth rter 7 Sp lmitteldosierer 8 Klarsp lerdosierer 9 Fil...

Page 9: ...be Ladung 4 Taste f r verz gerten Start 5 Start Stop Taste Zum Starten Pausieren und Fortsetzen des Waschpragramm 6 Kontrolllampe zur Nachf llung von Klarsp ler 7 Kontrolllampe zur Salz Nachf llung 8...

Page 10: ...llen Sie mit Hilfe des mitgelieferten Trichters das Regeneriersalz in den Vorratsbeh lter der Wasserent h rtungsanlage ein Dieser umfasst etwa 2 kg Salz Es ist normal dass beim Einf llen eine kleine M...

Page 11: ...0 3 7 H5 27 38 hart 3 8 5 4 H6 39 62 hart 5 5 8 9 H7 Anleitung Die Tasten und f r ca 5 Sekunden gleichzeitig gedr ckt halten Ein Piepston ert nt und auf dem Display die Anzeige H4 Standard Um den Wert...

Page 12: ...nung gelockert 1 Gie en Sie dann langsam den fl ssigen Klarsp ler 2 ein die Kapazit t des Vorratsbeh lters ist ca 110 ml Sie sollten den Klarsp ler langsam eingie en bis die Pe gelanzeige komplett sch...

Page 13: ...ung so lange aufw rts ein bis keine Wasserflecke mehr entstehen Sollten sich auf dem Geschirr Schlieren und Streifen bilden ist die Einstellung der Klarsp ldosierung zu hoch Dies verursacht zu viel Sc...

Page 14: ...ten Waschmittels abgestimmt Sie k nnen so die gleichen Ergebnisse erzielen die sonst nur mit dem Programm Intensiv erreicht werden k nnen Sp lmitteltabletten Sp lmitteltabletten verschiedener Marken l...

Page 15: ...es nicht umkippen kann 4 Das Geschirr darf den Wasserspr hkopf beim Rotieren nicht blockieren 5 Sehr kleines Geschirr sollte nicht in die Sp lmaschine gegeben werden da dieses eventuell von dem Korb...

Page 16: ...Der untere Korb verf gt ber klappbare Tellerhalter so dass auch gr ere oder meh rere T pfe und Pfannen Platz finden Anpassung des oberen Geschirrkorbs Die H henverstellung am oberen Korb Ihrer Maschi...

Page 17: ...es Geschirr wie T pfe Pfannen usw leichter einlegen zu k nnen Je nach Platzbedarf k nnen Sie die Halter einzeln oder alle um bzw aufklappen Besteckschublade Legen Sie das Besteck wie abgebildet in die...

Page 18: ...ern in der Geschirrsp lmaschi ne dies k nnte zu deren Besch digung f hren Kleine Gegenst nde k nnen im Besteck korb abgelegt werden Folgende Gegenst nde sind zum Sp len nicht geeignet Folgende Gegenst...

Page 19: ...0 Sanft Zum sanften Sp len von feinem und tem peraturempfindli chem Geschirr Unmittelbar nach Verschmut zung starten Vorsp len Hauptsp l gang 45 C Sp len Hei sp len Trocknen 5 20 oder 3 in 1 Tabs 152...

Page 20: ...es 2 Ziehen Sie den oberen und unteren Geschirrkorb heraus und r umen Sie die Geschirrteile ein siehe Hinweise f r die Beladung des Geschirr sp lers 3 Dr cken Sie den unteren und oberen Korb zur ck in...

Page 21: ...warten um das Herausnehmen von Geschirr zu vermeiden dass noch hei oder zerbrechlicher sein kann Das Geschirr wird auch besser trocken wenn Sie es l nger in der offenen Geschirrsp lmaschine lassen 4 f...

Page 22: ...te ggf mehrmals um eine der folgenden Zusatz funktionen auszuw hlen 3 in 1 Tab Falls Sie die 3 in 1 Tabs verwenden dr cken Sie die Taste einmal und die Sp lmaschine passt den Sp lablauf an diese Table...

Page 23: ...tsprechende Leuchte Sie k nnen das Bedienfeld sperren um unbeabsichtigte Eingriffe zu vermeiden Alle Tasten sind funktionslos Dr cken Sie gleichzeitig die Taste und die Taste f r den verz gerten Start...

Page 24: ...nd regelm ig zu reinigen damit die Geschirrsp lma schine sauber bleibt und ihre Effizienz erh lt Nach dem Gebrauch vergessen Sie nicht die Geschirrsp lmaschine auszuschalten Wenn das Ger t im Bereitsc...

Page 25: ...n des Geschirrsp lers befindet Grobfilter Flachfilter Feinfilter Grobfilter Dieser Filter f ngt gr ere Speisenreste ab z B Knochen oder Glassplitter welche das Abflussrohr verstopfen k nnten Flachfilt...

Page 26: ...Filter festgesetzt haben 2 Ziehen Sie den Flachfilter heraus und sp len Sie ihn auch unter flie endem Wasser ab um alle Speisenreste die sich an dem Filter angesetzt haben zu entfernen 3 Ziehen Sie de...

Page 27: ...digt werden k nnten F r Innen und Au enfl chen verwenden Sie bitte keine Scheu ermittel da sie diese besch digen k nnten Wischen Sie das Bedienungspanel bitte nur mit warmem Wasser und einem feuchten...

Page 28: ...e eventuell den Fehler selbst beseitigen wobei Sie die nach stehenden Anweisungen ber cksichtigen sollten Vor der Aufnahme der Wartungsarbeiten ist das Ger t zuerst von der Stromversorgung zu trennen...

Page 29: ...eweiligen Fehlercodes f hrte schlie en Sie das Ger t wieder an die Spannungsversorgung an Schalten Sie die Geschirrsp lmaschine mit der EIN AUS Taste ein und warten Sie 5 Sekunden bevor Sie das eigene...

Page 30: ...ist Die Ablasspumpe stoppt nicht berlauf Das System ist so entworfen dass jeder berlauf festgestellt wird Wird ein berlauf festgestellt l uft die Ablasspumpe weiter falls das Ger t mit Spannung versor...

Page 31: ...und die Sp lmittelgrade in Ordnung sind Vergewissern Sie sich ob das Geschirr richtig eingelegt ist Dampf Normale Erscheinung Beim Trocknen und Ablassen von Wasser kann es zur Leckage einer kleinen D...

Page 32: ...Dieses Programm ist f r das Sp len von normal verschmutzten Geschirr geeignet und hinsichtlich des Verh ltnisses von Energie zu Wasserverbrauch am effizientesten Hersteller KKT KOLBE Modellnummer GS6...

Page 33: ...kabel und deaktivieren Sie die Verriegelung Kartonverpackungen werden aus Recyclingpapier hergestellt und soll ten zur Wiederverwertung in der Altpapiersammlung entsorgt werden Indem Sie sicherstellen...

Page 34: ...s vereinbart ist unsere Kundendienstzentrale zu benachrichtigen Die Reparatur erfolgt ausschlie lich in unserer Kundendienstwerkstatt W hrend der ersten 6 Monate tr gt KKT KOLBE die Kosten f r R ckhol...

Page 35: ...Version 2 0 190708 EN Model GS6013ED User s manual for your dishwasher EN...

Page 36: ...on may save you many problems This symbol on the product or its packaging indicates that this product must not be treated as normal household waste but must be disposed of at a collection point for th...

Page 37: ...itch off the device and disconnect it from the power supply Do not pull the plug out of the socket by the cable The outer surface of the appliance may get hot when your dishwasher is in use Installati...

Page 38: ...appen that children or animals get into the device when the door is left open Therefore please check the inside of the appliance before starting a rinse cycle Please keep children and pets away from t...

Page 39: ...r baskets 4 Rinsing programs Overview 53 4 1 Setting up the rinsing program 4 2 Changing the rinsing program 4 3 At the end of the cycle 4 4 Additional loading of dishes 4 5 Setting up the delayed sta...

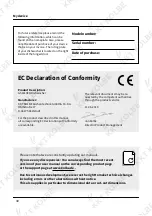
Page 40: ...s manual all corresponding EC Declarations of Conformity are available The relevant documents may be re quested by the competent authorities through the product vendor 11 06 2019 Jan Kolbe Director Pr...

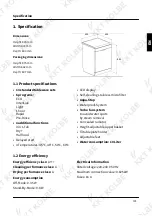
Page 41: ...ed voltage 220 240 V 50 Hz Maximum connection value 0 825kW Fuses 16 A 1 1 Product specifications 14 standard tableware sets 6 programs ECO Intensive Light 1 hour Rapid Pre Rinse 3 additional function...

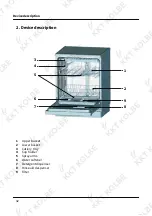
Page 42: ...2 Device description 1 Upper basket 2 Lower basket 3 Cutlery tray 4 Cup holder 5 Spray arms 6 Water softener 7 Detergent dispenser 8 Rinse aid despenser 9 Filter 2 Device description 3 4 2 1 9 8 5 6 7...

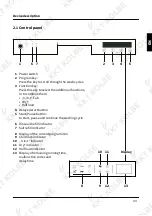
Page 43: ...Half load 4 Delayed start button 5 Start Pause button to start pause and continue the washing cycle 6 Rinse aid refill indicator 7 Salt refill indicator 8 Display of the current program icon 9 Child...

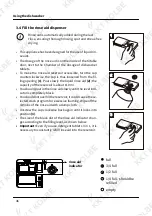
Page 44: ...d 500ml Place the end of the funnel supplied into the hole and introduce about 2kg of salt It is normal for a small amount of water to come out of the salt container Carefully screw the cap back on Us...

Page 45: ...cal water authority about these values Setting Hold down the button and press the button for about 5 seconds The buzzer rings one time and H4 appears on the screen standard value To change the value a...

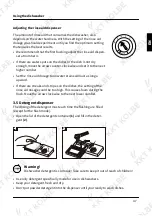
Page 46: ...owly the liquid rinse aid 2 the capacity of the reservoir is about 110 ml You should pour in the rinse aid slowly until the level indi cator is completely black You should not overfill the reservoir i...

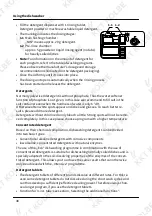
Page 47: ...the rinse aid dosage to no water stains will last as long a upward If there are streaks and stripes on the dishes the setting of the rinse aid dosage could be too high This causes foam during the flu...

Page 48: ...each better re sults please add more detergent Detergents without chlorine do only bleach a little Strong spots will not be remo ved completely In this case please choose a program with a higher tempe...

Page 49: ...e down 2 Curve items or those with recesses should be at a slant so that water can run off 3 They are stacked securely and can not tip over 4 They do not prevent the spray arms from rotating while was...

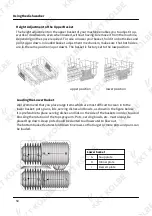
Page 50: ...bowls etc must always be placed top down Deep pots should be slanted to allow water to flow out The bottom basket features fold down tine rows so that larger or more pots and pans can be loaded Heigh...

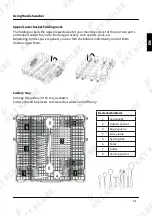
Page 51: ...spoons 3 Soup spoons 4 Gravy ladle 5 Serving fork 6 Forks 7 Knifes 8 Serving spoons Upper Lower basket Folding racks The folding racks in the upper lower basket of your machine consist of three or tw...

Page 52: ...sher it could cause damage to them Small objects can be placed in the cutlery basket The following items are not suitable for washing The following items are suitable for washing only partially Cutler...

Page 53: ...825 10 Light Light wash cycle to be used for more delicate items which are sensitive to high temperatures Run cycle imme diately after use Pre wash Main wash 45 C Rinse Hot rinse Drying 5 20 or 3 in...

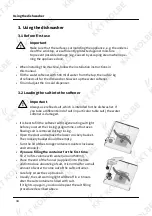
Page 54: ...ing the dishwasher 3 Press the lower and upper basket back in place 4 Fill in the dishwashing detergent 5 Turn the dishwasher on using the ON OFF button Wait before pushing the program selection butto...

Page 55: ...wait at least five minutes in order to avoid taking out dishes that still may be hot or fragile The dishes are also dry better if you leave it longer in the open dishwasher 4 Open the door and take th...

Page 56: ...in 1 tab function If you use the 3 in 1 tabs press the key once and the machine adjusts the purging sequence of these tablets Use of 3 in 1 Detergent Tablets Before using 3in1 tablets i e rinsing tabl...

Page 57: ...ing performance The temperature is increased and the drying function is intensified Half load Use this function if you want to start a washing cycle even though the machine is only half full of dishes...

Page 58: ...ure on energy and water All filters must be cleaned regularly to ensure that the dishwasher is clean and works efficiently After use do not forget to switch off the dishwasher If the unit remains in s...

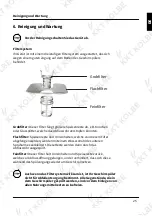
Page 59: ...o the bottom of the dishwasher Coarse filter Flat filter Micro filter Coarse filter Big debris such as bone and glass that could clog the drain will be trapped in the coarse filter To remove an item c...

Page 60: ...and remove all food residues that have attached themselves to the filter 2 Pull the main filter out and rinse it off under running water to remove all food residues that have been attached to the filt...

Page 61: ...aners as they may damage them Please wipe the control panel please only with warm water and a damp clean wiping cloth When cleaning the operation panel or operating parts never use abrasive cleaners o...

Page 62: ...llowing error codes you may be able to eliminate the error itself by considering the following instructions Before starting maintenance work the device must first be dis connected from the power suppl...

Page 63: ...correct the error that led to the display of the error codes connect the power back to the power supply Switch the dishwasher on with the ON OFF button and wait 5 se conds before you set your own pro...

Page 64: ...mp doesn t stop Overflow The system is designed with a security system so that any overflow is detected When an overflow is detected it conti nues to run the drain pump if the unit is powered Sound No...

Page 65: ...and detergent levels are fine Verify whether the dishes are loaded properly Steam Normal appearance The drying and draining of water can result in the leakage of a small amount of steam in the vicinit...

Page 66: ...soiled dishes and is the most efficient in terms of energy water consumption ratio Technical information 8 Technical information Manufacturer KKT KOLBE Model number GS6013ED Standard tableware sets 1...

Page 67: ...ly cable and make the door closing device unusable Cardboard packaging is manufactured from recycled paper and should be disposed in the waste paper collection for recycling By ensuring this product i...

Page 68: ...Vielen Dank f rs Lesen Wir w nschen Ihnen viel Freude mit Ihrem Geschirrsp ler Thanks for reading We wish you much pleasure with your dishwasher Version 2 0 190708...

Reviews: