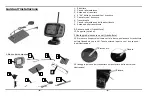
background image

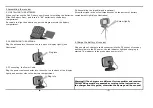
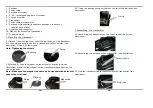
Plug the power cable connector into the socket on the back of the display 
tightly and another side to the battery compartment.

5.3 Connecting  the Power Cable

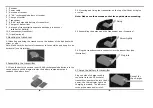
5.2 ASSEMBLING THE ANTENNA

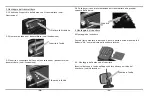
When you first use the Fish Finder you will need to installing the batteries. 
Slide the Battery Door,  and insert  4 "AA" batteries to the battery 
compartment.
Be certain to align the batteries as per the diagram within the battery 
compartment. 

Plug the antenna into the socket on the  back of display tightly(see 
illustration)

-7-

Screw the tripod in the screw thread socket on the bottom of battery 
compartment tightly(see illustration)

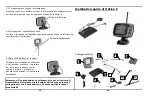
Plug one side of charger's cable connector into the DC socket of receiver, 
another side into the AC power, the red indicator light and charging is 
started. The indicator turns green when power is full.

Warning!!! The chargers are different for transmitter and receiver. 
Correct using must be requested according to the instruction on 
the charger and this guide, otherwise the damage will be caused!

5 Assembling the receiver

-6-

5.4 Assembling the tripod(tripod is optional)

6 Charge the battery of receiver

5.1 INSTALLING THE BATTERIES 

Screw tightly

Plug into

Plug into

Summary of Contents for FD39

Page 1: ...rasduttore 4 Assemblaggio del trasmettitore 4 Specification 2 Guida all installazione 3 Contents Assemblaggio del ricevitore 6 Charge the battery in the transmitter 5 Elenco dei componenti 3 1 Manuale...

Page 2: ...128Vx64H 4 AA Batterie ricaricabili 200KHz DC12V Unit di misura della profondit metri e piedi Temperatura di funzionamento Angolo del cono di rilevazione Caratteristiche Funzionamento del ricevitore F...

Page 3: ...ucer 2 1Mounting and fixing the transducer on the bottom of the bait boat with screw or glue 4 3 1 Open the battery door and insert 8 AAA rechargeable batteries into the case as shown on the diagram i...

Page 4: ...see illustration 7 Screw the tripod in the screw thread socket on the bottom of battery compartment tightly see illustration Plug one side of charger s cable connector into the DC socket of receiver...

Page 5: ...nar trasduttore 10 Supporto optional 1 Elenco dei componenti 2 2 fissaggio del cavo del trasduttore sul posteriore della barca vedi illustrazione Guida all installazione 8 2 1 Rimuovere il coperchio s...

Page 6: ...itore Prima di tutto montate le batterie Aprire la porta a slitta e inserire le 4 batterie AA come indicato nello schema interno 10 3 2 Montare l antenna sul trasmettitore vedi illustrazione 3 3 Inser...

Page 7: ...la ricarica iniziata L indicatore diventa verde quando la ricarica sar completata Attenzione Il caricabatterie va utilizzato solo per il ricevitore Il trasmettitore si alimenta con la batteria della b...

Page 8: ...boat by glue see illustration make the the magnet on the transducer magnetize with the one on the boat 2 1Method I Remove the cover under the bait boat put the transducer into the hole and keep the b...

Page 9: ...partment Be certain to align the batteries as per the diagram within the battery compartment Plug the antenna into the socket on the back of display tightly see illustration 4 4 Assembling the tripod...

Page 10: ...sordine sullo schermo 8 Lower Zoom Range 7 Profilo del fondo 8 Upper Zoom Range 9 Icona che indica la posizione e l altezza del pesce 5 Profondit dell acqua 6 Temperatura dell acqua 3 2 Sensibilit 3 I...

Page 11: ...ata Quando si preme ZOOM la scritta ZOOM appare temporaneamente sul display Selezionare ON per ingrandire l area attorno al fondo rivelando cos i pesci e le strutture in prossimit del fondo Con lo Zoo...

Page 12: ...it Impostazione memorizzata Premere POWER MENU fino a quando compare la scrtta TEMP UNIT Scegliere l unit di misura che pu essere in C o F 22 3 11 Allarme di batteria scarica Impostazione memorizzata...

Page 13: ...la durata della batteria 1 Assicurarsi che il trasduttore sia immerso in acqua prima di operare Osservazioni e Suggerimenti 5 Non usare mai due Fish Finder FD39 nella stessa area in quanto pu verifica...

Reviews: