background image


- 14 - 


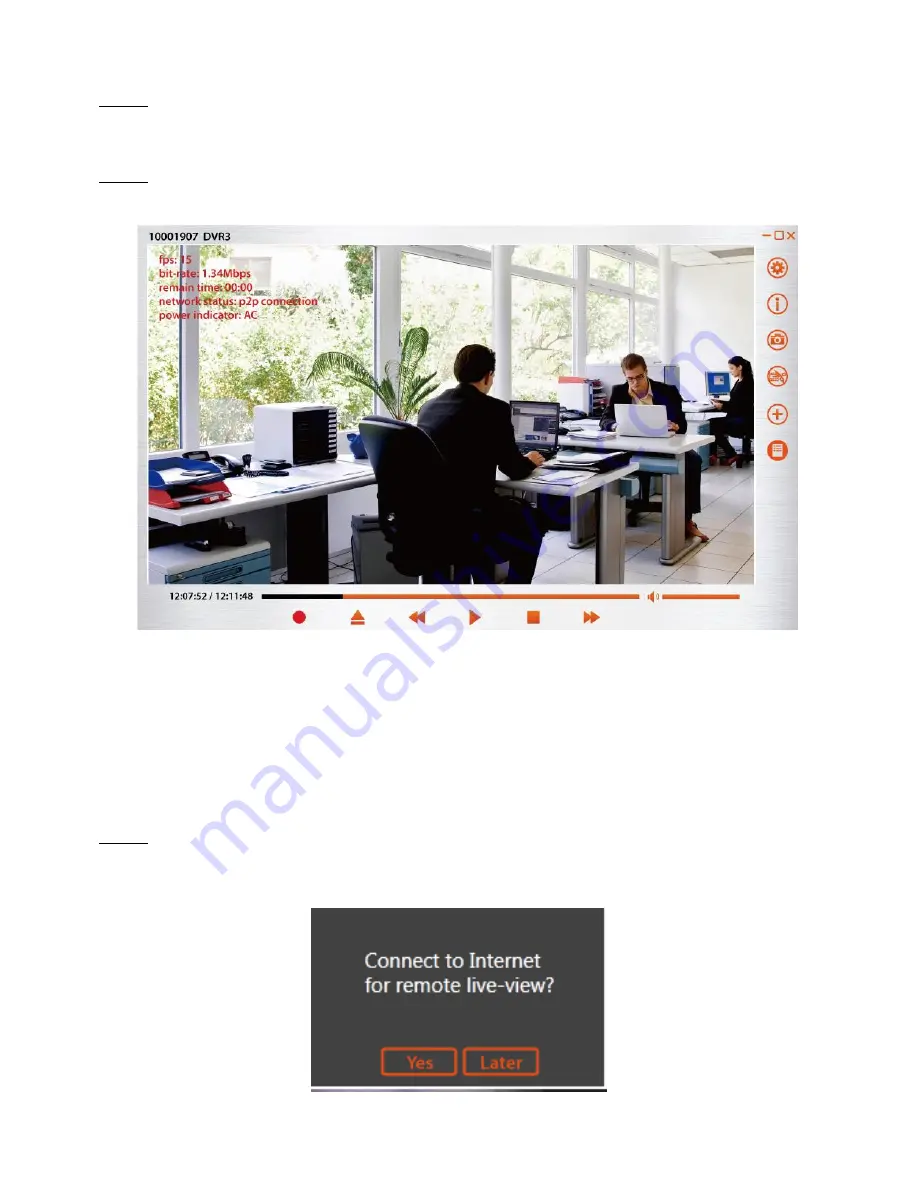
Step3.

 Software will link to CH0709c. 


Step4.

 Point to point connection is done and remote live view is seen.    You will see Network 

status is 

“p2p connection”. 


(2)Internet mode Connection (You can see remote live view of WiFi tissue box via router 

by Internet mode connection)   


Note: Point to Point connection need to be done first.     


Step1.

 When Point to Point connection is done, a pop up message will come up to ask if you 

would like to connect to internet for remote live-view.    If selecting 

“Later”, pop up message will 

come up in next Point to Point connection. 


Summary of Contents for F40709001

Page 1: ...720P Wifi Tissue Box HD Wifi Camcorder User Manual Ver 2 2 0 F40709001...

Page 2: ...Status 5 How to Charge The Battery 5 Compatible Storage 7 Software hardware specifications on PC mobile devices 8 WiFi tissue box setup instruction 9 I Device setting 9 II EZ SEE software instruction...

Page 3: ...e careful to protect it from rain sea water or high humidity environment etc Protect from high temperatures To avoid damage or mis operation of the device only use in temperature of 0 40 C Do not brin...

Page 4: ...3 Quick Start Guide...

Page 5: ...4 Diagram Appearance Perspective...

Page 6: ...P to P mode 2 The Power Indicator Red LED will Blinking once a second if the CH0709c is working as Internet mode 3 When device power off the Red LED will off How to Charge The Battery Connect the prov...

Page 7: ...6 Package Contains CH0709 Main Unit x 1 3 7V 4800mA Li polymer Battery x 1 Power Adapter Cradle x 1...

Page 8: ...ro SD card or SD card by the 720P DVR series first before recording IMPORTANT 1 Please format the memory card by tissue box first before recording 2 Please put memory card inside the storage lot first...

Page 9: ...soft Windows XP Windows 7 Windows 8 NET Framework 3 5 higher CPU 2 0GHz or higher only support x86 and x64 Memory 1GB up Display card Independent display card and support DirectX 9 0 or higher To use...

Page 10: ...9 WiFi tissue box setup instruction I Device setting Step1 Turn on the device and wait 1 minute for WiFi module working Step2 Please check the ID number on the sticker outside the box eg 20000001...

Page 11: ...t you will see the ID in your WiFi list Please connect with the device directly Link the device with your PC or laptop Default WiFi password of CH0709c is 888888888 1 Setup by PC or laptop 2 Setup by...

Page 12: ...iew Camera Status Display Live view image Minimize Full screen Exit Recording Fast Rewind Stop Volume Open File Play Fast Forward Caution Home wireless security surveillance has risk According to diff...

Page 13: ...irectly Step1 Adding camera into list a Via Camera ID list When running the EZ SEE PC software there will a Camera ID List popup on the screen Click the Camera ID you would like to install on the list...

Page 14: ...ht side of EZ SEE software Below popup message will come up Input ID Camera Name User Name Password and save the information Step2 Press button again Select the ID you would like to connect in the Cam...

Page 15: ...nnection You can see remote live view of WiFi tissue box via router by Internet mode connection Note Point to Point connection need to be done first Step1 When Point to Point connection is done a pop...

Page 16: ...below Step3 Select the Router you would like to connect with CH0709c and password pop up message to come up Step4 After password confirmation EZ SEE software will start internet mode setting for CH07...

Page 17: ...for WiFi setting Please wait 1 2 minutes Step6 Press button Select the ID you would like to connect in the Camera list and click Live for live viewing Step7 You will see Network status is Internet co...

Page 18: ...ftware on PC or laptop Camera Status Display Live view image Minimize Full screen Exit Recording Fast Rewind Stop Volume Open File Play Fast Forward 1 Setting EZ SEE settings Setting Info Snapshot Vid...

Page 19: ...d place Backward You can set up the time period to be jumped when you press button Default setting is 5 seconds Alarm Switch to enable the intruder alert which will send a warning message when movemen...

Page 20: ...Configuration to adjust the camera parameters wirelessly Camera parameters Adjustable value Framerate 1 2 3 4 5 10 15 Resolution HD D1 PIR post recording 2 min 4 min 6 min 8 min Storage mode Overwrit...

Page 21: ...at Storage micro SD card will be formatted if Format button is pressed Below dialog will show to reconfirm that you want to load default Press Format to reconfirm Date and Time Press Setup button and...

Page 22: ...can set up recording schedule for CH0709c 2 Info Camera Information it will provide information about antenna signal strength connection mode of CH0709 and the connecting process log records If CH0709...

Page 23: ...ch you set in general setting 4 Video Cut During playback you can edit the video length by press button Select the start time you would like to set and press The video will keep being playback and wil...

Page 24: ...live view connection ID number can be checked here Camera Name User Name and Password can be changed here all changes will be saved and then dialog will close all changes will not be saved and then d...

Page 25: ...you click below information will show on your live view screen Fps and bit rate the streaming process status Both data are high means the internet condition now is performing well Remain time how much...

Page 26: ...APP Interface Overview Caution Home wireless security surveillance has risk According to different location it will cause the internet environment occasionally unstable and further to fail connected...

Page 27: ...onnect with PC or laptop with wireless network card directly Step1 Adding camera into list Start EZ SEE App and press ADD button in left top corner Android iOS a By scanning QR code Press SCAN button...

Page 28: ...ill link to CH0709 directly b By manually input Input ID User Name Password and Press Save button in the right top corner You can find ID number on the sticker outside the box eg 20000001 Default sett...

Page 29: ...28 Android iOS After setting you will see ID in camera list Press the ID you would like to connect Android iOS APP will connect to CH0709c...

Page 30: ...sue box via router by Internet mode connection Note Point to Point connection need to be done first Step1 1st time setting When Point to Point connection is done a pop up message will come up to ask i...

Page 31: ...nnect and enter the password For Android version below popup message will come up EZ SEE APP will start internet mode setting for CH0709c with the router you chose For iOS version camera list will sho...

Page 32: ...setting Press Menu in the left top corner and select WiFi Setup Android iOS Select the router you would like to connect and enter the password Press the Setup button in right top corner to finish sett...

Page 33: ...art setting connection with router and CH0709 When finish setting dialog Done will come up and please press OK Android iOS Step3 Internet mode connection is done and remote live view is seen You will...

Page 34: ...on EZ SEE software on PC or laptop Android iOS When EZ SEE App runs you will see 2 buttons in the top Left Side Add camera adding as per previous instruction Right Side Menu You will see below functio...

Page 35: ...eg 20000011 Press Done to complete the setting Android iOS 2 Configure EZ SEE Dial Call Set up phone number as urgent contact call Snapshot pictures The number of pictures are taken when you press the...

Page 36: ...work connection need to be done first If connection is failed you will not see this page Select the camera you would like to set up Android iOS You can do Remote Configuration to adjust the camera par...

Page 37: ...erwrite Fullstop LED indicator ON OFF Recording Audio ON OFF OFF will mute the video recording Buzzer ON OFF OFF will mute the setting sound Date and Time Press Setup button and you can set up date an...

Page 38: ...low dialog will show to reconfirm that you want to load default Press OK to reconfirm Android iOS Reset to Factory Default Factory default will be loaded if Confirm button is pressed Below dialog will...

Page 39: ...38 User Name Password and Camera Please press Confirm after setting Android iOS You will see the Firmware Version of main board and WiFi board in the bottom of this page...

Page 40: ...mera will be triggered and instantly sends an alert message if you enable this function Select the camera you would like to set up Android iOS Enable Alert and press Confirm or Cancel to return to cam...

Page 41: ...ds intruder alert in camera list the green light indicates a warning about a current triggered event and flashes every 0 5 sec Once click in to see live view green light will vanish Android iOS 7 Abou...

Page 42: ...en FPS and Bit Rate the streaming process status Both data are high means the internet condition now is performing well Remain time time left for recording on your SD card Power indicator AC or batter...

Page 43: ...42 Reverse live view will be displayed in 180 degree format...

Page 44: ...n live viewing gently put your index finger and thumb on the screen slide outward direction at the same time to enlarge a specific area There is a small bar on the left while zooming magnitude 4 0 is...

Page 45: ...5 10 15 fps Video format AVI Recording Storage SD card up to 64G Antenna Gain 13dBm 6Mbps 10dBm 54Mbps Receiving Sensitivity 90dBm 6Mbps 72dBm 54Mbps Audio Recording Yes Audio Input Condenser Micropho...

Reviews: