background image

22

23

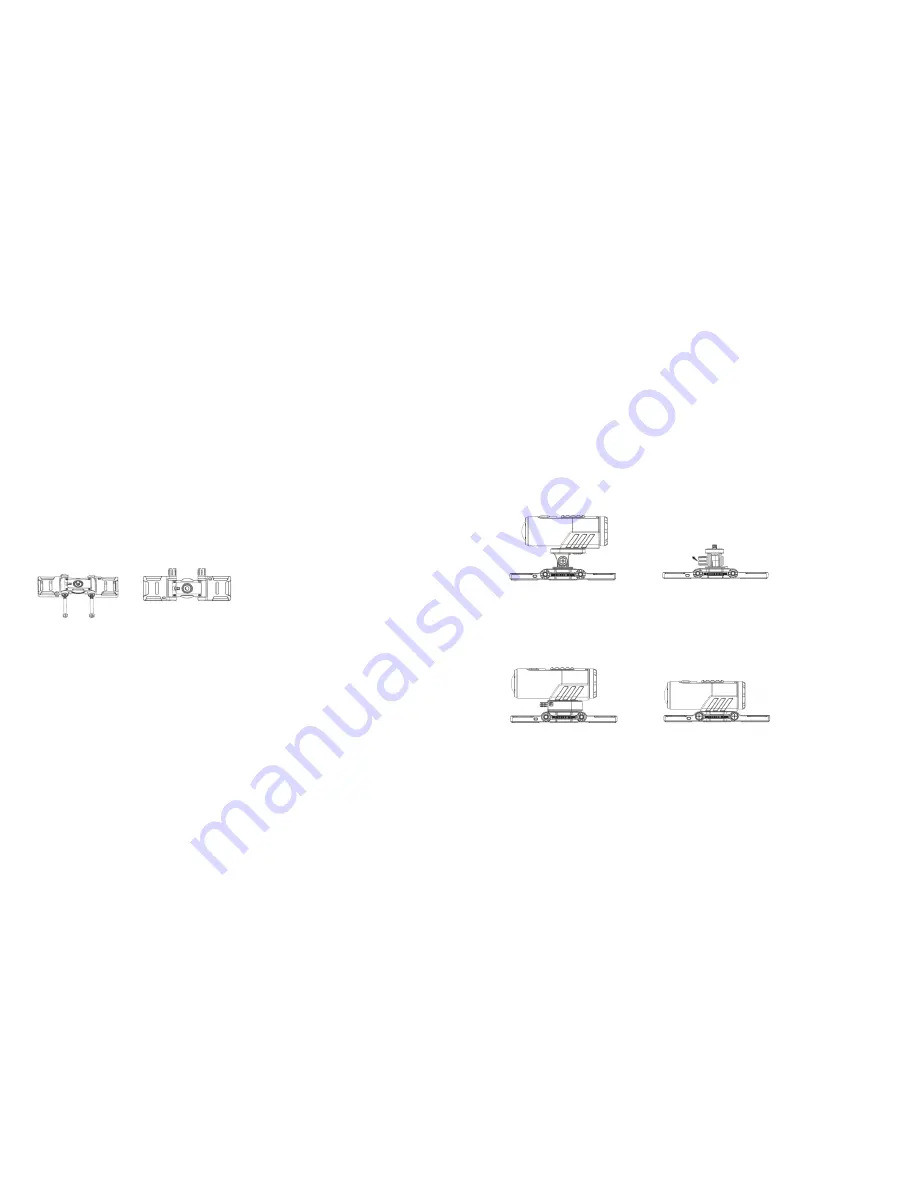
•   Attaching the camera to the Body Piece via the Tilting Head Adaptor (for details on how to attach the Tilting Head 

Adaptor to your camera, please refer to ‘Attaching the Tilting Head Adaptor to your camera’, page 21). 
Note:  The camera position can be adjusted horizontally, plus the camera angle can be rotated upwards or downwards 

by loosening or tightening the nut on the Tilting Head Adaptor.

•    Attaching the camera to the Body Piece via the Quick Release Adaptor and Quick Release Adaptor socket (for details 

on how to attach the Quick Release Adaptor with socket to your camera, please refer to ‘Attaching the Quick Release 
Adaptor with socket to your camera’, page 21). 
Note:  The camera position can be adjusted horizontally when using this method.

•   Attaching the camera directly to the Body Piece. 

Note:  The horizontal and vertical position of the camera will be fixed when using this method. 

[continued...] 

Mounting your camera

Mounting onto your board

Assembling the Flat Mount

•   Attach the Flat Wings to the left and right side of the Body Piece accordingly 

Note:  Please make sure you install the Flat Wings with the 3M adhesive facing downward and fit the gears of the  

Flat Wings and the Body Piece correctly on both sides.

•   Insert the bolts through the holes and tighten the nut 

Note: The angle of the Flat Wings can be adjusted: simply loosen the nut, adjust the Flat Wings and re-tighten the nut. 

Mounting onto your board 

1.  Peel off the 3M adhesive’s protective film on the left and right Flat Wings and attach the Flat Mount onto the board.
2.   There are three ways to mount the camera onto the Body Piece: 

Either use the Tilting Head Adaptor or Quick Release Adaptor socket to mount your camera onto the Body Piece or 
attach your camera directly onto the Body Piece. Please note that the Tilting Head Adaptor provides a wider angle  
to allow for greater adjustment

Rotate the nut

Summary of Contents for rush hd100W

Page 1: ...1 1 kitvision co uk JB 2776 Kitvision 2013 Christchurch Dorset BH23 4FL A c t i o n Ca m e r a HD100W User manual ...

Page 2: ... record your memories We re committed to developing the very latest technologies so you can capture re live and share your experiences in the best way possible By remembering the past and embracing the future our vision is for every single precious moment to be treasured forever ...

Page 3: ... Contents Main features 6 Box contents 7 Functions 8 Using the camera 10 Using Wi Fi 15 Connecting your camera 18 Before mounting your camera 20 Mounting your camera 22 Troubleshooting 36 Specifications 37 ...

Page 4: ...ey 12 Grip Tie x 2 13 Quick Release Adaptor with Socket 14 Secure String 15 Neoprene Case 16 Carabiner 17 User Manual Main features Records 1080p Full HD video using one easy slide switch Takes 5 MP digital photographs Supports up to 32 GB Micro SD cards and takes FHD videos up to 4 hours Built in 1200mAh Li Polymer battery for up to 2 5 hours of continuous use Waterproof up to 10 metres without u...

Page 5: ...t Connects the camera to a TV via the HDMI cable 7 USB port Connect to a computer for data transfer or camera setup Charges your camera 8 Video resolution switch Selects video resolution FHD Full HD or HD 9 Reset button Resets the camera 10 Wi Fi LED indicator Shows the Wi Fi status 11 Wi Fi power button located on the camera body Turns the Wi Fi on or off 12 Back cover Rotates to seal the camera ...

Page 6: ... the card slot as it may damage both the camera and the micro SD card Note A new micro SD card should be formatted before use For more information please see Connecting your camera page 18 Setting date and time You can set the camera s clock with the software to ensure that your video and photo files are saved with the correct date time information To set up the camera clock 1 Connect your camera ...

Page 7: ...ecord function Whether the camera power is ON or OFF simply slide the Recording Slide Switch from STOP to REC to start recording When your camera is OFF and the Recording Slide Switch is in the REC position press and hold the Power button to turn the camera ON and it will start recording When starting a video recording a short vibration will indicate that recording has started The LED indicator wi...

Page 8: ...r the General Settings option in the software Using Wi Fi Turn on Wi Fi 1 Press and hold the Power button to turn on your camera 2 Press the Wi Fi Power Button either on the camera body or on the back cover to turn on Wi Fi After a short vibration the blue LED lights up to indicate that Wi Fi is preparing It will take around 15 20 seconds for the Wi Fi to become ready and connectable The LED will ...

Page 9: ...amera to your smart device App 1 Search for the Action app in your device s relevant App store 2 Download and install the app to your smart device 3 Turn on Wi Fi 4 Go to your mobile device s network settings and choose Wi Fi Search the network and find and click ACTIONPLUS 5 Enter the password 123456789 to connect to your camera 6 Open your app and follow App specific instructions Brief introduct...

Page 10: ...to a PC via the USB cable included 3 Press the Power button to turn the camera on 4 Open the micro SD card folder inside file manager and you will find the file actionplus exe Click on the file to open it PC only If you cannot find actionplus exe in your micro SD folder unplug the cable from the PC turn the camera on and off once and reconnect to the PC Using the software you can Change the photo ...

Page 11: ...trap Wings or Grip Wings Once the camera has been secured to the Flat Mount Strap Mount or Grip Mount clip both ends together Attaching the Tilting Head Adaptor to your camera 1 Fit the screw of the Tilting Head Adaptor to the tripod socket of the camera 2 Screw the Tilting Head Adaptor until it is tight Attaching the Quick Release Adaptor with socket to your camera 3 Fit the screw of the Quick Re...

Page 12: ...on of the camera will be fixed when using this method continued Mounting your camera Mounting onto your board Assembling the Flat Mount Attach the Flat Wings to the left and right side of the Body Piece accordingly Note Please make sure you install the Flat Wings with the 3M adhesive facing downward and fit the gears of the Flat Wings and the Body Piece correctly on both sides Insert the bolts thr...

Page 13: ...ten the mount Mounting onto your bike helmet backpack Assembling the Strap Mount 1 Attach the Strap Wings to the left and right side of the Body Piece accordingly Note Please make sure you install the Strap Wings with the flat eva pad facing downwards and fit the gears of the Strap Wings and the Body Piece correctly on both sides 2 Insert the bolt into the slide rail from the hole and tighten the ...

Page 14: ...tach the Quick Release Adaptor with socket to your camera please refer to Attaching the Quick Release Adaptor with socket to your camera page 21 Note The camera position can be adjusted horizontally when using this method Attaching the camera directly onto the Body Piece Note The horizontal and vertical position of the camera will be fixed when using this method 7 Rotate the wheel on the Body Piec...

Page 15: ...he mount Please refer to Securing the strap page 20 Mounting onto your handlebars Assembling the Grip Mount 1 Attach the Grip Wings to the left and right side of the Body Piece accordingly Note Please make sure you install the Grip Wings with the curved rubber pad facing downwards and fit the gears of the Grip Wings and the Body Piece correctly on both sides 2 Insert the bolts through the holes an...

Page 16: ...iece Either use the Tilting Head Adaptor or Quick Release Adaptor socket to mount your camera onto the Body Piece or attach your camera directly onto the Body Piece Please note that the Tilting Head Adaptor provides a wider angle to allow for greater adjustment a Attaching the camera to the Body Piece via the Tilting Head Adaptor for details on how to attach the Tilting Head Adaptor to your camera...

Page 17: ...the Body Piece 3 Peel off the protective film which covers the 3M adhesive under the Curved Mount and attach the Curved Mount onto the Helmet Mounting with a 90º Adaptor You can also mount the camera onto the side of a motorcycle helmet with the 90º Adaptor 1 Fit the screw of the 90º Adaptor to the tripod socket of the camera 2 Screw the nut of the 90º Adaptor until it is tight Attaching the Tilti...

Page 18: ... via the Quick Release Adaptor and Quick Release Adaptor socket for details please refer to the section Attaching the Quick Release Adaptor with socket to the camera with the 90º Adaptor page 33 Note The camera position can be adjusted horizontally when using this method c Attaching the camera with the 90º Adaptor directly to the Body Piece Note The horizontal and vertical position of the camera w...

Page 19: ...ge 0 5 m Video 1080p 1920 x 1080 pixels 16 9 30 FPS 960p 1280 x 960 pixels 4 3 30 FPS 720p 1280 x 720 pixels 16 9 60 FPS 720p 1280 x 720 pixels 16 9 30 FPS Format H 264 compression saved as MPEG4 mov file Dual video files for easy sharing Photo Resolution 5 megapixel in JPEG format Capture modes Single Photo Burst Shot Time Lapse Audio Built in high quality microphone ADPCM Compression Automatic G...

Page 20: ...ce to radio or television reception which can be determined by turning the equipment off and on the user is encouraged to try to correct the interference by one or more of the following measures Reorient or relocate the receiving antenna Increase the separation between the equipment and receiver Connect the equipment into an outlet on a circuit different from that to which the receiver is connecte...

Reviews: