background image

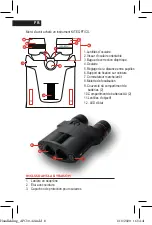
1.Lentilles d’oculaire

2.Viseur d’oculaire orientable

3.Bague de correction dioptrique

4.Oculaire

5.Réglage de la distance entre pupilles

6.Support de fixation sur ceinture

7.Commutateur marche/arrêt

8.Molette de focalisation

9.Couvercle du compartiment de  

    batteries (2)

10.Compartiment de batteries AA (2)

11.Lentilles d’objectif

12. LED d’état

INSERTION DES BATTERIES // BATTERIES NON INCLUSES

Retirez les couvercles des compartiments de batteries (9) sur les côtés 

gauche et droit en les tournant dans le sens inverse des aiguilles d’une 

montre. 

APC 30: Insérez 1 pile AA de chaque côté. - le côté entre en premier. fermez 

les couvercles des piles en les tournant dans le sens des aiguilles d’une 

montre.

APC 42: Insérez 2 piles AA dans le compartiment à piles fonctionnel, marqué 

du symbole.

Vous pouvez insérer 2 piles AA de rechange dans le compartiment marqué 

du symbole

LE SYSTÈME DE STABILISATION

Les jumelles KITE APC ont la capacité d’atténuer les vibrations. Les prismes 

des jumelles stabilisées APC sont montés sur une suspension à cardan sur 

deux axes, laquelle est entraînée par un moteur électrique commandé par 

capteur gyroscopique. Les jumelles stabilisées KITE APC sont équipées de la 

dernière technologie, permettant des corrections de 2° à 3°.

PREMIÈRE UTILISATION


-

A.  Fixez la lanière aux points de fixation (6) prévus à cet effet.


-

B.  Si vous portez des lunettes lors de l’utilisation, ne sortez pas les  


viseurs d’oculaire. Si vous ne portez pas de lunettes lors de l’utilisation,  


sortez les viseurs d’oculaire (2) en les tournant dans le sens inverse  


des aiguilles d’une montre.


-

C.  Regardez un point fixe éloigné avec les jumelles et réglez la distance  


entre pupilles (5) des oculaires (4) en les ouvrant et les fermant jusqu’à  


obtenir une belle image circulaire.


-

D.  Ajustez le réglage de dioptrie pour que les jumelles corrigent une  


éventuelle divergence entre vos deux yeux.

Handleiding_APC30-42.indd   9

Handleiding_APC30-42.indd   9

1/10/2020   16:34:41

1/10/2020   16:34:41

Summary of Contents for BINO APC STABILIZED 42

Page 1: ...APC STABILIZED BINOCULARS MANUAL AND WARRANTY Handleiding_APC30 42 indd 1 Handleiding_APC30 42 indd 1 1 10 2020 16 34 40 1 10 2020 16 34 40 ...

Page 2: ...e afstand 6 Riembevestiging 7 Aan Uit schakelaar 8 Scherpstelwiel 9 Batterijdeksel 2 10 AA batterij compartiment 2 11 Objectieflenzen 12 Status LED INBEGREPEN 1 Neopreen nekriem 2 Etui met riem 3 Beschermkap voor oculairen 11 11 9 9 1 6 1 4 2 7 2 3 8 10 10 5 12 Handleiding_APC30 42 indd 2 Handleiding_APC30 42 indd 2 1 10 2020 16 34 40 1 10 2020 16 34 40 ...

Page 3: ... ophanging langs 2 assen die wordt aangedreven door een gyro sensor gestuurde electromotor De KITE APC gestabiliseerde verrekijkers zijn uitgerust me de laatste technologie die correcties toelaat van 2 tot 3 EERSTE GEBRUIK A Hecht de nekriem aan de daartoe voorziene riembevestigingspunten 6 B Bij het dragen van een bril tijdens gebruik draait u de oogschelpen 2 niet uit Draagt u geen bril tijdens ...

Page 4: ...positie te brengen Het status LED 12 zal groen oplichten OPGELET Indien u de aan uit schakelaar 7 in de ON positie brengt terwijl geen batterijen zijn geplaatst of deze leeg zijn zal uw beeld onstabiel zijn Dit is normaal AUTO UIT TIMER Ongeacht zijn positie rust of actief zal het instrument 90 minuten na de initiele inschakeling van de aan uit knop naar ON compleet uitschakelen Het status LED gaa...

Page 5: ...mfort RUST POSITIE hangend aan de nek of staand op een tafel het instrument is met 60 of meer verticaal getilt De stabilisatie electronica wordt automatisch in slaap modus gebracht de status LED 12 pinkt rood ACTIEVE POSITIE tijdens observatie Het instrument is met 40 of meer horizontaal getilt De electronica activeert en het status LED is groen ZORG EN ONDERHOUD OPGELET De APC 30 is NIET waterdic...

Page 6: ...OP ELEKTRONICA De garantietermijn start op de aankoopdatum en is onderhevig aan volgende voorwaarden In geval van materiaal en of fabricagefout die niet door de gebruiker veroorzaakt werd staat KITE in voor alle herstelkosten Hierbij behouden wij het recht het instrument naar eigen goeddunken te repareren of te vervangen De garantie is niet geldig wanneer het defect werd veroorzaakt door verkeerd ...

Page 7: ...achter in volle zon Dit toestel is niet waterdicht stel het toestel nooit bloot aan water of vocht Water of vocht in het toestel kan leiden tot brand elektrocutie of beschadiging van het toestel GEBRUIK VAN DE BATTERIJ Gebruik enkel de voorgeschreven batterij AA GEBRUIK GEEN OPLAADBARE BATTERIJEN Plaats de batterij op de correcte manier met de zijde eerste Schakel het toestel na gebruik steeds uit...

Page 8: ...einture 7 Commutateur marche arrêt 8 Molette de focalisation 9 Couvercle du compartiment de batteries 2 10 Compartiment de batteries AA 2 11 Lentilles d objectif 12 LED d état INCLUS DANS LA LIVRAISON 1 Lanière en néoprène 2 Étui avec ceinture 3 Capuchon de protection pour oculaires 11 11 9 9 1 6 1 4 2 7 2 3 8 10 10 5 12 Handleiding_APC30 42 indd 8 Handleiding_APC30 42 indd 8 1 10 2020 16 34 41 1 ...

Page 9: ...suspension à cardan sur deux axes laquelle est entraînée par un moteur électrique commandé par capteur gyroscopique Les jumelles stabilisées KITE APC sont équipées de la dernière technologie permettant des corrections de 2 à 3 PREMIÈRE UTILISATION A Fixez la lanière aux points de fixation 6 prévus à cet effet B Si vous portez des lunettes lors de l utilisation ne sortez pas les viseurs d oculaire ...

Page 10: ...ssez le commutateur marche arrêt 7 en position ON alors que les batteries ne sont pas insérées ou qu elles sont vides l image ne sera pas stabilisée Ceci est tout à fait normal MINUTERIE D ARRÊT AUTOMATIQUE Quelle que soit la position de repos ou active l instrument s éteint intégralement 90 minutes après la mise sous tension initiale par le commutateur marche arrêt La LED d état s éteint Lorsque ...

Page 11: ...ndues au cou ou debout sur une table l instrument est incliné verticalement de 60 ou plus L électronique de stabilisation est automatiquement mise en veille la LED d état 12 clignote en rouge POSITION ACTIVE pendant l observation l instrument est incliné horizontalement de 40 ou plus L électronique est activée et la LED d état s allume en vert ENTRETIEN ET MAINTENANCE ATTENTION L APC 30 n est PAS ...

Page 12: ...ionnement GARANTIE 30 ANS 2 ANS SUR ÉLECTRONIQUES La période de garantie commence à la date d achat et la couverture est soumise aux conditions suivantes En cas de défauts matériels et ou de fabrication non causés par l utilisateur KITE se chargera de tous les frais de réparation Nous nous réservons le droit de réparer ou de remplacer l instrument à notre discrétion La garantie ne s applique pas s...

Page 13: ... l appareil en plein soleil Cet appareil n est pas étanche ne l exposez pas à l eau ou à l humidité De l eau ou de l humidité à l intérieur de l appareil peuvent provoquer un incendie une décharge électrique ou endommager l appareil UTILISATION DE BATTERIES N utilisez que le type de batteries spécifié AA N UTILISEZ PAS DE PILES RECHARGABLES Insérez correctement la batterie l extrémité en premier É...

Page 14: ...ent 6 Strap loops 7 On off switch 8 Focus wheel 9 Battery covers 2 10 AA battery compartment 2 11 Objective lenses 12 Power indication light INCLUDED 1 Neoprene Neckstrap 2 Softcase with strap 3 Ocular protection cover 11 11 9 9 1 6 1 4 2 7 2 3 8 10 10 5 12 Handleiding_APC30 42 indd 14 Handleiding_APC30 42 indd 14 1 10 2020 16 34 41 1 10 2020 16 34 41 ...

Page 15: ... gimbal mechanism that is steered by a gyro sensor controled electro motor The KITE APC stabilized binoculars feature enhanced technology that allows the instrument to correct the image stability by 2 to 3 FIRST USE A Attach the neckstrap to the strap loops 6 on both sides B For use while wearing spectacles do not twist up the eyecups 2 For use without wearing spectacles twist up the eyecups 2 by ...

Page 16: ...sition The power indication light 12 turns green NOTE placing the switch 7 to ON position while no batteries are placed or batteries are empty will cause shaky image This is normal AUTO OFF TIMER No matter the position the instrument is in active mode or rest sleep mode 90 minutes after placing the switch to ON the instrument will completely switch OFF again At this moment the power indicator 12 w...

Page 17: ...he instrument is tilted to a vertical position by 60 or more The stabilization electronics automatically go to sleep mode the power indicator 12 blinks red ACTIVE POSITION during observation The insturment is tilted to a horizontal position by 40 or more The electronics become active the power indicator 12 lights green CARE AND MAINTENANCE WARNING The APC 30 is NOT waterproof but IPX 5 water resis...

Page 18: ...ranty period of your instrument starts on the date of purchase in accordance with the following conditions In case of manufacturing faults or defects in material not caused by the user we take on material and workmanship costs We reserve the right to repair or replace the instrument or the defective part at our discretion This warranty is not valid when the defect has been caused by improper handl...

Page 19: ...re electric shock or product failure USE OF THE BATTERY Always use the specified batteries 2x AA DO NOT USE RECHARGABLE BATTERIES Please arrange plus and minus ends correctly Always turn off the switch after use If you do not use the device for a long period of time please remove and store the battery Do not short it charge it take it apart overheat it or place it in fire In the unlikely event tha...

Page 20: ...lung Pupillendistanz 6 Gurtbefestigung 7 Ein Aus Schalter 8 Schärfenrad 9 Batteriedeckel 2 10 AA Batteriefach 2 11 Objektivlinsen 12 LED Statusanzeige INBEGRIFFEN 1 Neopren Nackengurt 2 Etui mit Gurt 3 Schutzkappe für Okulare 11 11 9 9 1 6 1 4 2 7 2 3 8 10 10 5 12 Handleiding_APC30 42 indd 20 Handleiding_APC30 42 indd 20 1 10 2020 16 34 41 1 10 2020 16 34 41 ...

Page 21: ...per Gyro Sensor gesteuerten Elektromotor angetrieben wird Die APC stabilisierten Ferngläser von KITE sind mit der neuesten Technologie ausgerüstet die Korrekturen von 2 bis 3 ermöglicht ERSTE VERWENDUNG A Befestigen Sie den Nackengurt an den dazu vorgesehenen Gurtbefestigungspunkten 6 B Beim Tragen einer Brille während der Verwendung drehen Sie die Augenmuscheln 2 nicht heraus Wenn Sie während der...

Page 22: ... Position stellen Die LED Statusanzeige 12 wird grün aufleuchten ACHTUNG Wenn Sie den Ein Aus Schalter 7 in die ON Position stellen während keine Batterien eingelegt sind oder diese leer sind wird Ihr Bild instabil sein Das ist normal AUTO AUS TIMER Ungeachtet seiner Position Ruhe oder aktiv wird sich das Instrument 90 Minuten nach der anfänglichen Einschaltung der Ein Aus Taste auf ON vollständig...

Page 23: ...N am Hals hängend oder auf einem Tisch stehend das Instrument ist um 60 oder mehr vertikal gekippt Die Stabilisierungselektronik wird automatisch in den Schlafmodus gebracht die Status LED 12 blinkt rot AKTIVE POSITION während der Beobachtung das Instrument ist um 40 oder mehr horizontal gekippt Die Elektronik ist aktiviert und die LED Statusanzeige ist grün PFLEGE UND WARTUNG ACHTUNG Der APC 30 i...

Page 24: ...da dies die Funktion stören könnte GARANTIE 30 JAHRE 2 JAHRE ELEKTRONIK Die Garantiefrist beginnt am Kaufdatum und unterliegt folgenden Bedingungen Bei Material und oder Fabrikationsfehlern die nicht vom Benutzer verursacht wurden übernimmt KITE alle Reparaturkosten Dabei behalten wir uns das Recht vor das Instrument im eigenen Ermessen zu reparieren oder auszutauschen Die Garantie ist nicht gülti...

Page 25: ...Gerät niemals in der vollen Sonne stehen Dieses Gerät ist nicht wasserdicht meiden Sie folglich jeden Kontakt mit Wasser oder Feuchtigkeit Wasser oder Feuchtigkeit im Gerät kann zu Brand Tod durch Stromschlag oder Beschädigung des Gerätes führen VERWENDUNG DER BATTERIE Verwenden Sie ausschließlich die vorgeschriebene Batterie AA VERWENDEN SIE KEINE AUFLADBAREN BATTERIEN Legen Sie die Batterie korr...

Page 26: ...7 Botón ON OFF 8 Rueda de enfoque 9 Tapas del compartimento de las pilas 2 10 Compartimento de las pilas AA 2 11 Lentes de objetivo 12 Luz del indicador de corriente INCLUYE 1 Correa de neopreno para cuello 2 Funda con correa 3 Tapa de protección del ocular 11 11 9 9 1 6 1 4 2 7 2 3 8 10 10 5 12 Handleiding_APC30 42 indd 26 Handleiding_APC30 42 indd 26 1 10 2020 16 34 42 1 10 2020 16 34 42 ...

Page 27: ...s ejes con cardán regulado por un motor eléctrico con sensor giroscópico Los prismáticos con estabilizador KITE APC ofrecen una tecnología avanzada que permite corregir la estabilidad de la imagen hasta 2 a 3 PRIMER USO A Fije la correa del cuello a las presillas 6 situadas a ambos lados del instrumento B Si va a usar los prismáticos con gafas no gire las copas oculares 2 para sacarlas Si los usa ...

Page 28: ... ON La luz del indicador de corriente 12 será de color verde ADVERTENCIA Si acciona el botón 7 en modo ON sin las pilas en los compartimentos o con pilas descargadas obtendrá una imagen inestable Esto es normal TEMPORIZADOR DE APAGADO AUTOMÁTICO Independientemente de la posición en la que se encuentre el instrumento modo activo o modo en reposo espera a los 90 minutos de su encendido modo ON el in...

Page 29: ... reposan sobre una mesa El instrumento se inclina en una posición vertical de 60 o más Automáticamente el sistema electrónico del estabilizador entrará en modo de espera y la luz del indicador de corriente 12 parpadeará en rojo POSICIÓN ACTIVA durante la observación El instrumento se inclina en una posición horizontal de 40 o más El sistema electrónico se activará y la luz del indicador 12 se volv...

Page 30: ...ar un mal funcionamiento GARANTÍA 30 AÑOS 2 AÑOS EN ELECTRÓNICA El periodo de garantía de sus prismáticos comienza en la fecha de compra y es conforme a las siguientes condiciones En caso de fallos de fabricación o defectos en el material que no estén causados por el usuario nos haremos cargo de los costes de material y de la mano de obra Nos reservamos el derecho de reparar o sustituir el instrum...

Page 31: ...rcuito o que el producto dejase de funcionar USO DE LA BATERÍA Utilice siempre las pilas especificadas AA NO USE BATERIAS RECARGABLES Posicione los polos positivos y negativos correctamente Después de cada uso coloque siempre el botón de corriente en modo OFF Si no va a usar el dispositivo durante algún tiempo retire las pilas de su interior y guárdelas Evite que provoquen un cortocircuito no las ...

Page 32: ...av avstånd mellan pupillerna 6 Remöglor 7 På avknapp 8 Fokusratt 9 Batteriluckor 2 10 AA batterifack 2 11 Objektivlinser 12 Indikatorlampa MEDFÖLJER 1 Nackrem av neopren 2 Mjuk väska med bärrem 3 Okularlock 1 6 1 4 2 7 2 3 11 11 9 8 10 10 5 12 9 Handleiding_APC30 42 indd 32 Handleiding_APC30 42 indd 32 1 10 2020 16 34 42 1 10 2020 16 34 42 ...

Page 33: ... gimbalmekanik vilken styrs av elmotorer via en gyrosensor KITE APC stabiliserande kikare har en avancerad teknik som stabiliserar vibrationer på upp till 2 3 FÖRSTA ANVÄNDNINGSTILLFÄLLET A Fäst nackremmen i remöglorna 6 på bägge sidor B Om du använder kikaren med glasögon fäll inte upp ögonmusslorna 2 Om du använder kikaren utan glasögon fäll upp ögonmusslorna 2 genom att vrida dem moturs C Titta...

Page 34: ...äge ON Indikatorlampan 12 lyser grönt Obs Om du ställer strömbrytare 7 i läge ON utan att det finns batterier i kikaren eller om batterierna är urladdade blir bilden skakig Det är normalt AUTOMATISK AVSTÄNGNING Oavsett i vilket läge instrument är inställt aktivt läge eller vilo beredskapsläge stängs instrumentet av 90 minuter efter det att strömbrytaren satts i läge ON När detta sker släcks indika...

Page 35: ... i nackremmen eller stående på ett bord Instrumentet lutar 60 vertikalt eller mer Den stabiliserande elektroniken försätts automatiskt i beredskapsläge indikatorlampan 12 blinkar rött AKTIVT LÄGE vid användning Instrumentet lutar i horisontell position med 40 eller mer Elektroniken aktiveras indikatorlampan 12 lyser grönt SKÖTSEL OCH UNDERHÅLL VARNING APC 30 är INTE vattentät men IPX 5 vattentät A...

Page 36: ...PÅ ELEKTRONIK Garantitiden för instrumentet inleds det datum då du köpte produkten och gäller enligt följande villkor Vid material eller tillverkningsfel som inte orsakats av användaren bekostar vi material och arbete Vi förbehåller rätten att besluta ifall instrumentet eller den defekta delen ska repareras eller bytas ut Denna garanti är inte giltig om defekten orsakats av att instrumentet hanter...

Page 37: ...r ANVÄNDNING AV BATTERIET Använd alltid de batterier som anges AA ANVÄND INTE LADDBART BATTERIER Se till att batteriernas polaritet är rätt Stäng alltid av strömbrytaren efter användning Ta ut batterierna och förvara dem skilda från enheten om du inte ska använda den under en längre tid De får inte kortslutas laddas demonteras överhettas eller utsättas för eld Om du skulle få elektrolyt som läckt ...

Page 38: ...Handleiding_APC30 42 indd 38 Handleiding_APC30 42 indd 38 1 10 2020 16 34 42 1 10 2020 16 34 42 ...

Page 39: ...pra Дата покупки Stempel van de verkoper Cachet du revendeur Dealer s stamp Stempel des Fachhändlers Återförsäljarstämpel Jälleenmyyjän leima Forhandlerens stempel Sello del establecimiento Timbro del rivenditore Carimbo do revendedor Печать продавца Handleiding_APC30 42 indd 39 Handleiding_APC30 42 indd 39 1 10 2020 16 34 42 1 10 2020 16 34 42 ...

Page 40: ...mingveld 89 8490 Jabbeke Belgium T 32 0 50 69 23 19 F 32 0 50 69 23 26 info kiteoptics com www kiteoptics com Handleiding_APC30 42 indd 40 Handleiding_APC30 42 indd 40 1 10 2020 16 34 42 1 10 2020 16 34 42 ...

Reviews: