background image

2

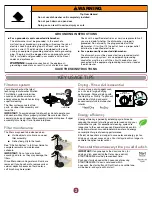
Tip Over Hazard

Do not use dishwasher until completely installed.

Do not push down on open door.

Doing so can result in serious injury or cuts.

WARNING

GROUNDING INSTRUCTIONS

SAVE THESE INSTRUCTIONS

■  

For a grounded, cord-connected dishwasher:

The dishwasher must be grounded. In the event of a 
malfunction or breakdown, grounding will reduce the risk of 
electric shock by providing a path of least resistance for 
electric current. The dishwasher is equipped with a cord 
having an equipment-grounding conductor and a grounding 
plug. The plug must be plugged into an appropriate outlet 
that is installed and grounded in accordance with all local 
codes and ordinances.

WARNING:

 Improper connection of the equipment-

grounding conductor can result in a risk of electric shock. 

Check with a qualified electrician or service representative if 
you are in doubt whether the dishwasher is properly 
grounded. Do not modify the plug provided with the 
dishwasher; if it will not fit the outlet, have a proper outlet 
installed by a qualified electrician.

■  

For a permanently connected dishwasher:

The dishwasher must be connected to a grounded metal, 
permanent wiring system, or an equipment-grounding 
conductor must be run with the circuit conductors and 
connected to the equipment-grounding terminal or lead on 
the dishwasher.

KEY USAGE TIPS

Filtration system

Your dishwasher has the latest 
technology in dishwasher filtration. 
This filtration system minimizes 
sound and optimizes water and 
energy conservation while providing 
superior cleaning.

The filter system consists of two 
parts, an upper filter assembly and 
lower filter.

IMPORTANT: To avoid damage to dishwasher, do not operate your 
dishwasher without filters properly installed. Be sure lower filter is 
securely in place and upper filter assembly is locked into place. If upper 
assembly turns freely, it is not locked into place.

Filter maintenance

The filters may need to be cleaned when:

Visible objects or soils are on upper 
filter assembly.

Dishes feel gritty to the touch.

See “Filtration System” in full User Guide for 
complete removal and maintenance 
schedule.

IMPORTANT: Do not use wire brush, 
scouring pad, etc., as they may damage the 
filters.

Rinse filter under running water until soils are 
removed. If you have hard to remove soils or 
calcium deposits because of hard water, a 
soft brush may be required. 


Upper Filter

Assembly

Lower Filter

P

U

S

H
D
O
W
N
&

T

U

R

N

L

O

C

K

U

N

L

O

C

K

Drying - Rinse Aid is essential.

You must use a drying agent such 
as a rinse aid for good drying 
performance. Rinse aid along with 
the Heat Dry or ProDry™ option will 
provide best drying and avoid 
excessive moisture in dishwasher 
interior.  

Energy efficiency

Energy efficiency is gained by extending cycle time and 
reducing the amount of wattage and water used during your 
dishwasher’s cycle. For exceptional cleaning, cycles are 
longer due to the soak and pauses. Several models contain 
an optical water sensor used to determine water and energy 
consumption for great cleaning performance. 

Efficient dishwashers run longer to save water and energy, just as 
driving a car slower saves on gas. Your first cycle will run longer to 
calibrate the optical water sensor.

Press start/resume every time you add a dish.

IMPORTANT: If anyone opens the door (such as, for 
adding a dish, even during the Delay Hours option), 
START/RESUME must be pressed each time. 

Push door firmly closed within 3 seconds of pressing 
START/RESUME. If door is not closed within 
3 seconds, the start button LED will flash, an audible tone 
will be heard, and cycle will not start.

RINSE AID

IMPROVES DRYING

CHECK

WITH DOOR

FULLY OPEN

Full

Add

Lock

Summary of Contents for W10579120A

Page 1: ...ts intended function Use only detergents or rinse agents recommended for use in a dishwasher and keep them out of the reach of children When loading items to be washed 1 Locate sharp items so that they are not likely to damage the door seal and 2 Load sharp knives with the handles up to reduce the risk of cut type injuries Do not wash plastic items unless they are marked dishwasher safe or the equ...

Page 2: ...alled Be sure lower filter is securely in place and upper filter assembly is locked into place If upper assembly turns freely it is not locked into place Filter maintenance The filters may need to be cleaned when Visible objects or soils are on upper filter assembly Dishes feel gritty to the touch See Filtration System in full User Guide for complete removal and maintenance schedule IMPORTANT Do n...

Page 3: ...u do not plan to run a wash cycle soon run a rinse cycle Do not use detergent Use automatic dishwasher detergent only Add detergent just before starting a cycle Fresh automatic dishwasher detergent results in better cleaning Store tightly closed detergent container in a cool dry place Premeasured Detergents Many detergents now come in premeasured forms gel packs tablets or powder packs These forms...

Page 4: ... If door is not closed within 3 seconds the Start button LED will flash an audible tone will be heard and cycle will not start IMPORTANT If anyone opens the door such as for adding a dish even during the Delay Hours option Start Resume button must be pressed each time If Start Resume button is located on front of door push door firmly closed The door latches automatically Select the wash cycle opt...

Page 5: ...y jets to provide intensified cleaning power to specific wash areas 53 73 0 3 0 0 11 2 Raises the main wash temperature to improve cleaning for loads containing tough baked on food Tough Normal ProWash Raises the main wash temperate from 105 F 41 C to either 130 F 55C or 140 F 60C 42 60 0 3 0 0 11 2 Sanitizes dishes and glassware in accordance with NSF International NSF ANSI Standard 184 for Resid...

Page 6: ... you are able to turn Control Lock off To turn off Control Lock press and hold CONTROL LOCK or 4 HOUR DELAY depending on model for 3 seconds The light turns off NOTE If your model requires you to press and hold 4 HOUR DELAY to lock the controls the Control Lock LED will be on or off to indicate whether Control Lock is active or not Control Purpose Comments To start or resume a wash cycle If the do...

Page 7: ...option is needed for proper drying Proper loading of items can affect drying For improved results place items on the more slanted side of the rack Glasses and cups with concave bottoms hold water This water may spill onto other items when you are unloading the dishwasher Unload the bottom rack first Spotting Filming NOTES Liquid rinse aid is necessary for drying and to reduce spotting Use the corr...

Page 8: ...ppliance if it is installed in an inaccessible location or is not installed in accordance with KitchenAid s published installation instructions 11 Replacement parts or repair labor on major appliances with original model serial numbers that have been removed altered or cannot be easily determined The cost of repair or replacement under these excluded circumstances shall be borne by the customer DI...

Page 9: ...r le lave vaisselle N utiliser le lave vaisselle que pour laver la vaisselle Utiliser les détersifs ou agents de rinçage recommandés pour lave vaisselle et les garder hors de la portée des enfants Lorsque vous chargez le lave vaisselle 1 Placer les objets coupants de façon qu ils ne puissent endommager le joint de la porte et 2 Placer les couteaux le manche vers le haut de façon à ne pas vous coup...

Page 10: ...en emboîté Entretien du filtre Les filtres devront peut être être nettoyés lorsque On remarque des objets ou saletés sur le filtre supérieur Les plats sont rugueux au toucher Voir Système de filtration dans le guide d utilisation complet pour savoir comment éliminer totalement ces saletés ou connaître la fréquence de nettoyage à adopter IMPORTANT Ne pas utiliser de brosse métallique de tampon à ré...

Page 11: ...utiliser un détergent à lave vaisselle automatique frais Conserver le récipient du détergent bien fermé dans un lieu sec et frais Détergents pré mesurés Beaucoup de détergents sont vendus en format pré mesuré sachets de gel pastilles ou sachets de poudre Ces formats sont idéaux quelle que soit la dureté de l eau et de saleté Toujours placer les détergents pré mesurés dans le compartiment principal...

Page 12: ...r le bouton Start Resume mise en marche reprise Si le bouton Start Resume mise en marche reprise se trouve à l avant de la porte bien fermer la porte Le verrou de la porte s engage automatiquement Sélectionner le programme de lavage et les options souhaités puis appuyer sur START RESUME mise en marche reprise ou appuyer sur START RESUME pour répéter les mêmes programme et options que pour le progr...

Page 13: ... communes Tough tenace Normal ProWash Top Rack Only panier supérieur uniquement Active les jets ProScrub pour un pouvoir nettoyant renforcé dans des zones de lavage spécifiques 53 73 0 3 0 0 11 2 Augmente la température principale de lavage pour améliorer le nettoyage des charges comportant des résidus difficiles à nettoyer ayant adhéré pendant la cuisson Tough tenace Normal ProWash Fait passer la...

Page 14: ...DELAY mise en marche différée de 4 heures selon le modèle pendant 3 secondes Le témoin lumineux s éteint REMARQUE Si sur votre modèle le verrouillage des commandes s effectue en appuyant sans relâcher sur 4 HOUR DELAY mise en marche différée de 4 heures la DEL de verrouillage des commandes sera allumée lorsque le verrouillage des commandes est activé ou éteinte lorsqu il est désactivé Commande Fon...

Page 15: ...ule sur la vaisselle REMARQUES Un agent de rinçage liquide est nécessaire pour le séchage et pour réduire les taches Utiliser la bonne quantité de détergent Confirmer que les traces peuvent s enlever en trempant l article dans du vinaigre blanc pendant 5 minutes Si les traces disparaissent ceci est dû à l eau dure Ajuster la quantité de détergent et d agent de rinçage voir la section Entretien du ...

Page 16: ...votre gros appareil ménager est situé dans une région éloignée où un service d entretien KitchenAid autorisé n est pas disponible 10 La dépose et la réinstallation de votre gros appareil ménager si celui ci est installé dans un endroit inaccessible ou n est pas installé conformément aux instructions d installation fournies par KitchenAid 11 Les pièces de rechange ou la main d œuvre pour les gros a...

Reviews: