background image

3

4

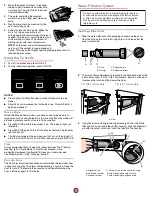
Turn the filter clockwise until it locks into the housing. Ensure that

the alignment arrow on the filter head aligns with the locked
symbol on the control box housing.

NOTE: If the filter is not correctly locked into the housing, the ice
maker will not produce ice.

5

For 15" (38.1 cm) models, push the control box door closed until

the latch snaps closed.

The Water Filter Status Light

The water filter status lights will help you know when to change your 
water filter. 

The “Order Filter” status light will be illuminated when it is time to
order a replacement filter.

The “Replace Filter” status light will be illuminated when it is time to
replace the filter.

Replacing the disposable water filter with a new filter will
automatically reset the filter status tracking feature. See “Using the
Controls.”

Replace the Water Filter

To purchase a replacement water filter, see “Accessories.”

Replace the disposable water filter when indicated on the water filter 
status display or at least every 9 months. If the ice making rate 
decreases before the Replace Filter light illuminates, then replace the 
filter.   

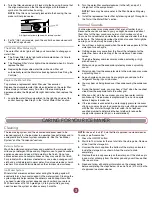
1. Locate the water filter compartment in the right-hand side of the

control housing. See Step 3 in the “Install Water Filter” section.

2. Turn the water filter counterclockwise (to the left), and pull it

straight out of the compartment.

NOTE: There may be some water in the filter. Some spilling may
occur.

3. Install the replacement water filter by following steps 2 through 5 in

the “Install the Water Filter” section.

Normal Sounds

Your new ice maker may make sounds that are not familiar to you. 
Because the sounds are new to you, you might be concerned about 
them. Most of the new sounds are normal. Hard surfaces such as 
floors, walls and cabinets can make the sounds seem louder than they 
actually are. The following describes the kinds of sounds that might be 
new to you and what may be making them.

You will hear a buzzing sound when the water valve opens to fill the
water pan for each cycle.

Rattling noises may come from the flow of the refrigerant or the
water line. Items stored on top of the ice maker can also make
noises.

The high-efficiency compressor may make a pulsating or high
pitched sound.

Water running over the evaporator plate may make a splashing
sound.

Water running from the evaporator plate to the water pan may make
a splashing sound.

As each cycle ends, you may hear a gurgling sound due to the
refrigerant flowing in your ice maker.

You may hear air being forced over the condenser by the condenser
fan.

During the harvest cycle, you may hear a “thud” when the ice sheet
slides from the evaporator onto the cutter grid.

When you first start the ice maker, you may hear water running
continuously. The ice maker is programmed to run a rinse cycle
before it begins to make ice.

If the ice maker is connected to a water supply pressure in excess
of 60 psi, you may hear a loud sound during water filling associated
with the flow of water through the inlet valve. Call a licensed,
qualified plumber to determine the best method to reduce the
supply water pressure (50 psi is recommended).

Cleaning

The ice making system and the air cooled condenser need to be 
cleaned regularly for the ice maker to operate at peak efficiency and to 
avoid premature failure of system components. See the “Ice Maker 
System” and the “Condenser” sections.

Exterior Surfaces

Wash the exterior enamel surfaces and gaskets with warm water and 
mild soap or detergent. Wipe and dry. Regular use of a good household 
appliance cleaner and wax will help maintain the finish. Do not use 
abrasive cleaners on enamel surfaces as they may scratch the finish.

For products with a stainless steel exterior, use a clean sponge or soft 
cloth and a mild detergent in warm water. Do not use abrasive or harsh 
cleaners. Do not use chlorine bleach on the stainless steel surfaces.

Ice Maker System

Minerals that are removed from water during the freezing cycle will 
eventually form a hard scaly deposit in the water system. Cleaning the 
system regularly helps remove the mineral scale buildup. How often 
you need to clean the system depends upon how hard your water is. 
With hard water of 15 to 20 grains/gal. (4 to 5 grains/liter), you may 
need to clean the system as often as every 9 months.

NOTE: Use one 16 oz (473 mL) bottle of approved ice maker cleaner. 
To order, see “Accessories.”

1. Press the ON/OFF button.

2. Wait 5 to 10 minutes for the ice to fall into the storage bin. Remove

all ice from the storage bin.

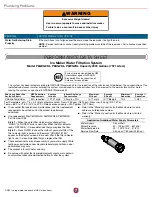
3. Unscrew the drain cap from the bottom of the water pan located

inside the storage bin as shown. Allow the water to drain
completely.

4. Replace the drain cap securely on the water pan. If the drain cap is

loose, water will empty from the water pan and you will have either
thin ice or no ice.

5. Read and follow all handling information on the cleaner bottle

before completing the steps below. Use one 16 oz (473 mL) bottle
of approved ice maker cleaner.

A. Alignment arrow aligned with locked symbol

A

CARING FOR YOUR ICE MAKER

Summary of Contents for W10541605C

Page 1: ... be killed or seriously injured if you don t follow instructions All safety messages will tell you what the potential hazard is tell you how to reduce the chance of injury and tell you what can happen if the instructions are not followed Your safety and the safety of others are very important We have provided many important safety messages in this manual and on your appliance Always read and obey ...

Page 2: ... To turn Max Ice back on press MAX ICE Clean It is recommended that you clean the ice maker when the Cleaning Needed light is illuminated or 9 months has elapsed or ice production decreases significantly To clean your ice maker see Ice Maker System in the Cleaning section Door Ajar Alarm The Door Ajar Alarm feature sounds an alarm when the ice maker door is open for 5 minutes The alarm will repeat...

Page 3: ...ound due to the refrigerant flowing in your ice maker You may hear air being forced over the condenser by the condenser fan During the harvest cycle you may hear a thud when the ice sheet slides from the evaporator onto the cutter grid When you first start the ice maker you may hear water running continuously The ice maker is programmed to run a rinse cycle before it begins to make ice If the ice ...

Page 4: ... failure 1 Unplug ice maker or disconnect power 2 Remove the 2 screws in the lower access panel and the 2 screws from the base grille area of the front panel support 3 Pull the bottom forward and then pull down to remove the lower access panel 4 Remove dirt and lint from the condenser fins and the unit compartment with a brush attachment on a vacuum cleaner 5 Replace the lower access panel using t...

Page 5: ...er wait a few minutes for the drain pump to clear If there is still water in the bin check to see whether the drain hose is kinked For models with drain pumps check that the drain hose is not damaged or kinked or pinched between cabinet and ice maker Use only Whirlpool approved drain pump kit Part Number 1901A Ice Maker Seems Noisy Water overflowing the reservoir is normal This overflow helps to p...

Page 6: ...king the airflow through the condenser If there is white scale buildup in the ice maker s water or freezing system you should clean the ice maker If the drain cap is loose water will empty from the water pan and you will have either thin ice or no ice Tighten the drain cap Ensure that the cutter grid is securely in place and that its harness plug is connected Check that water filter is properly in...

Page 7: ... in your water supply While testing was performed under standard laboratory conditions actual performance may vary The product is for cold water use only Do not use with water that is microbiologically unsafe or of unknown quality without adequate disinfection before or after the system Refer to the Warranty section for the Manufacturer s name address and telephone number Refer to the Warranty sec...

Page 8: ...sumable parts i e light bulbs batteries air or water filters preservation solutions etc 5 Defects or damage caused by the use of non genuine KitchenAid parts or accessories 6 Conversion of products from natural gas or L P gas 7 Damage from accident misuse abuse fire floods acts of God or use with products not approved by KitchenAid 8 Repairs to parts or systems to correct product damage or defects...

Page 9: ...gistrer la machine à glaçons sur www kitchenaid ca Guide d utilisation Machine à glaçons Risque possible de décès ou de blessure grave si vous ne suivez pas immédiatement les instructions Risque possible de décès ou de blessure grave si vous ne suivez pas les instructions Tous les messages de sécurité vous diront quel est le danger potentiel et vous disent comment réduire le risque de blessure et ...

Page 10: ...our réactiver Max Ice glaçons max appuyer sur MAX ICE Nettoyage On recommande de nettoyer la machine à glaçons lorsque le témoin lumineux Cleaning Needed nettoyage nécessaire s illumine lorsque 9 mois se seront écoulés ou lorsque la production de glaçons diminue de façon significative Pour nettoyer la machine à glaçons voir Système de la machine à glaçons dans la section Nettoyage Alarme de porte ...

Page 11: ...is au condenseur par le ventilateur du condenseur Au cours du programme de récolte vous pouvez entendre un bruit sourd lorsque la plaque de glace glisse de l évaporateur sur la grille de coupe Lors de la mise en marche initiale de la machine à glaçons il est possible que vous entendiez l eau couler continuellement La machine à glaçons est programmée pour effectuer un programme de rinçage avant de ...

Page 12: ...cter la source de courant électrique 2 Retirer les deux vis du panneau d accès inférieur et les deux vis de la grille de base du support du panneau avant 3 Tirer le bas vers l avant puis tirer vers le bas pour retirer le panneau d accès inférieur 4 Retirer la saleté et la charpie déposées sur les ailettes du condenseur et du logement de l unité de condensation à l aide de la brosse d un aspirateur...

Page 13: ...tée à la machine à glaçons attendre quelques minutes pour que la pompe de vidange évacue l eau S il y a de l eau stagnante dans le bac vérifier pour voir si le tuyau d évacuation est déformé Pour les modèles comportant des pompes de vidange vérifier que le tuyau de vidange n est pas endommagé déformé ou coincé entre la machine à glaçons et la caisse de l appareil Utiliser uniquement l ensemble de ...

Page 14: ...té ou de la charpie peuvent bloquer le débit d air passant dans le condenseur S il y a une accumulation blanche de tartre dans le système d eau ou de congélation de la machine à glaçons il faut nettoyer l appareil Si le bouchon de vidange est desserré l eau s écoulera du bac à eau et la glace sera mince ou il n y aura pas de glace Resserrer le bouchon de vidange S assurer que la grille de coupe es...

Page 15: ...tions de laboratoires standard le rendement réel peut varier Le produit doit être utilisé pour l eau froide seulement Ne pas utiliser pour le filtrage d une eau microbiologiquement polluée ou de qualité inconnue en l absence d un dispositif de désinfection adéquat avant ou après le système Consulter la section Garantie pour obtenir le nom l adresse et le numéro de téléphone du fabricant Consulter ...

Page 16: ...ou à eau solutions de conservation etc 5 Défauts ou dommage résultant de l utilisation de pièces ou accessoires KitchenAid non authentiques 6 Conversion de votre produit du gaz naturel ou du gaz de pétrole liquéfié 7 Dommages causés par accident mésusage abus incendie inondations catastrophe naturelle ou l utilisation de produits non approuvés par KitchenAid 8 Réparations aux pièces ou systèmes da...

Reviews: