9
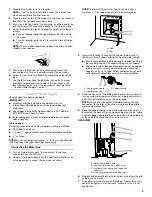
5. Cubes fall into the storage bin. When the bin is full, the ice
maker shuts off automatically and restarts when more ice is
needed. The ice bin is not refrigerated, and some melting will
occur. The amount of melting varies with room temperature.
NOTE: As the room and water temperatures vary, so will the
amount of ice produced and stored. This means that higher
operating temperatures result in reduced ice production.
Using the Controls
1. To start ice production, press ON.
2. To stop ice maker operation, press OFF.
NOTES:
■
Pressing the On/Off switch does not shut off power to the ice
maker.
■
Allow 24 hours to produce the first batch of ice. Discard the
first batch produced.
Max Ice Mode
Select the Max Ice feature when you have an upcoming need for a
large amount of ice and the ice bin is low or empty. Max Ice mode
will produce a greater quantity of ice in a 24-hour period.
■
Press and hold MAX ICE while the ice maker is on. The
indicator light will illuminate.
■
Press and hold MAX ICE again to turn off the Max Ice feature.
The indicator light will turn off.
Service
The service light indicates when service is needed. If the service
light turns on, turn the ice maker off and back on. If the service
light turns on again, call for service.
Clean/Reset
The Cleaning/Reset Status light will help you know when it is time
to clean your ice maker. The light will change from green to yellow.
This tells you it is almost time to clean your ice maker. It is
recommended that you clean the ice maker when the status light
changes to red OR ice production decreases significantly. To
clean your ice maker, see “Ice Maker System” in the “Cleaning”
section.
ICE MAKER CARE
Cleaning
The ice making system and the air cooled condenser need to be
cleaned regularly for the ice maker to operate at peak efficiency
and to avoid premature failure of system components. See the
“Ice Maker System” and the “Condenser” sections.
Exterior Surfaces
Wash the exterior enamel surfaces and gaskets with warm water
and mild soap or detergent. Wipe and dry. Regular use of a good
household appliance cleaner and wax will help maintain the finish.
Do not use abrasive cleaners on enamel surfaces as they may
scratch the finish.
For products with a stainless steel exterior, use a clean sponge or
soft cloth and a mild detergent in warm water. Do not use abrasive
or harsh cleaners. Do not use chlorine bleach on the stainless
steel surfaces.
Ice Maker System
Minerals that are removed from water during the freezing cycle will
eventually form a hard scaly deposit in the water system. Cleaning
the system regularly helps remove the mineral scale buildup. How
often you need to clean the system depends upon how hard your
water is. With hard water of 15 to 20 grains/gal. (4 to 5 grains/
liter), you may need to clean the system as often as every
6 months.
NOTE: Use one 16 oz (473 mL) bottle of approved ice maker
cleaner. To order, call 1-800-422-1230 and ask for Part Number
4396808. In Canada, call 1-800-807-6777.
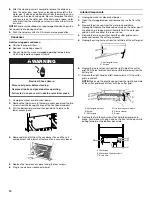
1. Press the OFF control.
2. Wait 5 to 10 minutes for the ice to fall into the storage bin.
Remove all ice from the storage bin.
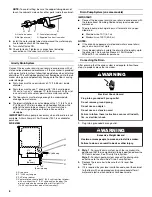
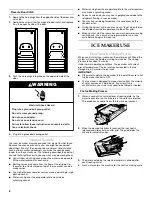
3. Unscrew the drain cap from the bottom of the water pan
located inside the storage bin as shown. Allow the water to
drain completely.
4. Replace the drain cap securely on the water pan. If the drain
cap is loose, water will empty from the water pan and you will
have either thin ice or no ice.
5. Read and follow all handling information on the cleaner bottle
before completing the steps below. Use one 16 oz (473 mL)
bottle of approved ice maker cleaner.
6. Pour one bottle of solution into the water pan. Fill the bottle
twice with tap water and pour it into the water pan.
7. Press the CLEAN button. See “Using the Controls.” The light
will blink, indicating that the cleaning cycle is in process.
When the indicator light turns green (approximately
70 minutes), the cleaning cycle is complete. During the
cleaning cycle, the system will both clean and rinse itself.
A. Water pan
B. Water pan thumb screws
C. Drain cap
A
B
C
B

