background image

9

3. Remove filter from its connection and discard. (Follow the 

instructions provided with your refreshment center water filter 
to replace. See “Assistance or Service” section to order.) 

4. Disconnect ice bin and sink drain and plastic tubing from the 

filter connector and allow to drain.

5. Cover refreshment center with accessory cover or tarpaulin.

Cabinet Door Alignment

Style 2 Only

Your cabinet door(s) can be realigned if necessary.

1. Check door to determine alignment requirements.

2. Open the cabinet door.

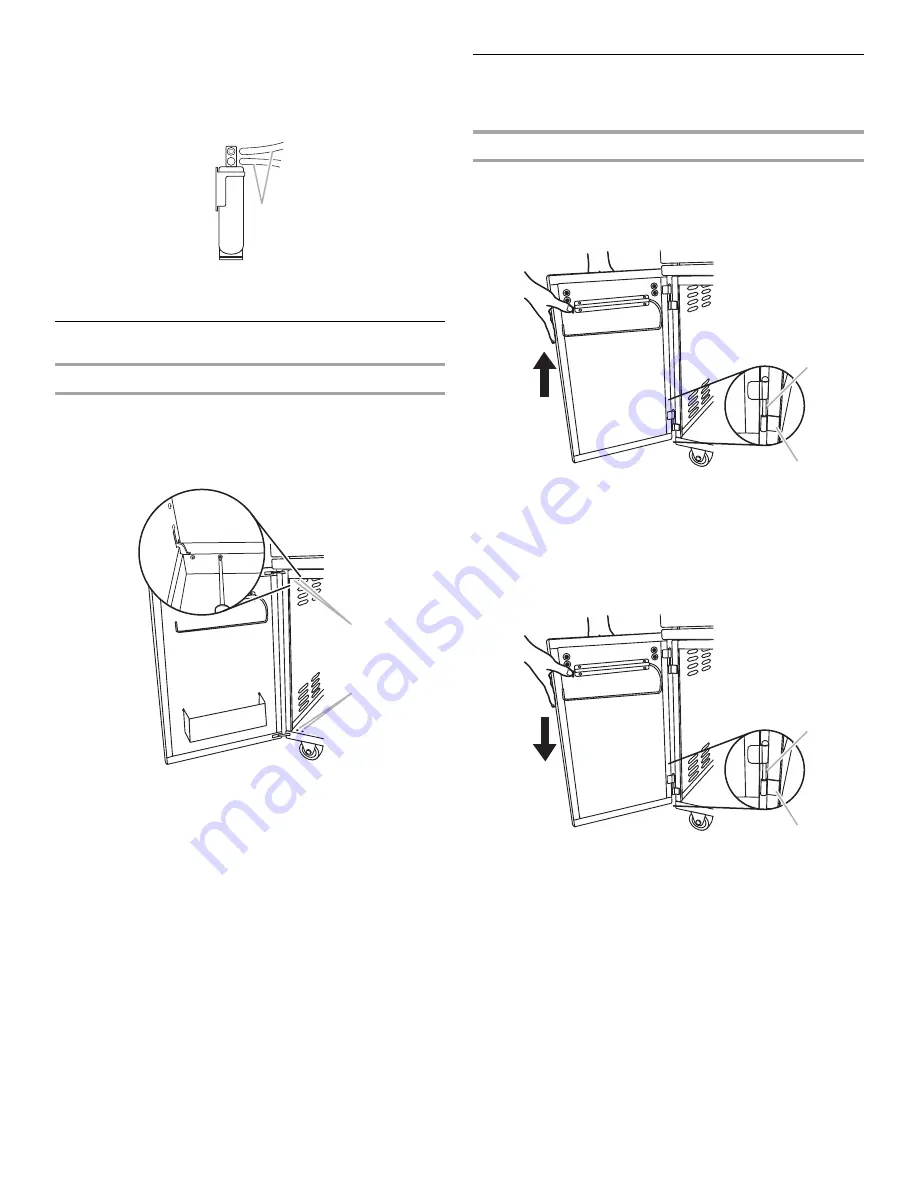
3. Locate and loosen the 4 door hinge mounting screws ½ turn.

4. Adjust the top or bottom of the door in the direction 

necessary to align the door.

5. Tighten the 4 door hinge mounting screws.

6. Close the door and check alignment.

7. Readjust the door using steps 2 through 6 if necessary.

8. Repeat steps 1 through 7 on the other door if necessary.

Cabinet Door Removal

The door(s) can be removed if necessary to gain access to the 
inside of the cabinet area.

Style 1

To Remove the Door: 

1. Open cabinet door.

2. Lift door to slide door hinge pins from hinge brackets on 

cabinet.

3. Repeat steps 1 and 2 for the other door if necessary.

To Replace the Door:

1. Position hinge pins on the door with the hinge brackets on 

the cabinet. Gently push down to slide the pins into place.

2. Repeat Step 1 for the other door if necessary.

A. Plastic tubing

A. Top screws (2 - underside of frame)
B. Bottom screws (2)

A

A

B

A. Door hinge pin
B. Hinge bracket 

A. Door hinge pin
B. Hinge bracket 

A

B

A

B

Summary of Contents for KBFU271

Page 1: ...In Canada for assistance installation and service call 1 800 807 6777 or visit our website at www KitchenAid ca COMPTOIRPOURRAFRAÎCHISSEMENTS D EXTÉRIEUR AUTOPORTANTETENCASTRÉ Instructionsd installationetGuided utilisationetd entretien Au Canada pour assistance installation ou service composez le 1 800 807 6777 ou visitez notre site web www KitchenAid ca Table of Contents Table des matières 2 Mode...

Page 2: ...POUR RAFRAÎCHISSEMENTS 20 Nettoyage général 20 Alignement de la porte du placard 21 Dépose de la porte du placard 21 Fixation de l étagère à condiments 22 ASSISTANCE OU SERVICE 23 Accessoires 23 Au Canada 23 GARANTIE 23 OUTDOOR REFRESHMENT CENTER SAFETY You can be killed or seriously injured if you don t immediately You can be killed or seriously injured if you don t follow All safety messages wil...

Page 3: ...g flange and mounting screws on built in model only Parts needed NSF or UPC listed water connection lines or hose All weather clear silicone LocationRequirements IMPORTANT Observe all governing codes and ordinances Product Dimensions Freestanding Models The freestanding model must have suitable drain systems in accordance with local codes for the ice bin and sink drains Built In Models Cabinet Dim...

Page 4: ... Power Burners Warming Drawer Access Doors Refrigerator or Ice Maker Utility or Trash Drawer Minimum Spacing Requirement Between Cutouts Dimension K Between 2 or more sets of Access Doors adjacent to each other K 14 35 6 cm when 2 adjacent doors are opened to 90 degrees K 8 20 3 cm when 1 of the adjacent doors is opened to 90 degrees Between a set of Access Doors and a Trash Drawer Utility Drawer ...

Page 5: ...m 10 27 3 cm 19 50 2 cm Cutout Dimensions Built in Side Burner Burner Position Dimension C Dimension D Dimension E Front to Back 13 34 3 cm 10 27 3 cm 22 57 5 cm Side by Side 24 62 2 cm 10 27 3 cm 16 42 9 cm Cutout Dimensions Built in Sear Burner Dimension C Dimension D Dimension E 13 34 3 cm 10 27 0 cm 22 57 6 cm Cutout Dimensions Built in Refreshment Center Dimension C Dimension D Dimension E 30...

Page 6: ...r in a convenient location under the cutout Position the water inlet connector so that the plastic tubing easily reaches the filter inlet connection 7 Connect ice bin drain and sink drain fittings to drain system in accordance with local code requirements Cutout Dimensions Built in Warming Drawer Warming Drawer Size Dimension J 24 61 0 cm 22 57 2 cm Cutout Dimensions Built in Utility Drawer and Bu...

Page 7: ...r supply and drain system to outdoor refreshment center according to local code requirements 1 Check that you have adequate drain connections for the refreshment center 2 Remove the faucet from the ice bin 3 Install the faucet and securely fasten 4 Connect the plastic tubing from the water filter to the faucet connection and securely tighten A Underside of mounting trim A Plastic tube insert B Pla...

Page 8: ... lint free cloth Vinegar for hard water spots Use a glass cleaner to remove fingerprints To avoid damage to stainless steel surfaces do not use soap filled scouring pads abrasive cleaners cleaners containing chlorine Cooktop Polishing Creme steel wool pads gritty washcloths or some paper towels REFRESHMENT CENTER WATER FILTER Filter should be replaced every 6 to 12 months To remove filter turn fil...

Page 9: ...o align the door 5 Tighten the 4 door hinge mounting screws 6 Close the door and check alignment 7 Readjust the door using steps 2 through 6 if necessary 8 Repeat steps 1 through 7 on the other door if necessary CabinetDoorRemoval The door s can be removed if necessary to gain access to the inside of the cabinet area Style 1 To Remove the Door 1 Open cabinet door 2 Lift door to slide door hinge pi...

Page 10: ...Do not tighten 3 Check and adjust door then tighten the screws See Cabinet Door Alignment 4 Repeat steps 1 through 3 for the other door if necessary AttachCondimentShelf 1 Open cabinet door 2 Use a short Phillips screwdriver or a 90 screwdriver with a Phillips screw bit to loosen the 2 mounting screws on the inner door panel 3 Position the condiment shelf so that the large ends of the keyhole slot...

Page 11: ...nding Refreshment Center Order Part Number 8212707 Vinyl Cover for Outdoor Built In Refreshment Center Order Part Number 8212708 Water Filter Order Part Number 4396508 InCanada Call the KitchenAid Canada Customer eXperience Centre toll free 1 800 807 6777 Our consultants provide assistance with Features and specifications on our full line of appliances Use and maintenance procedures Accessory and ...

Page 12: ...n accordance with published installation instructions 10 Damage resulting from normal wear and tear of your outdoor product 11 Outdoor products with original model serial numbers that have been removed altered or cannot be easily determined This warranty is void if the factory applied serial number has been altered or removed from your outdoor product The cost of repair or replacement under these ...

Page 13: ...duire en cas de non respect des instructions Votre sécurité et celle des autres est très importante Nous donnons de nombreux messages de sécurité importants dans ce manuel et sur votre appareil ménager Assurez vous de toujours lire tous les messages de sécurité et de vous y conformer AVERTISSEMENT DANGER Voici le symbole d alerte de sécurité Ce symbole d alerte de sécurité vous signale les dangers...

Page 14: ...onduits de raccordement ou tuyau homologués NSF ou UPC Silicone transparente résistant aux intempéries Exigencesd emplacement IMPORTANT Observer les dispositions de tous les codes et règlements en vigueur Dimensions du produit Modèles autoportants Pour l installation du modèle autoportant on doit disposer d un circuit de liaison à l égout adéquat installé conformément aux prescriptions des codes l...

Page 15: ...d accès Réfrigérateur ou machine à glaçons 12 min vers n importe quel accessoire Tiroir utilitaire ou à déchets Brûleurs haute puissance Power brûleurs latéraux ou brûleurs à infrarouge TM Valeur de dégagement de séparation minimale entre les ouvertures à découper Dimension K Entre au moins 2 portes d accès adjacentes K 14 35 6 cm lorsque 2 portes adjacentes sont ouvertes à 90 degrés K 8 20 3 cm l...

Page 16: ...on D Dimension E 19 49 2 cm 10 27 3 cm 19 50 2 cm Dimensions de l ouverture à découper Brûleur latéral encastré Position du brûleur Dimension C Dimension D Dimension E De l avant vers l arrière 13 34 3 cm 10 27 3 cm 22 57 5 cm Côte à côte 24 62 2 cm 10 27 3 cm 16 42 9 cm Dimensions de l ouverture à découper Brûleur à infrarouge encastré Dimension C Dimension D Dimension E 13 34 3 cm 10 27 0 cm 22 ...

Page 17: ...acilement atteindre le point de connexion sur le filtre 7 Les circuits de raccordement à l égout pour le bac à glaçons et l évier doivent être réalisés conformément aux prescriptions du code local en vigueur Dimensions de l ouverture à découper Machine à glaçons d extérieur Dimension G Dimension H 18 45 7 cm 34 86 4 cm min à 34 87 6 cm max Dimensions de l ouverture à découper Tiroir réchaud encast...

Page 18: ...utoportant Demander à un plombier agréé d installer et de raccorder le comptoir pour rafraîchissements d extérieur à la source d eau potable et à l égout conformément aux prescriptions du code local en vigueur 1 Vérifier que vous avez un circuit de liaison à l égout adéquat pour le comptoir pour rafraîchissements 2 Enlever le robinet du bac à glaçons 3 Installer le robinet bien serrer A Face infér...

Page 19: ...bac à glaçons 8 Faire pivoter chaque étagère latérale vers le haut jusqu à la position de verrouillage ou laisser chaque étagère abaissée selon le besoin 9 Bloquer les roulettes avant pour empêcher le comptoir pour rafraîchissements de bouger A Partie à insérer pour le tube de plastique B Virole de plastique C Écrou de compression D Tube de plastique depuis le filtre à eau sortie E Filtre A Tube d...

Page 20: ...tervalles de 6 à 12 mois Pour démonter le filtre faire tourner le filtre d un quart de tour dans le sens antihoraire Pour l installation du filtre enfoncer la nouvelle cartouche et faire tourner dans le sens horaire EXTÉRIEUR DU COMPTOIR POUR RAFRAÎCHISSEMENTS La qualité de ce matériau résiste à la plupart des taches et piqûres de corrosion dès lors que la surface est maintenue propre et protégée ...

Page 21: ...avoir accès à l intérieur du placard Style 1 Dépose de la porte 1 Ouvrir la porte du placard 2 Soulever la porte afin que les broches de charnière glissent hors des supports de charnière du placard 3 Répéter les étapes 1 et 2 pour l autre porte si nécessaire Remise en place de la porte 1 Aligner les broches de charnière de la porte avec les charnières sur le placard Appuyer pour faire pénétrer dou...

Page 22: ... porte puis resserrer les vis Voir Alignement de la porte du placard 4 Répéter les étapes 1 à 3 pour l autre porte si nécessaire Fixationdel étagèreàcondiments 1 Ouvrir la porte du placard 2 À l aide d un tournevis Philips court ou d un tournevis à 90 avec embout à vis Philips desserrer les 2 vis de montage du panneau interne de la porte 3 Positionner l étagère à condiments pour engager sur les 2 ...

Page 23: ...it toute question ou préoccupation à KitchenAid Canada à l adresse suivante Centre pour l eXpérience de la clientèle KitchenAid Canada 1901 Minnesota Court Mississauga Ontario L5N 3A7 Veuillez inclure dans votre correspondance un numéro de téléphone où l on peut vous joindre dans la journée GARANTIE DES PRODUITS POURUSAGE EXTÉRIEUR KITCHENAID GARANTIE LIMITÉE Pendant un an à compter de la date d a...

Page 24: ... circonstances exclues est à la charge du client CLAUSE D EXONÉRATION DE RESPONSABILITÉ AU TITRE DES GARANTIES IMPLICITES LIMITATION DES RECOURS LE SEUL ET EXCLUSIF RECOURS DU CLIENT DANS LE CADRE DE LA PRÉSENTE GARANTIE LIMITÉE CONSISTE EN LA RÉPARATION PRÉVUE CI DESSUS LES GARANTIES IMPLICITES Y COMPRIS LES GARANTIES APPLICABLES DE QUALITÉ MARCHANDE ET D APTITUDE À UN USAGE PARTICULIER SONT LIMI...

Reviews: