background image

ENGLISH

CARE AND CLEANING


|  

17

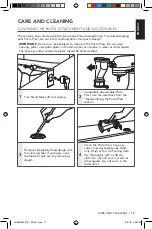
1

Turn Stand Mixer off and unplug�

2

Completely disassemble Pasta 

Press� Use the directions from the 

“Disassembling the Pasta Press” 

section�

CARE AND CLEANING

CLEANING THE PASTA ATTACHMENT AND ACCESSORIES

These accessories are designed to be used with pasta dough only� To avoid damaging 

your Pasta Press, do not insert anything other than pasta dough�

IMPORTANT:

 Do not use metal objects to clean out the Pasta Press� Do not wash 

housing, cutter, and pasta plates in the dishwasher or immerse in water or other liquids� 

The housing, cutter, and pasta plates should be hand washed�

3

Remove completely dried dough with 

the cleaning tool� If necessary, use a 

toothpick to pick out any remaining 

dough� 

4

Clean the Pasta Press housing, 

cutter, and pasta plates by hand 

only� Wash with a soft, damp cloth� 

Dry thoroughly with a soft dry 

cloth� Do not immerse in water or 

other liquids� Do not wash in the 

dishwasher� 

W10829435B_01_EN_v01.indd   17

3/4/16   3:08 PM

Summary of Contents for 5KSMPEXTA

Page 1: ...5KSMPEXTA W10829435B_01_EN_v01 indd 1 3 4 16 3 08 PM ...

Page 2: ...W10829435B_01_EN_v01 indd 2 3 4 16 3 08 PM ...

Page 3: ...English 5 Deutsch 23 Français 41 Italiano 59 Nederlands 77 Español 95 Português 113 Ελληνικά 131 Svenska 149 W10829435B_01_EN_v01 indd 3 3 4 16 3 08 PM ...

Page 4: ...W10829435B_01_EN_v01 indd 4 3 4 16 3 08 PM ...

Page 5: ...S 10 Choosing the Right Pasta plate 10 Assembling the Pasta Press 11 Attaching the Pasta Press 11 Making Pasta 13 Disassembling the Pasta Press 15 CARE AND CLEANING 17 RECIPES 18 Cooking Pasta 18 Basic Egg Noodle Pasta 19 TROUBLESHOOTING 20 WARRANTY AND SERVICE 21 TABLE OF CONTENTS W10829435B_01_EN_v01 indd 5 3 4 16 3 08 PM ...

Page 6: ... AND FEATURES PARTS AND ACCESSORIES Spaghetti Housing Auger Dough pusher combo tool Cleaning tool PASTA PLATES Bucatini Rigatoni Fusilli Large macaroni Small macaroni Cutter Pasta ring W10829435B_01_EN_v01 indd 6 3 4 16 3 08 PM ...

Page 7: ...xer from outlet when not in use before putting on or taking off parts and before cleaning 4 This appliance can be used by children aged from 8 years and above and persons with reduced physical sensory or mental capabilities or lack of experience and knowledge if they have been given supervision or instruction concerning use of the appliance in a safe way and understand the hazards involved Childre...

Page 8: ...8 Do not feed dough by hand Always use the combo tool to push food 9 Do not operate the Stand Mixer with a damaged cord or plug or after the Stand Mixer malfunctions or is dropped or damaged in any manner Return the Stand Mixer to the nearest Authorized Service Centre for examination repair or electrical or mechanical adjustment 10 The use of accessories not recommended or sold by KitchenAid may c...

Page 9: ...crapping the product This appliance is marked in compliance with European Directive 2012 19 EU Waste Electrical and Electronic Equipment WEEE By ensuring this product is disposed of correctly you will help prevent potential negative consequences for the environment and human health which could otherwise be caused by inappropriate waste handling of this product The symbol on the product or on the a...

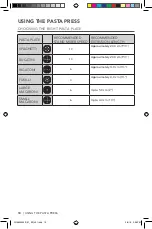
Page 10: ...NDED STAND MIXER SPEED RECOMMENDED EXTRUSION LENGTH SPAGHETTI 10 Approximately 24 0 cm 9 BUCATINI 10 Approximately 24 0 cm 9 RIGATONI 6 Approximately 4 0 cm 1 FUSILLI 3 Approximately 4 0 cm 1 LARGE MACARONI 6 Up to 5 0 cm 2 SMALL MACARONI 6 Up to 4 0 cm 1 W10829435B_01_EN_v01 indd 10 3 4 16 3 08 PM ...

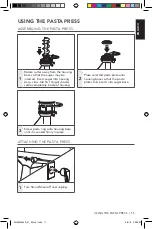
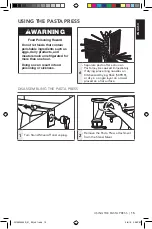
Page 11: ... may be inserted Insert auger into housing base cross tab first Auger should settle completely inside of housing 2 Place selected pasta plate onto housing base so that the pasta plate s tab inserts into auger base USING THE PASTA PRESS ASSEMBLING THE PASTA PRESS ATTACHING THE PASTA PRESS 1 Turn Stand Mixer off and unplug W10829435B_01_EN_v01 indd 11 3 4 16 3 08 PM ...

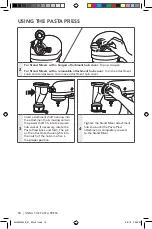
Page 12: ...chment housing fits into the notch of the hub rim when in the proper position 4 Tighten the Stand Mixer attachment hub knob until the Pasta Press attachment is completely secured to the Stand Mixer 2 For Stand Mixers with a hinged attachment hub cover Flip up to open For Stand Mixers with a removable attachment hub cover Turn the attachment knob counterclockwise to remove attachment hub cover W108...

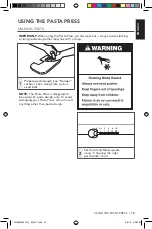
Page 13: ...right pasta plate chart USING THE PASTA PRESS MAKING PASTA IMPORTANT When using the Pasta Press do not wear ties scarves loose clothing or long necklaces gather long hair with a clasp NOTE The Pasta Press is designed to be used with pasta dough only To avoid damaging your Pasta Press do not insert anything other than pasta dough W10829435B_01_EN_v01 indd 13 3 4 16 3 08 PM ...

Page 14: ...e auger Wait until auger is visible before adding the next piece 4 Use the combo tool to push dough only if dough becomes caught in the hopper and no longer self feeds 5 Use the cutter to cut pasta at desired length as it exits the press See Choosing the right pasta plate for recommended lengths W10829435B_01_EN_v01 indd 14 3 4 16 3 08 PM ...

Page 15: ...asta may be cooked immediately If drying place long noodles on KitchenAid Drying Rack 5KPDR or dry in a single layer on a towel placed on a flat surface WARNING Food Poisoning Hazard Do not let foods that contain perishable ingredients such as eggs dairy products and meats remain unrefrigerated for more than one hour Doing so can result in food poisoning or sickness W10829435B_01_EN_v01 indd 15 3 ...

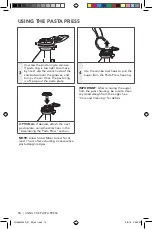
Page 16: ...IMPORTANT After removing the auger from the press housing be sure to clean any dried dough from the auger See Care and Cleaning for details 3 Unscrew the pasta ring to remove If pasta ring is too tight to remove by hand slip the wrench side of the combo tool over the grooves and turn as shown Once the pasta ring is off pop out the pasta plate 4 Use the combo tool hook to pull the auger from the Pa...

Page 17: ...RTANT Do not use metal objects to clean out the Pasta Press Do not wash housing cutter and pasta plates in the dishwasher or immerse in water or other liquids The housing cutter and pasta plates should be hand washed 3 Remove completely dried dough with the cleaning tool If necessary use a toothpick to pick out any remaining dough 4 Clean the Pasta Press housing cutter and pasta plates by hand onl...

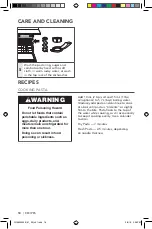
Page 18: ...l until pasta is al dente or slightly firm to the bite Pasta floats to the top of the water while cooking so stir occasionally to keep it cooking evenly Use a colander to drain Dry Pasta 7 minutes Fresh Pasta 2 5 minutes depending on noodle thickness WARNING Food Poisoning Hazard Do not let foods that contain perishable ingredients such as eggs dairy products and meats remain unrefrigerated for mo...

Page 19: ...eed 2 and gradually add eggs and 15 mL 1 tbs water Mix for 30 seconds Stop the Stand Mixer and exchange the flat beater for the dough hook Turn to Speed 2 and knead for 2 minutes Let dough rest for 20 minutes Remove mixture from bowl and place on a clean surface Dough may appear crumbly Hand knead for 30 seconds to 1 minute or until dough is smooth pliable and holds together in a ball Form walnut ...

Page 20: ...sing the Pasta Press section 4 Is your dough prepared according to the recipe 5 Is the Stand Mixer plugged in 6 Is the fuse in the circuit to the Stand Mixer in working order If you have a circuit breaker box be sure the circuit is closed 7 Turn off the Stand Mixer for 10 15 seconds then turn it back on If the Stand Mixer still does not start allow it to cool for 30 minutes before turning it back ...

Page 21: ...ce In U K and Ireland For any questions or to find the nearest KitchenAid Authorized Service Centre please find our contact details below NOTE All service should be handled locally by an Authorized KitchenAid Service Centre Contact number for U K and Northern Ireland Tollfree number 0800 988 1266 calls from mobile phones are charged standard network rate or call 0194 260 5504 Contact number for Ir...

Page 22: ...W10829435B_01_EN_v01 indd 22 3 4 16 3 08 PM ...

Reviews: