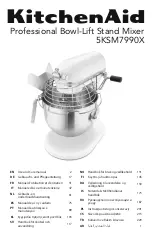
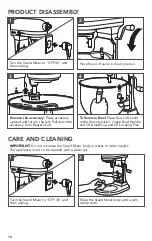
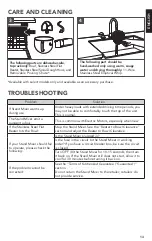
background image

ENGLISH

13

CARE AND CLEANING

The following part should be  

hand-washed only using warm, soapy 

water and drying thoroughly: 

11-Wire 

Stainless Steel Elliptical Whip

.

4

The following parts are dishwasher-safe, 

top rack only:

 Bowl, Stainless Steel Flat 

Beater, Stainless Steel Spiral Dough Hook, and 

Removable Pouring Chute

*.

3

*Available with select models only and available as an accessory purchase.

TROUBLESHOOTING

Problem

Solution

If Stand Mixer warms up 

during use:

Under heavy loads with extended mixing time periods, you 

may not be able to comfortably touch the top of the unit. 

This is normal.

The Stand Mixer emit a 

pungent odour:

This is common with Electric Motors, especially when new.

If the Stainless Steel Flat 

Beater hits the Bowl:

Stop the Stand Mixer. See the “Beater to Bowl Clearance” 

section and adjust the Beater to Bowl Clearance.

If your Stand Mixer should fail 

to operate, please check the 

following:

Is the Stand Mixer plugged in?
Is the fuse in the circuit to the Stand Mixer in working 

order? If you have a circuit breaker box, be sure the circuit 

is closed.
Turn 

OFF (0) the Stand Mixer for 10-15 seconds, then turn 

it back on. If the Stand Mixer still does not start, allow it to 

cool for 30 minutes before turning it back on.

If the problem cannot be 

corrected:

See the “Terms of KitchenAid Guarantee (“Guarantee”)” 

section.
Do not return the Stand Mixer to the retailer; retailers do 

not provide service.

W11457004A.indb   13

W11457004A.indb   13

03-09-2020   11:42:33

03-09-2020   11:42:33

Summary of Contents for 5KSM7990X

Page 1: ...Εγχειρίδιο Χρήσης και Φροντίδας 103 SV Handbok för skötsel och användning 117 NO Håndbok for bruk og vedlikehold 131 FI Käyttö ja huolto opas 145 DA Vejledning til anvendelse og vedligehold 159 IS Notenda Meðhöndlunar handbók 173 RU Руководство по эксплуатации и уходу 187 PL Instrukcja obsługi i konserwacji 201 CS Návod k použití a údržbě 215 TR Kullanım ve Bakım kılavuzu 229 AR والعناية االستخدام...

Page 2: ...op Switch 11 Speed Control Lever 12 11 Wire Stainless Steel Elliptical Whip 13 Stainless Steel Spiral Dough Hook 14 Stainless Steel Flat Beater 15 Removable Pouring Chute 16 Attachment Knob Bowl type may vary Bowls are also available for purchase as separate accessories Included with select models Picture Style may vary from product depending on model 11 3 5 7 9 8 1 6 10 4 2 12 13 14 15 16 ...

Page 3: ...the appliance in a safe way and understand the hazards involved Children shall not play with the appliance 5 European Union Only This appliance shall not be used by children Keep the appliance and its cord out of reach of children 6 Turn the appliance OFF 0 then unplug from the outlet when not in use before assembling or disassembling parts and before cleaning To unplug grasp the plug and pull fro...

Page 4: ...production of food SAVE THESE INSTRUCTIONS Electrical Shock Hazard Plug into an earthed outlet Do not remove earth prong Do not use an adapter Do not use an extension cord Failure to follow these instructions can result in death fire or electrical shock ELECTRICAL REQUIREMENTS Voltage 220 240 V Frequency 50 60 Hz Wattage 325 W Recommended operating time 1 30 minutes with a duty cycle of 10 min ON ...

Page 5: ...e accompanying documentation indicates that it should not be treated as domestic waste but must be taken to an appropriate collection centre for the recycling of electrical and electronic equipment Disposal must be carried out in accordance with local environmental regulations for waste disposal For more detailed information about treatment recovery and recycling of this product please contact you...

Page 6: ...18 EN 61000 3 2 2019 IEC 61000 3 3 2013 A1 2017 EN 61000 3 3 2013 EN 55014 1 2006 A1 1009 A2 2011 EN 55014 2 2015 EN 50564 2011 The object of the declaration described above is in conformity with the relevant Union harmonization legislation 2014 35 EU Low Voltage Directive 2014 30 EU Electromagnetic Compatibility Directive 2011 65 EU ROHS II European Directive 2015 863 EU Commission delegated Dire...

Page 7: ... rotor slicer shredder pasta roller and fruit vegetable strainer 6 Stainless Steel Flat Beater 11 Wire Stainless Steel Elliptical Whip Beating Creaming For medium fast beating creaming or whipping Use to finish mixing cake doughnut and other batters High speed for cake mixes 8 10 11 Wire Stainless Steel Elliptical Whip Fast beating Whipping For whipping cream egg whites and boiled frostings For wh...

Page 8: ... always be in the raised position when mixing 5 IMPORTANT If the Bowl is not securely snapped into place it will be unstable and wobble during use To attach the Bowl Fit the Bowl Supports over Locating Pins and press down on back of the Bowl until Bowl Pin snaps into spring latch 3 Spring latch Locating pin Pin Place Bowl Lift Lever in down position 2 CAPACITY CHART 6 9 L Bowl All purpose flour 2 ...

Page 9: ...Bowl Guard Make sure that the guard is returned to the down position before beginning to use the Stand Mixer The Stand Mixer will not run if the Bowl Guard is not in the proper position Place the Pouring Chute Attach the pouring shield to the front of Bowl Guard It provides a convenient way to add ingredients to the Stand Mixer Bowl Available with select models only and available as an accessory p...

Page 10: ...ailure to follow these instructions can result in death fire or electrical shock 2 4 6 8 10 RESET OFF 0 STIR Plug it into an earthed outlet Start with lower speed to avoid splashing and increase it gradually Refer to the Speed Control Guide 1 Do not scrape the Bowl while operating Scraping the Bowl once or twice during mixing is usually sufficient 2 ...

Page 11: ... up hinge Attachment Hub cover to open 2 Insert attachment into Attachment Hub making certain that attachment power shaft fits into the square Attachment Hub socket 3 Tighten the Attachment Knob by turning it clockwise until the attachment is secured to the Stand Mixer 4 NOTE See the Use and Care Guide of each specific attachment for more details To remove Turn the Stand Mixer to OFF 0 and then un...

Page 12: ...1 Remove the accessory Press accessory upward and turn to the left Pull down the accessory from Beater Shaft 3 Place Bowl Lift Lever in down position 2 CARE AND CLEANING 2 4 6 8 10 RESET OFF 0 STIR Turn the Stand Mixer to OFF 0 and then unplug 1 Wipe the Stand Mixer body with a soft damp cloth 2 IMPORTANT Do not immerse the Stand Mixer body in water or other liquids The appliance is not to be clea...

Page 13: ...Mixer emit a pungent odour This is common with Electric Motors especially when new If the Stainless Steel Flat Beater hits the Bowl Stop the Stand Mixer See the Beater to Bowl Clearance section and adjust the Beater to Bowl Clearance If your Stand Mixer should fail to operate please check the following Is the Stand Mixer plugged in Is the fuse in the circuit to the Stand Mixer in working order If ...

Reviews: