background image

6

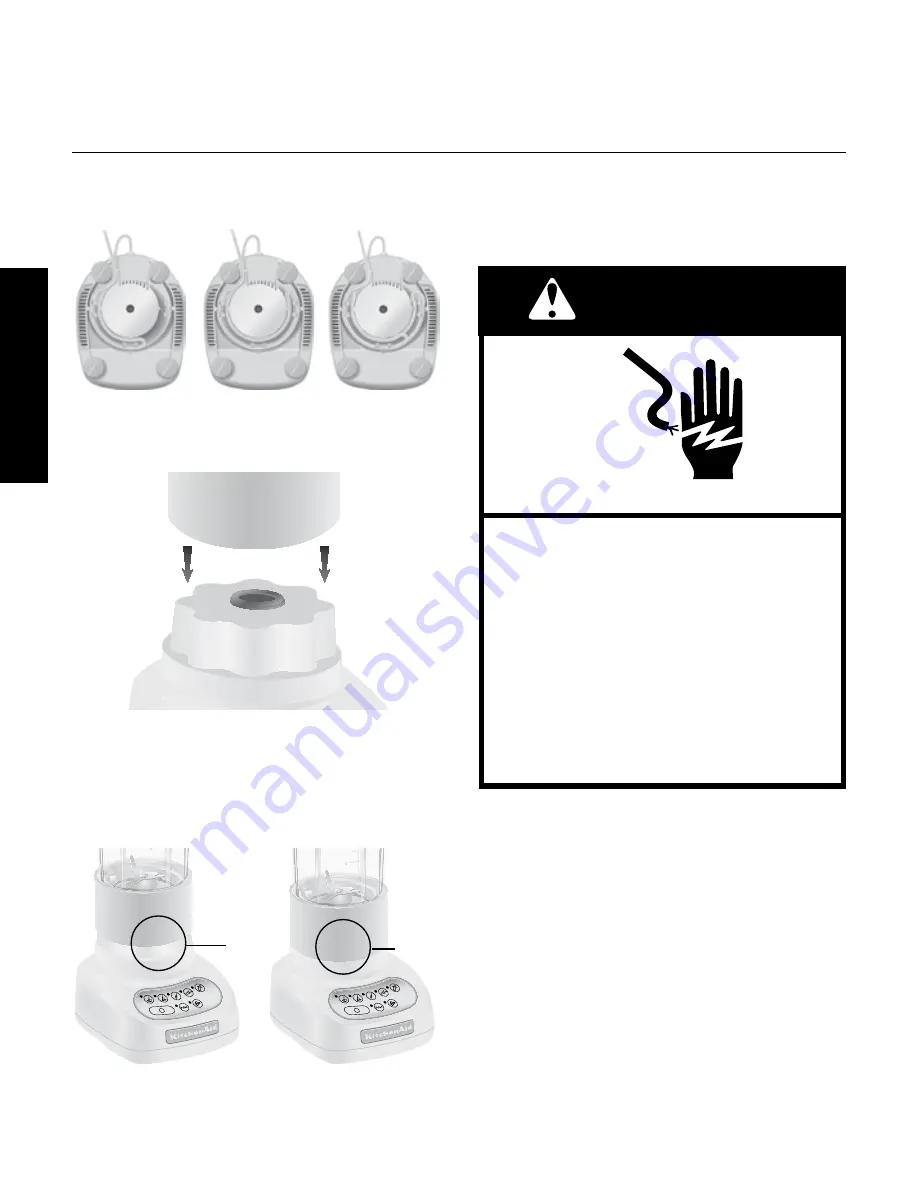
preparing the Culinary Blender Jar for use

5.  Adjust the length of the Blender  

power cord.

6.  Put Culinary Blender Jar assembly 

onto the Blender base.

note:

 When properly positioned, 

Culinary Blender Jar assembly will rest 

completely on Blender base. If not, 

repeat steps 3 and 4.

7.  To attach the Culinary Blender Jar 

lid, twist to lock onto the Culinary 

Blender Jar.

8.  Plug power cord into a grounded 

outlet. Blender is now ready for 

operation.

9.  Before removing the Culinary 

Blender Jar from the base, always 

press “O” and unplug the power 

cord.

Electrical Shock Hazard

Plug into a grounded outlet.
Do not use an adapter.
Do not use an extension cord.
Failure to follow these 

instructions can result in 

death, fire or electrical shock.

Warning

gap

no  

gap

(For “Using the Blender” & “Speed Control Guide” 

information, see: ARTISAN™ BLENDER INSTRUCTIONS 

booklet, pages 6, 7, 8 and 9)

English

Summary of Contents for 5KSBCJ

Page 1: ...a Instrucciones Blenderbehållare för matlagning Instruktioner Beholder for kulinarisk blender Bruksanvisning Kulinaarinen tehosekoitinastia Ohjeet Kulinarisk blenderglas Instruktioner Copo Culinário para Liquidificador Instruções Blandarakanna fyrir létta matreiðslu Leiðbeiningar Κανάτα μπλέντερ Οδηγίες Mały Kielich do BLendera Instrukcja Obsługi Чаша блендера Инструкция Кулинарна кана за блендер ...

Page 2: ...is manual and on your appliance Always read and obey all safety messages This is the safety alert symbol This symbol alerts you to potential hazards that can kill or hurt you and others All safety messages will follow the safety alert symbol and either the word DANGER or WARNING These words mean You can be killed or seriously injured if you don t immediately follow instructions You can be killed o...

Page 3: ...ng to reduce the risk of severe injury to persons or damage to the Blender A scraper may be used but must be used only when the Blender is not running 10 Blade assembly is sharp Handle carefully 11 To reduce risk of injury never put locking collar and blade assembly on the base without having the pitcher properly attached 12 Always operate Blender with cover in place 13 The use of attachments incl...

Page 4: ...rable Culinary Blender Jar is useful for small capacity recipes and individual servings Culinary Blender Jar Lid with Drizzle Cap The twist lock lid includes a removable drizzle cap that fits both the Culinary Blender Jar and pitcher lids This versatile cap can be used to drizzle oils or other ingredients while the blender is in operation On the lid the following caution is written CAUTION DO NOT ...

Page 5: ... Align the Culinary Blender Jar tabs with the slots of the locking collar 4 Press down and rotate Culinary Blender Jar clockwise approximately turn through two steps of resistance until two clicks are heard Using the 0 75 L Culinary Blender Jar Before using your Culinary Blender Jar for the first time wash the Culinary Blender Jar lid and drizzle cap in warm sudsy water see Care and Cleaning page ...

Page 6: ... onto the Culinary Blender Jar 8 Plug power cord into a grounded outlet Blender is now ready for operation 9 Before removing the Culinary Blender Jar from the base always press O and unplug the power cord Electrical Shock Hazard Plug into a grounded outlet Do not use an adapter Do not use an extension cord Failure to follow these instructions can result in death fire or electrical shock WARNING Ga...

Page 7: ...lt processing carrots evenly fine chopped result humus using 130 g drained chickpeas very good result mayonnaise 2 large eggs 150 200 ml very consistent thick result olive oil best result by adding vinegar salt and pepper once mixture has thickened herbs such as 25 g of parsley coarsely chopped result peanut butter 100 g cashew nuts fine ground result almond nuts 50 g or 150 g ground to very fine ...

Page 8: ...ts with soapy water Rinse and wipe dry NOTE Hand wash the lid the drizzle cap locking collar and blade assembly and sealing ring these items may be damaged in the dishwasher The Culinary Blender Jar can be placed in the bottom rack of an automatic dishwasher To Clean Without Disassembly Put the Culinary Blender Jar on the Blender base fill half full with warm not hot water and add 1 or 2 drops of ...

Page 9: ... KitchenAid Service Center KitchenAid Will Not Pay For A Repairs when Culinary Blender Jar is used for operations other than normal household food preparation B Damage resulting from accident alterations misuse abuse or installation operation not in accordance with local electrical codes KITCHENAID DOES NOT ASSUME ANY RESPONSIBILITY FOR INDIRECT DAMAGES Household KitchenAid 0 75 L Culinary Blender...

Page 10: ...www KitchenAid co uk www KitchenAid com Service Centers All service should be handled locally by an Authorized KitchenAid Service Center Contact the dealer from whom the unit was purchased to obtain the name of the nearest Authorized KitchenAid Service Center In the U K Call 0845 6011 287 In Ireland M X ELECTRIC Service Department 25 Alymer Crescent Kilcock CO KILDARE Call 1 87 2581574 Fax 1 628 4...

Page 11: ...11 English ...

Page 12: ...12 Registered Trademark of KitchenAid U S A Trademark of KitchenAid U S A 2011 All rights reserved Specifications subject to change without notice 7160dZw0111 W10388541A English ...

Reviews: