4
5
OPERATING INSTRUCTIONS
MAINTENANCE
Charging
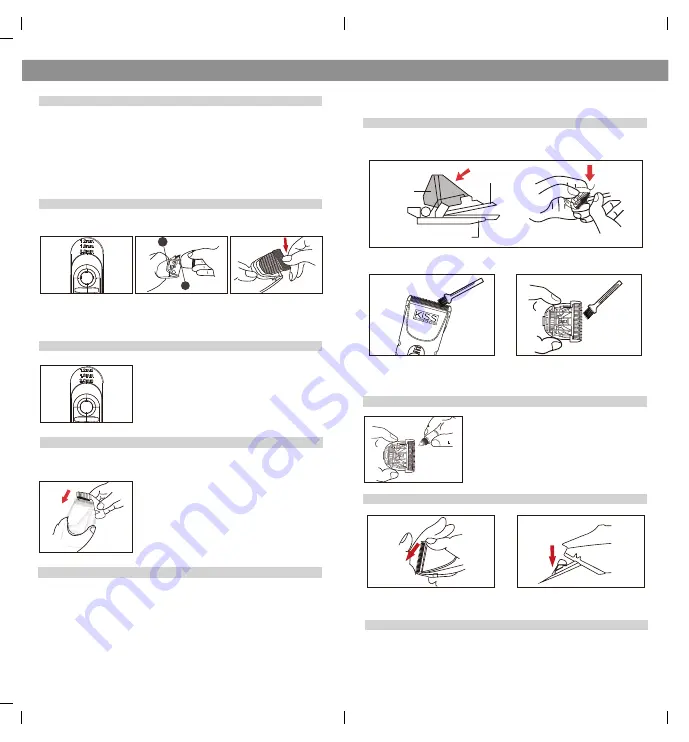
Install the Blade
Removing and Cleaning the Blade
Lubricating the Blade
Remove the Blade
Cleaning the Main Body and Accessories
Blade Adjustment
Comb Attachments
Cord Operation
A
B
1. Push up blade length
adjustor until 2.0mm before
installing the blade.
1. The blade length adjuster is on the clipper.
2. Select the desired length of the blade by moving
the adjustment slide.
1. The cutting length is marked on the comb
attachments.
2. Select a suitable size and slide the blade into the
comb attachment. Hold both sides of the comb and
push until the comb is in position.
(Notes: The comb should not be loose or easy to fall off
after installation.)
2. Align the blade (B) with
the hair clipper’s slot (A).
3. Push the blade into
the slot until it snaps in
position.
2. Brush off the collected residual hair from between the teeth and the blade housing.
3. Move the oscillating bracket with your thumb to separate stored hair from the
blades. Brush off the hair between the blades. Make sure that hair is not trapped
between the blades.
1. Remove the blade set from the blade housing by pressing the top cutting head
with your thumb.
1. When the power percentage is less than 5%, switch off the clipper to charge.
2. Connect the charging cord to the charging slot at one end of clipper.
3. Confirm that the switch is off and insert the plug.
5. It will automatically stop after a full charge.
6. A full charging takes an estimated 3 hours. The battery function will be at full
capacity after three charges.
Recharging time: 3 hours
You may adjust the cutting length from 3 - 12mm by attaching the comb attachment.
This trimmer can be operated by plugging it into the power source when the battery
is not fully charged.
1. Switch off.
2. Connect the adapter to the wall socket.
3. Connect the DC plug to the clipper.
4. Check if the charging indicator is lit.
5. Switch “On” to operate.
Always switch off before removing, replacing and cleaning the blade.
Set blade adjuster to 2.0mm to reassemble blade; otherwise the adjuster does not work.
1. Before or after use, drop a small amount of
oil on the red-point places shown in the left
picture.
2. Drop oil and spread evenly. Slightly move the
oscillating part to spread the oil between the
blades.
1. Switch off and unplug the trimmer before cleaning
.
2. Wipe with a soft damp cloth.
3. Allow it to completely air dry before use.
Please hold with the other hand to
avoid the blade falling off.
Press the moving part of the blade with
the thumb and then remove the blade.
Feed tool
Post
Moving blade
Fixed blade
Select a blade with a suitable size before operation.


