background image

15

16


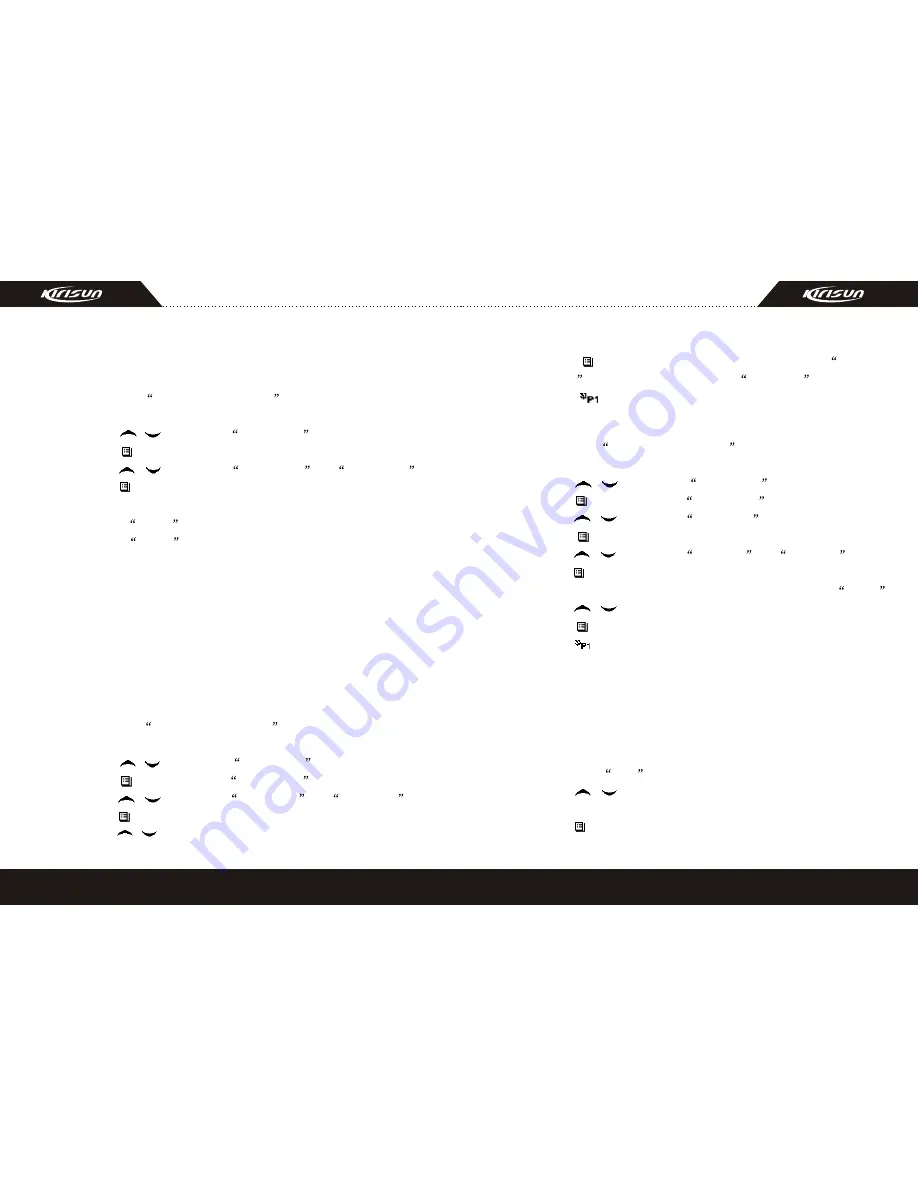
       During sweep, the red indicator will flicker. When the scan is

       landed on, the indicator will stop flickering.

       1.Enter the scan state through menu mode.  

          A.Press the 

Menu Selection/Enter

 button to enter the 

             menu mode.

          B.Press      /      button until 

SYS SCAN

.

          C.Press      button for selection.

          D.Press      /      button until 

SCAN ON?

 or 

SCAN OF?


          E.Press      button for select.

       2.Use the scan button.

           A.Press 

SCAN

 button to activate the scan function. 

           B.Press 

SCAN

 button again to disable the scan function.

9.2  Nuisance Delete   

       If a channel continuously generates noise or interference, press 

the  button to remove this channel from the scan list temporarily. 

Note: the priority channel can't be removed and the last one in the 

scan list, either.  

9.3    Edit Scan List 

9.3.1 Add or Delete the Channels in the Scan List    

         A.Press the 

Menu Selection/Enter

 button to enter the menu 

            mode.

         B.Press      /       button until 

PROG LST

.

         C.Press      button to select 

SCAN LIST

.

         D.Press      /      button until 

ADD LST?

 or 

DEL LST?

         E.Press      button for selection.

         F.Press      /      button until the channel you want to add or


9.3.2 Set Priority Channel  

         1.Press the 

Menu Selection/Enter

 button to enter the menu 

            mode.

         2.Press      /       button until 

PROG LST

.

         3.Press      button to select 

SCAN LIST

.


            delete.

         G.Press      button to complete operation you will s ee

CHN 

            SAVE  (If you added a channel)or

CHN DEL

         H.Press       button to return to the previous operation.

4.Press      /      button until 

ED PRIO?

.

5.Press      button for selection.

6.Press      /      button until 

PRIO#1?

 or 

PRIO#2?

.

7.Press    button to select the type of the required priority channel.

   For example, in Step 7, the type of priority channel is 

DES?

   Press      /      button to select the required priority channel. 

8.Press      button to complete operation.

9.Press      button to return to the previous operation.

10.  OST

         In a certain specific channel, you can revise the CTCSS/DCS 

         encode/decode setup of current channel. 

         The operating steps go as follows:  

          A.Press the  OST  button to enter the OST menu mode. 

         B.Press      /      button until the CTCSS/DCS encode/decode you

            want.  

         C.Press      button to select .

Summary of Contents for PT8200

Page 1: ...PT8200 INSTRUCTION MANUAL FM MOBILE TRANSCEIVER MOBILE RADIO ...

Page 2: ...nas used for this transmitter must not exceed an antenna gain of 3 dB The FCC Federal Communications Commission has adopted a safety standard for human exposure to RF energy which is below the OSHA Occupational Safety and Health Act limits Antenna mounting The antenna supplied by the manu facturer or radio dealer must not be mounted at a location such that during radio transmission any person can ...

Page 3: ...etal roof or trunk lid if the minim um safe distance is observed Antenna substitution Don t substitute any antenna for the one supplied or recommended by the manufacturer or radio dealer You may be exposing person s toexcess ive radio frequency radiation You may contact your radio dealer or the manufacturer for further instructions Maintain a separation distance from the antenna to person s at lea...

Page 4: ...6 Zone 12 7 13 8 13 9 15 9 1 15 9 2 Nuisance Delete 15 9 3 16 10 OST 17 11 17 12 18 13 19 14 21 Package opened Inspection and Installing Radio Overview Basic Operation Programmable Button Function Radio Call Selective Call Call Alert Talkaround Utilities Scan Start End Scan Function Edit Scan List GPS Information View Wired Clone Mode Trouble Shooting Guide Major Specifications CONTENTS ...

Page 5: ...lating board and lead from the car into the car engine Connect the red conductor to the positive terminal of the accumulator and the black conductor to the negative terminal At last ring the remained conductor and fix it Note Please maintain the sufficient relaxation of the power cable to make it convenient to dismantle the radio in the state of power connection Radio Installing Warning For passen...

Page 6: ...crews The microphone and its cable sho uld be fixed at the position not affecting safe driving Connect the microphone to the microphone jack on the front panel of the radio and put it on the hanger 3 button programmable button 4 LCD display screen For details see LCD Display 5 Volume Control knob To be used to adjust volume 6 Microphone Programming Interface 7 button programmable button 8 button p...

Page 7: ... then adjust the volume by turning the volume control knob 3 Channel The radio can provide 128 conventional channels There are totally 16 groups and each has at most 16 channels Press the CHANNEL UP or CHANNEL DOWN button to select the channel Press the ZONE UP or ZONE DOWN button to select the group you require 4 Transmission To send a call press the PTT button and speak to the microphone in the ...

Page 8: ...ween locking unlockingyour radio keypad 12 Scan Start end the scanning function of system 13 Nuisance Delete 14 Voice Companding 15 Public Address 16 Scrambler Enable or Disable voice scrambler function 17 Home Channel 18 Talkaround 19 VOX Selection 20 Monitor momentary Call Cancel When one channel continually generated unwanted noise this allow you temporary remove the channel from the current ac...

Page 9: ...on 4 30 Menu Select Enter 31 Horn Alert 32 Tenancy 33 Lone worker 34 Scan List Edit Press this button to open squelch press it again to returm to normal operation Press the button in the selective call state to quit such a state Enables the emergeney mode Press this button and to enter the fast menu mode of Radio Call For detailed operation see Menu Operation To enter the menu mode or make menu se...

Page 10: ...o enter the menu mode B Press button until RADIOCAL C Press button to select CALL ALT D Press button until the required call list is showed 6 Select Zone According to the setup of the communication network the radio can be distributed to different zones Select the proper zone to realize communicating with the radio from a different zone 1 Select the zone through menu A Press the Menu Selection Ent...

Page 11: ...n display SOFT VER SQL 0 9 Change the squelch level of the radio PWR LOW PWR MID PWR HI Select transmission power among high medium and low levels VOX 0 9 Change the VOX level of the radio BLED OFF BLED ON BL AUTO Select among such modes of backlight as turnoff normal turn on or auto Eg R01 00 Show the software version B Press button until RPTRTALK C Press button for selection D Press button until...

Page 12: ...to select SCAN LIST D Press button until ADD LST or DEL LST E Press button for selection F Press button until the channel you want to add or 9 3 2 Set Priority Channel 1 Press the Menu Selection Enter button to enter the menu mode 2 Press button until PROG LST 3 Press button to select SCAN LIST delete G Press button to complete operation you will see CHN SAVE If you added a channel or CHN DEL H Pr...

Page 13: ... after entering the wired clone mode To return to normal user mode the user needs to restart the machine The operating steps go as follows 1 Press P1 and P2 buttons for power on until show CLONE for two seconds and enter the clone mode If the function is disabled it will enter the user mode 2 Connect the slave radio with the wired clone cable first and then turn on 12 Wired Clone Mode 3 Press the ...

Page 14: ... change the IC 2 Phase lock loop unlocked Beeping A The crystal X1 of phase lock loop is broken Please change it B The oscillator tube is broken Please change it A The antenna is not in good contact Please fasten the antenna head B The high frequency amplifying tube Q26 is broken Please change it C The squelch level is set to high Please reset the squelch level D The mixed tube Q21 is broken Pleas...

Page 15: ...t complies with the essential requirements of the Radio and Telecommunication Terminal Equipment Directive 1999 5 EC and that any applicable Essential Test Suits measurement has been performed Description of equipment FM Handheld Transceiver Model No PT8200 This compliance is based on conformity with the following harmonised standards or documents DECLARATION OF CONFORMITY 0678 WenLiang Fu General...

Reviews: