background image

PT6500 User’s Manual


Page 30 of 30 

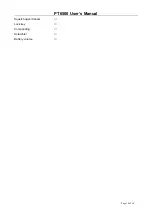
Squelch open/Cancel 

Lock key 

Companding 

Scrambler 

Battery volume 


Summary of Contents for PT6500

Page 1: ...enna Getting acquainted Basic Operation Programmable Button functions VOX Copy mode Whole setting Time out Timer TOT Battery Saving Low battery warning Voice Annunciation of Channel Number CTCSS DCS User s resolution Busy Channel Lockout BCL Receiving squelch mode DTMF signaling 2TONE signaling Transmit start over signaling PTT ID Problems and troubleshooting Major Specifications Status setting ...

Page 2: ...g PT6500 02 is a a occupational equipment And it operate with a duty factor not exceeding 50 The EUT cannot worn on the body The us version of this transmitter operates solely on us frequencies The user is not able to select on non us frequencies ...

Page 3: ...ial If any items are missing or have been damaged during shipment please contact the dealer immediately Supplied accessories Item Quantity Antenna 1 Battery 1 Charger 1 Power adapter 1 Hand strap 1 User s Manual 1 Preparation Charging the battery Connect the power adapter with the battery charger Plug the adapter into an AC wall outlet and the indicator turns green Power adapter Battery Charger ...

Page 4: ...ture or the circuit is abnormal Do not charge the battery at this moment just remove the battery and turn off the power of the charger Notes The battery is not fully charged in the factory Before the initial use please charge the new battery The KB 36A Ni MH battery KB 36C Li ion battery of this company is adaptable with this machine When you charge the battery the first time or after long time st...

Page 5: ...ling Removing the battery pack To install the battery pack Match the 3 bulges of the battery pack with the corresponding holes at the rear Button of the transceiver To install the battery pack Then firmly press the battery pack downwards to lock it in place until a click is heard To remove the battery pack Use your thumb to press the belt clip and one side of your index finger to press the release...

Page 6: ...rcuit or throw the battery to the fire Do not disassemble the battery by your self Installing the antenna Screw the antenna into the connector at the top of the transceiver by holding the Button of the antenna and turn it clockwise until secure Getting acquainted ...

Page 7: ...me after turning on the radio C Channel Selector Rotate to select the channel 1 128 D Antenna E Top Button programmable button It is recommended to be set as the emergency warning Button F Side button 1 programmable button G PTT PUSH TO TALK To make a call press and hold the PTT button then speak into the microphone with normal voice H Side button 2 programmable button I Button Return and delete b...

Page 8: ... and you will hear a beep if the dealer has set it 2 Adjust Volume Press the button preset as canceling squelch to listen to the background noise and rotate the Power Volume switch to adjust volume Icon Description Signal intensity SVC Compandor Disturbance Frequency Busy channel lockout Scanning Key lockout Signal reminder is programmed Battery volume flashes when the battery power goes too low ...

Page 9: ...hown in the above right figure Zone 1 is the zone of current channel 8 zones from 0 to 7 H is the transmit power of the channel H stands for high power M for middle power while L for low power CHANNEL 1 is the current channel 128 zones from 1 to 128 4 Make a Call To make a call press PTT and speak in normal voice and please keep your mouth 3 4 cm away from the microphone ...

Page 10: ...the menu or confirm any contents press button to return to the previous menu or cancel the set When entered the menu select the sub menu with the channel selector or The menu is as follows 菜单 Utilities 应用选项 Phone 电话 Rptr Talkarnd 脱网 Speak mode 喇叭模式 Zone Edit 区编辑 Call 联系列表 Ch Edit 信道编辑 Scan 扫描 Back Light 背景灯 Squelch Levevl 静噪等级 Key tone 按键音 Scrambler 扰频 Power Level 功率水平 Companding 压缩扩展 Save 省电 Rx F...

Page 11: ...r that way you have to set in PC communications Set back light 1 As shown in CH 1 press utilities is shown 2 Press to enter select mode 3 Press and Back Light is shown 4 Press to select On or Off 5 Select On or Off with press to confirm Set the squelch level 1 As shown in CH 1 press utilities is shown 2 Press to enter select mode 3 Press then Squelch Level is shown 4 Press to select squelch level ...

Page 12: ...ss to confirm Set Companding 1 As shown in CH 1 press utilities is shown 2 Press to enter select mode 3 Press and Companding is shown 4 Press to select Companding 5 Select On or Off by press to confirm Set saving 1 As shown in CH 1 press utilities is shown 2 Press to enter select mode 3 Press and Save is shown 4 Press to select Save 1 4 5 Chang the save percentage with press to confirm Set scrambl...

Page 13: ...ress and Key Tone is shown 4 Press to select Off or On 5 Select On or Off with press to confirm Set Rptr Talkarnd 1 As shown in CH 1 press to enter select mode 2 Press and Rptr Talkarnd is shown 3 Press to select the mode 4 Select Repeater Mode or Talkarnd mode with press to confirm Set speak On mode 1 As shown in CH 1 press to enter select mode 2 Press and Speak Mode is shown 3 Press to select th...

Page 14: ... is shown 3 Press to select the call list 4 Select with press PTT to transmit Set Rx FRQ 1 As shown in CH 1 press to enter select mode 2 Press and Ch Edit is shown 3 Press to select 4 Press is shown enter the set of Rx FRQ 5 Set the Rx FRQ value with the keypad 6 Press to delete and press to confirm Set Tx FRQ 1 As shown in CH 1 press to enter select mode 2 Press and Ch Edit is shown 3 Press to se...

Page 15: ...x CTCSS DCS FRQ 5 Set the Rx FRQ value with the keypad 6 Press to delete and press to confirm 7 stands for the radix point press to convert among CTCSS DCS and reverse DCS Set Tx CTCSS DCS 1 As shown in CH 1 press to enter select mode 2 Press and Ch Edit is shown 3 Press to select 4 Press is shown enter the set of Tx CTCSS DCS FRQ 5 Set the Tx FRQ value with the keypad 6 Press to delete and press ...

Page 16: ...nob 6 Key in the address code of the person you are calling 7 Press to transmit the current contact list Set status 1 As shown in CH 1 press to enter select mode 2 Press and status is shown 3 Press to select 4 Select the needed status with 5 Check the alias or address code of the status by turning the knob 6 Press to select the current status Programmable Button functions The dealer can program th...

Page 17: ... the dealer None Set of None Scan Press the button set as Scan to start scanning When carrier wave scan is enabled While in scanning the radio checks every channel any channel in any zone and stops on the channel on which a signal is detected until that signal disappears If the delay time between signal disappearing and continuing scanning has been preset the radio will remain on that channel Only...

Page 18: ...o start personal working 2 Press once again to quit Notes the separate working is connected with the automotive checking in the programming software and will be effective when both are set Contact list Enter the Contact list quickly It can be set as short key contact list long key off 1 Press the programmable key once to enter the contact list Call 2 Press again to enter the content interface of t...

Page 19: ...ong key off 1 Press the programmable key once will be shown 2 Select the character you need with e g 3 Press to confirm Key lock Press the key programmed as key lock for one second to lock unlock the keys for the transceiver It can be set as short key key lock long key off 1 Press the programmable key once will be shown 2 Press it again will be shown Squelch level Selector Enter the Select squelch...

Page 20: ...de by pressing it again will be shown Scrambler Press the key programmed as scrambler to prevent any third party to hear you talking on the phone It can be set as short key scrambler long key off 1 Press the programmable key once to open the scrambler mode will be shown 2 Cancel the mode by pressing it again will be shown Battery volume checking Display the battery power It can be set as short key...

Page 21: ...r what the signal or carrier wave is including optional signal squelch will be cancelled It can be set as short key cancel squelch long key off 1 Press the programmable key once to start squelch constantly 2 If you do not press it the squelch will still work Emergency Alert If press the top key programmed as Emergency Alert you can set the warning ring according to the programming software or send...

Page 22: ...nnel 1 long key off 1 Press the key once to instantaneously select the channel e g CHANN 15 2 Press again to return Call 1 2 3 or 4 Press the side button programmed as Call 1 2 3 or 4 to transmit the specified code stored in the contact list Release Call button and speak to the microphone to call with the PTT button still pressed It can be set as short key Call 1 long key off 1 Press the key once ...

Page 23: ... key once Zone No will be shown 2 Select zone No with 3 Press to confirm It can be set as short key channel lock long key off 1 Press the key once to perform channel lock then you can not choose the channel will be shown 2 Press it again to cancel channel lock will be shown VOX VOX function enables you to use the radio without manual operations This function can only be set by the dealer and you h...

Page 24: ...time has gone beyond the limit TOT reset The time delay from releasing the PTT key to the resetting of the timer is limited The countdown will go on if the time after releasing the PTT key is shorter than the reset time Battery Saving The dealer can set the type of this function by programming If the battery saving function is on 10 seconds after the radio hasn t receive any signals or no operatio...

Page 25: ...ll be locked if there is any Carrier wave Carrier wave CTCSS DCS transmitting is permitted if there are matched CTCSS DCS in the channel Receiving squelch mode The dealer may set the condition under which to turn on the speakers 1 CTCSS DCS and audio squelch only when the CTCSS DCS and optional signaling are patchable 2 Audio squelch once the optional signaling is matchable 3 CTCSS DCS squelch whe...

Page 26: ... to maintain or disconnect some repeaters or phone system Transmit start is used to connect routine repeaters and auxiliary facilities If the ID transmitted is matchable with that of the repeaters the repeaters and auxiliary facilities are available Transmit over is used to disconnect routine repeaters and auxiliary facilities If the ID transmitted is matchable with that of the repeaters the repea...

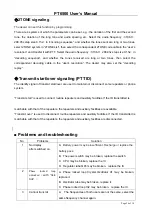
Page 27: ...icrophone if it is broken C Operational Amplifier IC14 may be broken replace it 6 Receiving green light is on but no voice is heard A Replace the speaker if it is broken B Audio power amplifier IC9 may be broken replace it C Switch Tube Q48 may be broken replace it D Operational Amplifier IC6 may be broken replace it 7 Abnormal programming A Make sure the wires are well connected B Abnormal output...

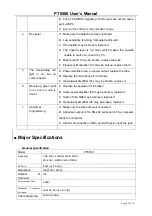
Page 28: ... 5 5 90 period Dimensions 56X120X35mm Weight 413 with battery and antenna Status setting by the dealer Model ___________ Serial No _____________ a Channel setting Channel No Receiving frequency Transmitting frequency CTCSS DCS decoding CTCSS DCS encoding Power Band width Scannin g BCL 1 2 3 4 5 6 7 8 9 10 11 12 13 14 15 16 17 18 128 b Optional function 2 1 Time out timer T OT 15 600 s 2 2 Squelch ...

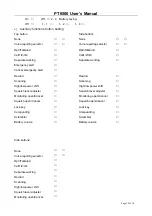
Page 29: ...ter Monitoring open Cancel Squelch open Cancel Lock key Companding Scrambler Battery volume Side button1 None Voice reporting selector Rptr Talkarnd Call1 2 3 4 Separate working Rewind Scanning High low power shift Squelch level adjuster Monitoring open Cancel Squelch open Cancel Lock key Companding Scrambler Battery volume Side button2 None Voice reporting selector Rptr Talkarnd Call1 2 3 4 Separ...

Page 30: ...PT6500 User s Manual Page 30 of 30 Squelch open Cancel Lock key Companding Scrambler Battery volume ...

Reviews: