INSTALLING MEASURING TAPE ON GUIDE TUBE
Caution! Only proceed with the following step once the rip fence system has been
adjusted and that the fence is set perfectly parallel with the saw blade. See
“Adjusting Rip Fence” section on the previous page for instructions.
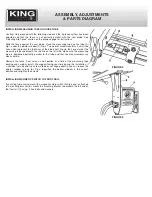
Slide the fence against the saw blade. Place the measuring tape on the tube (A)
Fig.1 under the pointer window (A) Fig.4. The pointer window contains 2 small red
lines which represent the thickness of the blade kerf, line up the zero mark of the
measuring tape underneath the red line on the left side. Make sure the measuring
tape is positioned perfectly parallel to the tube and that the measurements are
clearly visible.
Remove the fence. Peel away a small portion at a time of the measuring tape
backing and carefully install. We suggest taking your time during this installation, if
a mistake is made and the zero mark does not align perfectly, you can loosen the
pointer window screws (B) Fig.4, reposition the pointer window in the correct
position and retighten the screws.
INSTALLING MAGNETIC SWITCH TO FRONT RAIL
If your King table saw comes with a magnetic safety switch (A) Fig.5 and is attached
to a mounting bracket (B), mount the mounting bracket underneath the left end of
the front rail (C) using 2 hex. bolts and washers.
ASSEMBLY, ADJUSTMENTS
& PARTS DIAGRAM
FIGURE 4
FIGURE 5

