ASSEMBLY & ADJUSTMENTS
CHECKING WORK TABLE PARALLEL TO CUTTERHEAD
The work table is set parallel to the cutterhead at the factory and no further
adjustment should be necessary. If your planer is planing a taper, first
check to see if the knives are set properly in the cutterhead, proceed as
follows;
1. Disconnect the planer from the power source.
2. Place the gauge block (A) Fig.17 on the work table directly under the
front edge of the head casting (B), make slight contact by gently raising
the table as shown in Fig.17.
3. Move the gauge block (A) to the opposite end of the work table as shown
in Fig.18.
IMPORTANT: The distance from the work table to the edge of the head
casting should be the same.
4. Adjust opposite end in the same manner.
ADJUSTING WORK TABLE PARALLEL TO CUTTERHEAD
If the work table is not parallel to the cutterhead, peform the following
adjustments;
1. Disconnect the planer from the power source.
2. Tilt planer on its side to expose the underside of the base as shown in
Fig. 19.
3. Remove cap screw (A) and loosen cap screw (B) Fig.19, these two
cap screws will allow you to move the idler sprocket assembly (C) far
enough to release tension on the chain as shown in Fig.20.
4. Remove chain from the sprocket from the corner which needs
adjusting. Fig.20 shows the chain removed from the sprocket (D).
5. Turn sprocket (D) by hand to bring that corner into adjustement with
the other three corners.
IMPORTANT NOTE: Turning sprocket (D) clockwise will increase the
distance between the work table and the head casting, counter-
clockwise will decrease the distance. This adjustment is very
sensitive and it should not be necessary to turn the sprocket more
than one or two teeth.
KNOWING THE TRANSMITTING ROLLERS OF YOUR PLANER
A. Infeed roller
B. Outfeed roller
C. Chipbreaker
D. Cutterhead
E. Pressure bar
F. Anti-kickback fingers
The infeed roller and outfeed roller feed the stock while it is being planed.
Both these rollers are under spring tension and this tension must be
sufficient to feed the stock uniformly through the planer without slipping but
shouldn’t be too tight that it causes damage to the workpiece. The tension
should be equal at both ends of each roller
.
FIGURE 17
FIGURE 18
FIGURE 19
FIGURE 20
FIGURE 21
ASSEMBLY & ADJUSTMENTS
ADJUSTING INFEED AND OUTFEED ROLLER SPRING TENSION
To adjust the spring tension of the infeed and outfeed roller, using a hex.
key, turn set screw (A) Fig.22 to adjust the infeed roller spring tension and
set screw (B) to adjust the outfeed roller spring tension. Make sure that
both sides are adjusted evenly or else you will get uneven feeding of stock.
ANTI-KICKBACK FINGERS
Anti-kickback fingers (F) Fig.23 are provided for your safety to prevent
workpiece kickbacks. These fingers operate by gravity and it is necessary
to inspect them occasionally to make sure they are free of gum and pitch
so that they can move independently and operate correctly.
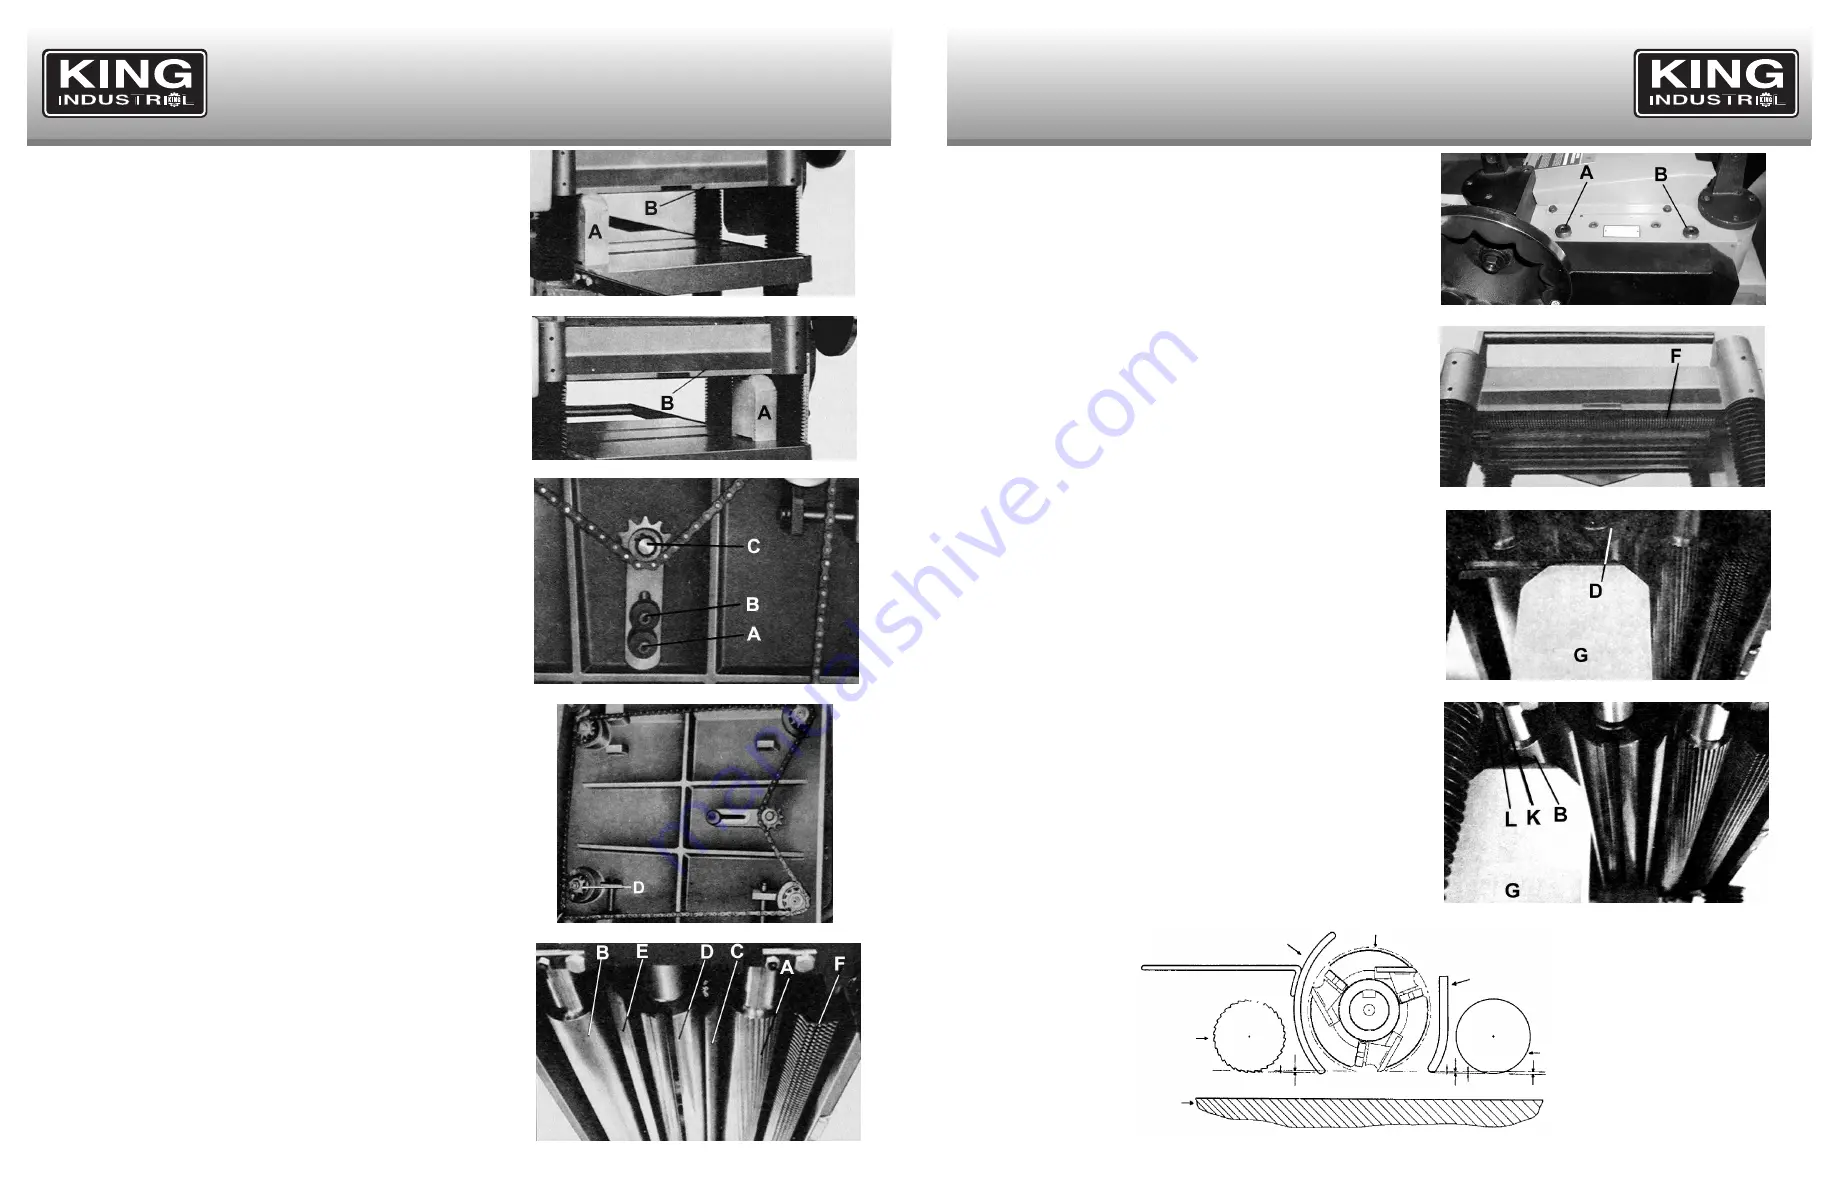
CHECKING AND ADJUSTING THE HEIGHT OF INFEED ROLLER,
CHIPBREAKER, PRESSURE BAR AND OUTFEED ROLLER
The infeed roller, chipbreaker, pressure bar and outfeed roller are adjusted
at the factory. The infeed roller and the chipbreaker were set at 0.1mm
(0.004”), the pressure bar was set at 0.2mm (0.008”) and the outfeed roller
was set at 0.5mm (0.02”) and all of them below the cutting circle as shown
in Fig.24. If an adjustment to the infeed roller, chipbreaker, pressure bar or
outfeed roller is necessary, follow the next steps;
Example: To check and adjust the outfeed roller 0.5mm (0.02”) below the
cutting circle, proceed as follows;
1. Disconnect planer from power source.
2. Make sure the knives are adjusted properly before attempting the
following adjustment.
3. Place the gauge block (G) on the table directly underneath the
cutterhead, as shown in Fig.25. Using a 0.5mm (0.02”) Feeler gauge (D)
placed on top of the gauge block, raise the work table until the knife just
touches the feeler gauge when the knife is at its lower point. Do not move
the work table any further until the outfeed roller is adjusted.
4. Move the gauge block (G) under one end of the outfeed roller (B) as
shown in Fig.26. The bottom of the outfeed roller should just touch the
top of the gauge block. If an adjustment to the outfeed roller is necessary,
loosen the lock nut (K) Fig.26 and turn screw (L) until the outfeed roller
just touches the gauge block. Retighten lock nut (K).
5. Check and adjust the opposite end of the outfeed roller in the same
manner.
FIGURE 22
FIGURE 23
FIGURE 25
FIGURE 26
FIGURE 24
Pressure bar
Chipbreaker
Infeed roller
Table
Outfeed roller
Cutterhead
0.1mm (0.004”)
0.2mm (0.008”)
0.5mm (0.02”)


