OPERATION
OPERATING CONTROLS
CONTROL PANEL
1. Raise the saw frame to the up position.
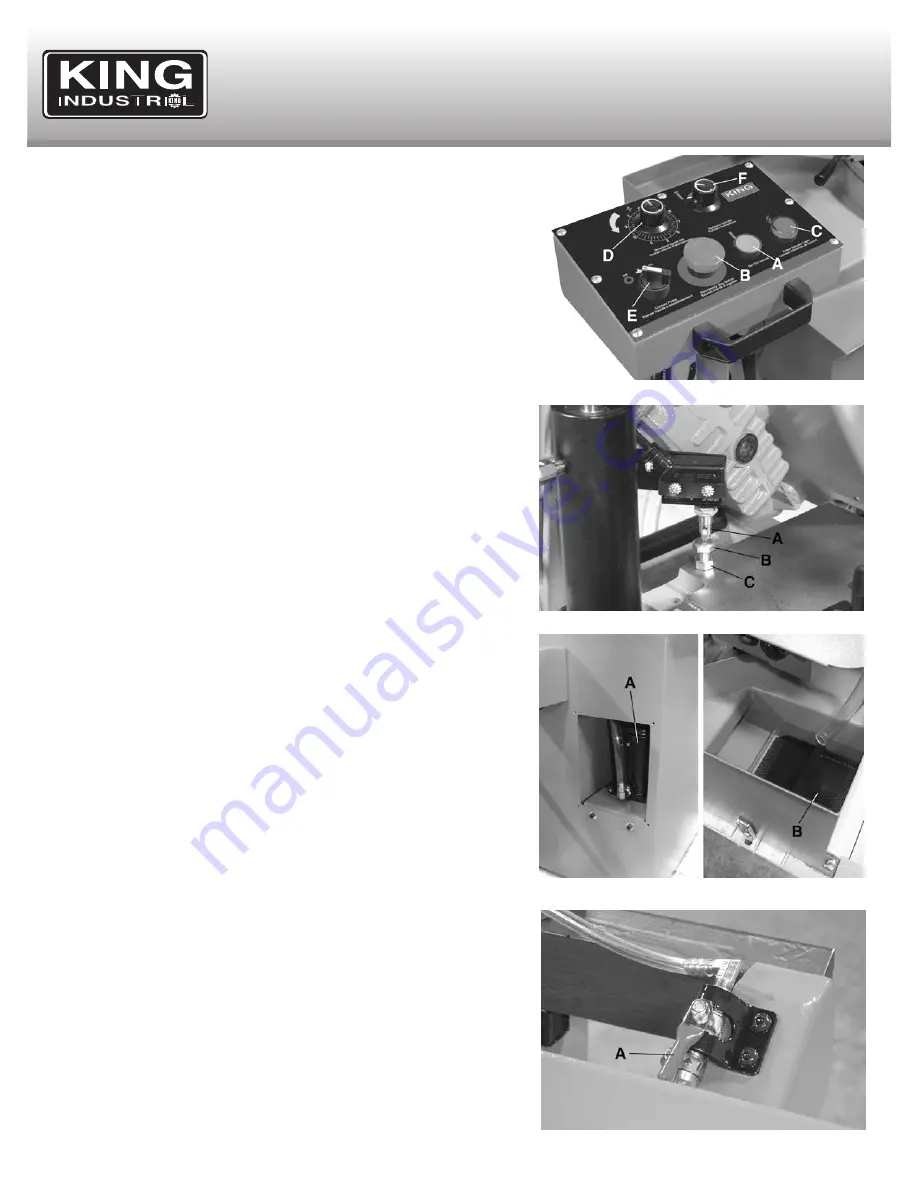
2. The machine is started by pushing the start button (A) Fig.19. The “Power
On” light (C) will turn on. The bandsaw will continue to run until the saw arm
is in the down position at the end of the cut, or when the stop button (B) is
pushed.
3. The down feed speed can be ajusted by setting the feed rate knob (D). If
you need to quickly stop the down feed of the saw arm, turn the hydraulic
shut-off valve knob (F) to the right (red symbol) to stop. To restart the down
feed at the identical feed rate set before, turn the hydraulic shut-off valve
knob (F) to the left (green symbol).
4. To begin the coolant flow of the coolant pump during cutting operations, turn
the coolant knob (E) to the left, to stop the coolant flow turn the coolant
knob to the right.
AUTOMATIC SHUT-OFF LIMIT SWITCH
1. An automatic shut-off limit switch is provided to stop the motor when the cut
is completed. The limit switch (A) Fig.20 comes into contact the top of the
stop bolt (B) shutting off the motor and coolant pump.
2. If the motor stops before the cut is completed, or continues to run after the
cut is completed, the height of the stop bolt (B) can be adjusted to make it
contact earlier or later. Loosen the hex. nut (C), adjust the height of the stop
bolt up or down, and make a test. Once this adjustment is done, retighten
the stop bolt hex. nut.
COOLANT SYSTEM
The bandsaw comes with a built-in coolant pump (A) Fig.21 and coolant fluid
recirculating system. Using coolant during operations will extend the life of
your blades by lowering the temperature of the blade and workpiece during
cuts.
Setting up the coolant system:
An enclosed section of the machine base is used as the coolant fluid reservoir,
it comes with a chip tray (B) Fig.21 to prevent metal chips from entering the
coolant fluid reservoir. Fill the reservoir with approximately 30 litres of your
chosen cutting fluid solution (see your nearest car parts or industrial
machinery dealer for more information) through the chip tray (B).
The rate of coolant flow is controlled by 2 independently operated stop valve
levers (A -one of two) Fig.22, which direct the coolant onto the blade at 2
different areas under each control arm. When doing small cutting operations,
only use one to direct collant flow to the workpiece. If additional coolant flow
is required to cover a larger cutting area, turn on the second stop valve lever
and position the control arms as close to the workpiece as possible.
WARNING!
Clean the screen of the chip tray (B) Fig.21 so coolant can
drain back to the coolant reservoir. .
BIOLOGICAL AND POISON HAZARD!
During storage some fluids grow
dangerous microbes, or due to the collection of toxic metal chips in the fluid,
the fluid can become a potent and extremely poisonous solution to humans
and animals. Use proper personal protection equipment when handling cutting
fluid and follow provincial laws and fluid manufacturer requirements to
properly dispose of coolant fluid.
FIGURE 19
FIGURE 20
FIGURE 21
FIGURE 22


