background image

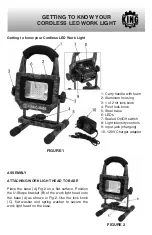
PARTS DIAGRAM & PARTS LISTS


Refer to the Parts section of the King Canada web site for the most updated parts diagram 
and parts list.

CHARGING 

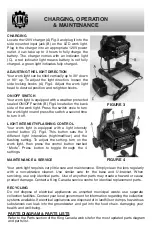
Locate the 120V charger (A) Fig.3 and plug it into the 
side mounted input jack (B) on the LED work light. 
Plug in the charger into an appropriate 120V power 
outlet, it can take up to 3 hours to fully charge the 
battery. The charger comes with an indicator light 
(C), a red indicator light means battery is not fully 
charged, a green light indicates fully charged. 

 
ADJUSTING THE LIGHT DIRECTION


Your work light can be tilted vertically up to 30° down 
or 90° up. To adjust the light direction, loosen the 
side locking knobs (A) Fig.4. Adjust the work light 
head to desired position, and retighten knobs. 
 

ON/OFF SWITCH


Your work light is equipped with a weather protected 
sealed ON/OFF switch (B) Fig.4 located on the back 
side of the work light. Press the switch once to turn 
the work light on and press the switch a second time 
to turn it off.  

 
LIGHT INTENSITY/FLASHING CONTROL


Your work light is equipped with a light intensity    
control button (C) Fig.4. This button sets the 3         
different light intensities (high/med/low) and the 
flashing setting. To adjust the setting, turn on the 
work light, then press the control button marked 
“Mode”. Press button to toggle through the 4          
settings.  
 

MAINTENANCE & SERVICE 


Your work light requires very little care and maintenance. Simply clean the lens regularly 
with a non-abrasive cleaner. Use similar care for the base and U-bracket. When     
servicing, use only identical parts.  Use of any other parts may create a hazard or cause 
product damage. Contact a King Canada service centre for identical replacement parts. 
 

RECYCLING 


Do not dispose of electrical appliances as unsorted municipal waste, use separate     
collection facilities. Contact your local government for information regarding the collection 
systems available. If electrical appliances are disposed of in landfills or dumps, hazardous 
substances can leak into the groundwater and get into the food chain, damaging your 
health and well-being. 

CHARGING, OPERATION 

& MAINTENANCE

FIGURE 3

FIGURE 4

Summary of Contents for KC-1502LED-C

Page 1: ...COPYRIGHT 2021 ALL RIGHTS RESERVED BY KING CANADA TOOLS INC CORDLESS LED WORK LIGHT INSTRUCTION MANUAL MODEL KC 1502LED C ...

Page 2: ...ack of maintenance King Canada shall in no event be liable for death injuries to persons or property or for incidental special or consequential damages arising from the use of our products To take advantage of this limited warranty return the product at your expense together with your dated proof of purchase to an authorized King Canada service center Contact your retailer or visit our web site at...

Page 3: ...refrigerators There is an increased risk of electric shock if your body is earthed or grounded c Do not expose power tools to rain or wet conditions Water entering a power tool will increase the risk of electric shock d Do not abuse the charger cord Never use the cord for carrying pulling or unplugging the power tool Keep cord away from heat oil sharp edges or moving parts Damaged or entangled cor...

Page 4: ...ols sharp and clean Properly maintained cutting tools with sharp cutting edges are less likely to bind and are easier to control g Use the power tool accessories and tool bits etc in accordance with these instructions taking into account the working conditions and the work to be performed Use of the power tool for operations different from those intended could result in a hazardous situation 5 Ser...

Page 5: ...n extension cord with the charger plug charger directly into a 120V AC receptacle 4 Do not use charger if power its cord is damaged replace damaged cord or charger 5 Do not charge battery when work area or the temperature is or below 00C or above 450C 6 Unplug charger when not in use 7 The contents of the battery is slightly acidic do not incinerate the battery it can explode in a fire 8 A small l...

Page 6: ...ition the U Shape bracket B of the work light head onto the base A as shown in Fig 2 Use the lock knob C flat washer and spring washer to secure the work light head on the base FIGURE 2 1 Carry handle with foam 2 Aluminum housing 3 1 of 2 tilt lock knob 4 Pivot lock knob 5 Steel base 6 LEDs 7 Sealed On Off switch 8 Light intensity controls 9 Input jack charging 10 120V Charger adapter ...

Page 7: ...d time to turn it off LIGHT INTENSITY FLASHING CONTROL Your work light is equipped with a light intensity control button C Fig 4 This button sets the 3 different light intensities high med low and the flashing setting To adjust the setting turn on the work light then press the control button marked Mode Press button to toggle through the 4 settings MAINTENANCE SERVICE Your work light requires very...

Reviews: