


PNEUMATIC LEVEL CONTROLLER
PNEUMATIC LEVEL CONTROLLER
MODEL: GEN 3
Installation, Operation & Maintenance Guide
MODEL: GEN 3
Installation, Operation & Maintenance Guide
www.kimray.com
10
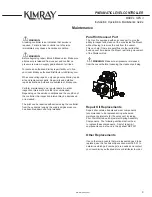
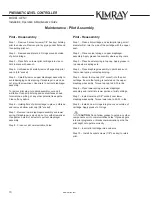
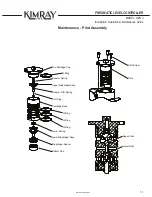
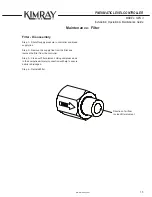
Maintenance - Pilot Assembly
Pilot - Disassembly
Step 1 – Remove 3 socket screws (1/8" hex key) holding
pilot to enclosure. Remove pilot by prying under flats and
then pulling pilot out.
Step 2 – Remove and discard 4 O-rings around outside
of pilot cartridge.
Step 3 – Place flats on lower pilot cartridge into vise or
hold in place with wrench.
Step 4– Unthread and carefully remove flanged top pilot
cap to (3/8" socket).
Step 5 – Carefully remove upper diaphragm assembly to
avoid damaging conical spring. If diaphragm is stuck, do
not pry with screwdriver. Use pliers to pull out diaphragm
assembly.
To remove pilot plug, turn pilot assembly over and it
will fall out. Inspect pilot plug and seat surfaces shown
for scratches, pitting, or any other potential leak paths.
Clean off any debris.
Step 6 – Holding flats of pilot cartridge in place, unthread
and remove bottom pilot cap (3/8" socket).
Step 7 - Remove lower diaphragm assembly and lower
spring. If diaphragm is stuck, do not pry with screwdriver.
Use pliers on stem of actuator to pull out diaphragm
assembly.
Step 8 - Clean out all communication holes.
Pilot - Reassembly
Step 1 – Clean pilot cartridge and install pilot plug, small
diameter first, into the side of the cartridge with the upper
seat.
Step 2 – Place conical spring on upper diaphragm
assembly. Apply grease to assembly where spring rests.
Step 3 – Place booster spring in top cap. Apply grease in
top cap where spring sets.
Step 4 – Place diaphragm assembly in pilot block such
that conical spring contacts pilot plug.
Step 5 – Screw the top cap (3/8" socket) into the pilot
cartridge. Ensure that spring is centered on the upper
diaphragm assembly. Torque top cap to 25-30 in·lbs.
Step 6 – Place lower spring on lower diaphragm
assembly and install into lower portion of pilot cartridge.
Step 7 – Install lower cap (3/8" socket) over lower
diaphragm assembly. Torque lower cap to 25-30 in·lbs.
Step 8 – Install 4 new O-rings into grooves on outside of
cartridge. Apply grease to O-rings.
CAUTION:
Do not allow grease to get on any other
components or into communication holes. If grease gets
into pilot plug/seats, or blocks communication paths, the
pilot might not operate correctly.
Step 9 – Insert pilot cartridge into enclosure.
Step 10 – Install 3 socket screws (1/8" hex key) to retain
pilot.