


19
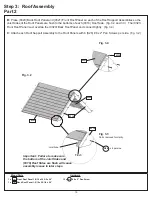
Step 3: Roof Assembly
Part 2
B:
Place (0320) Back Roof Panel and (0321) Front Roof Panel on each of the Roof Support Assemblies so the
Joist Sides of the Roof Panels are flush to the bottoms of each (0316) Roof Side. (fig. 3.2 and 3.3) The (0321)
Front Roof Panel must overlap the (0320) Back Roof Panel and connect tightly. (fig. 3.4)
C:
Attach each Roof Support Assembly to the Roof Panels with 6 (S26) #8 x 2” Pan Screws per side. (fig. 3.2)
Wood Parts
Hardware
12 x
#8 x 2” Pan Screw
1 x
Front Roof Panel 1-5/16 x 36-1/2 x 50”
1 x
Back Roof Panel 1-5/16 x 36-1/4 x 50”
0321
0320
0321
Fig. 3.4
Fig. 3.2
Fig. 3.3
S26
x 6 per side
0316
0321
Flush
0316
0320
0320
Parts removed for clarity.
Joist Side
Important: Failure to make sure
the bottom of the Joist Sides and
(0316) Roof Sides are flush will cause
assembly issues in later steps.
S26
Summary of Contents for Cedar Summit Bancroft Playhouse
Page 51: ...NOTES...


