ASSEMBLY INSTRUCTIONS
9
8
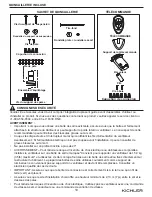
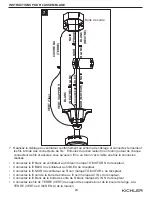
REMOTE CONTROL
RECEIVER
8. In order to use this remote control the dip switches
must match on both the remote control and the
receiver. Make sure they both have the same
configuration.
Remove the battery cover from the remote control.
Slide dip switches up or down using a small screw
driver (not included). Then match the dip switches
on the receiver to the same position as the remote
control.
Install the battery (included) and replace the battery
cover you previously removed.
The remote control comes with a cradle that may be
attached to the wall with the included screws.
9. Once wiring step has been completed, slide the
wired remote receiver in between the hanging
bracket (A) and the top of the downrod ball (B) with
the flat side of the receiver facing the ceiling. Turn
lead wires upward and carefully push them into the
outlet box, with the white and green wires to one
side of the box and the black wires toward the other
side.
9
A
B


