background image

ASSEMBLY INSTRUCTIONS

4

5

6

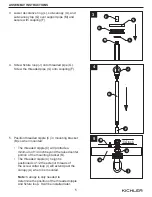
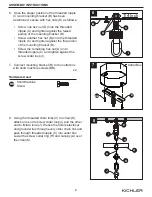
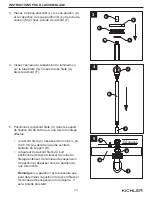
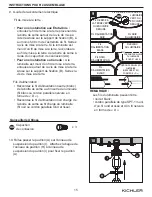
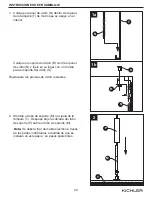
5.  Position threaded nipple (C) in mounting bracket 

(B) so when mounted: 


•  The threaded nipple (C) will protrude a    


minimum of 1/4 inch beyond the raised center  


portion of the mounting bracket (B).  


•  The threaded nipple (C) height is   


positioned so 1/2 the exterior threads of   


the screw collar loop (I) will extend past the  


canopy (A) when it is mounted.


Note:

 Canopy is only needed to    


determine the position of the threaded nipple  


and fixture loop.  It will be installed later.

5

B

A

1/4

 Inch


I

C

4

J

F

G

4.  Screw fixture loop (J) onto threaded pipe (G).  

Screw the threaded pipe (G) onto coupling (F).  

3.  Lower decorative ring (L), sub-canopy (U), and 

sub-canopy top (Q) over support pipe (M) and 
secure with coupling (F).  

3

L

Q

F

U

M

Summary of Contents for 0810289

Page 1: ...5 LIGHT PENDANT 1 ATTACH YOUR RECEIPT HERE Serial Number Purchase Date Questions problems missing parts Before returning to your retailer call our customer service department at 1 800 554 6504 8 a m 4 30 p m EST Monday Friday kichler com customer care contact us ...

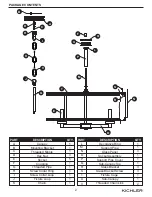
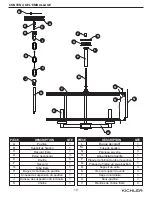
Page 2: ...p Chain B C D E F G H I J K 1 1 1 3 5 1 1 1 1 1 1 PART DESCRIPTION QTY Decorative Ring Support Pipe Glass Panel Socket Assembly Support Pipe Cover Sub Canopy Top Glass Bracket Glass Bracket Screw Fixture Cage Sub Canopy Threaded Chain Link N M L O P Q R S T U V 1 1 3 1 3 1 2 1 3 1 1 PART DESCRIPTION QTY A G V K L Q O C B D F U P J M T R S N E H I ...

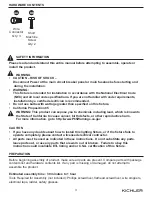
Page 3: ...he State of California to cause cancer birth defects or other reproductive harm For more information go to http www P65Warnings ca gov CAUTION If you have any doubts about how to install this lighting fixture or if the fixture fails to operate completely please contact a licensed electrical contractor All parts must be used as indicated in these instructions Do not substitute any parts leave parts...

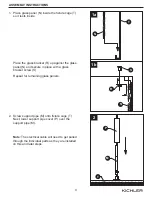
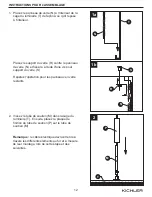
Page 4: ...t lower support pipe cover P over the support pipe M Place the glass bracket R up against the glass panel N and secure in place with a glass bracket screw S Repeat for remaining glass panels 1a 1b N N R T S Note The electrical cable will need to get pulled through the individual parts as they are installed on this and later steps 2 P M T ...

Page 5: ...o 1 2 the exterior threads of the screw collar loop I will extend past the canopy A when it is mounted Note Canopy is only needed to determine the position of the threaded nipple and fixture loop It will be installed later 5 B A 1 4 Inch I C 4 J F G 4 Screw fixture loop J onto threaded pipe G Screw the threaded pipe G onto coupling F 3 Lower decorative ring L sub canopy U and sub canopy top Q over...

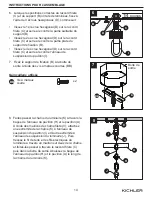
Page 6: ...e mounting bracket B Screw the remaining hex nut D onto threaded nipple C and tighten against the screw collar loop I Hardware Used Short Machine Screw x 2 BB 7 Connect mounting bracket B to the outlet box with short machine screws BB 8 Using the threaded chain links V on chain K attach one end to screw collar loop I and the other end to fixture loop J Weave the fixture electrical and ground wires...

Page 7: ...upply wires Connect the Neutral White supply wire from the outlet box to the Neutral fixture wire White or Parallel Cord D shaped and ribbed Connect the Hot Black supply wire from the outlet box to the Hot fixture wire Black or Parallel Cord round and smooth NOTE Fixture wires will either be Black and White Parallel Cord SPT 1 lamp wire with one round smooth wire and one D shaped ribbed wire 9 BAR...

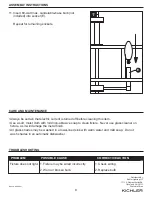
Page 8: ...g this item Use a soft moist cloth with mild non abrasive soap to clean fixture Never use glass cleaner on fixture as it will damage the metal finish All glass shades may be washed in a towel lined sink with warm water and mild soap Do not wash shades in an automatic dishwasher 11 Insert 60 watt max candelabra base bulb not included into socket E Repeat for remaining sockets E 11 REV 29 SEP 2021 P...

Page 9: ...stions des problèmes des pièces manquantes Avant de retourner le produit à votre détaillant appelez notre service à la clientèle au 1 800 554 6504 entre 8 h et 16 h 30 HNE du lundi au vendredi kichler com customer care contact us JOIGNEZ VOTRE REÇU ICI Numéro de série Date d achat ...

Page 10: ...ne B C D E F G H I J K 1 1 1 3 5 1 1 1 1 1 1 Bague décoratif Tube de soutien Panneau en verre Assemblage douille Plaque de finition du tube de soutien Plaque de finition du sous pavillon Support du verre Vis pour support du verre Cage du luminaire Sous pavillon Maillons de chaîne fileté N M L O P Q R S T U V 1 1 3 1 3 1 2 1 3 1 1 PIÈCE DESCRIPTION QTÉ PIÈCE DESCRIPTION QTÉ A G V K L Q O C B D F U ...

Page 11: ... État de la Californie comme cause de cancer malformations congénitales ou autres troubles de l appareil reproducteur Pour de plus amples informations consultez le site http www P65Warnings ca gov ATTENTION Si vous avez des doutes à propos de l installation ou si le luminaire ne fonctionne pas correctement veuillez communiquer avec un électricien qualifié Toutes les pièces doivent être utilisées t...

Page 12: ...acez la plaque de finition du tube de soutien P sur le tube de soutien M Placez le support du verre R contre le panneau de verre N et fixez le à l aide d une vis pour support du verre S Répétez l opération pour les panneaux en verre restants 1a 1b N N R T S Remarque le câble électrique devra être tiré à travers les différents éléments au fur et à mesure de leur montage lors de cette étape et des s...

Page 13: ...érieur de l anneau de suspension du pavillon I dépasser hors du pavillon A une fois monté Remarque Le pavillon n est nécessaire que pour déterminer la position du raccord fileté et de l anneau de suspension du luminaire Il sera installé plus tard 5 B A 1 4 pouces I C 4 J F G 4 Vissez l anneau de suspension du luminaire J sur le tube fileté G Vissez le tube fileté G dans le raccord F 3 Placez l ann...

Page 14: ...llerie utilisée Vis à métaux courte x 2 BB 7 Fixez le support de fixation B à la boîte de sortie à l aide des vis à métaux courtes BB Boîte de sortie 8 J H I J K V C A B 7 BB 8 Faites passer la chaîne du luminaire K à travers la bague de l anneau du pavillon H et le pavillon A À l aide des maillons de chaîne fileté V attachez une extrémité de la chaîne K à l anneau de suspension du pavillon I et l...

Page 15: ...ise à la terre enroulez le autour de la vis de mise à la terre située sur le support de fixation B Serrez la vis de mise à la terre Fils d alimentation Raccordez le fil d alimentation neutre blanc de la boîte de sortie au fil neutre du luminaire fil blanc ou cordon parallèle nervuré en forme de D Raccordez le fil d alimentation noir chargé de la boîte de sortie au fil chargé du luminaire fil noir ...

Page 16: ... risqueriez d endommager le fini métallique du luminaire Tous les abat jour en verre peuvent être nettoyés dans un évier couvert de serviettes à l aide d eau tiède et de savon doux Ne lavez pas les abat jour dans un lave vaisselle DÉPANNAGE Le luminaire ne s allume pas 1 Le luminaire est mal branché 1 Check wiring 2 L ampoule est usée ou brisée 2 Remplacez l ampoule 1 Vérifiez si le luminaire est ...

Page 17: ... problemas piezas faltantes Antes de devolverlo a la tienda llame a nuestro departamento de servicio al cliente al 1 800 554 6504 de 8 00 a m a 4 30 p m hora del Este EST de lunes a viernes kichler com customer care contact us ADJUNTE SU RECIBO AQUÍ Número de serie Fecha de compra ...

Page 18: ...a B C D E F G H I J K 1 1 1 3 5 1 1 1 1 1 1 Anillo decorativa Tubo de soporte Panel de vidrio Conjunto del portalámparas Cubierta del tubo de soporte Cache de la cubierta baja Soporte del vidrio Tornillo del soporte del vidrio Jaula de la lámpara Cubierta baja Eslabones roscados N M L O P Q R S T U V 1 1 3 1 3 1 2 1 3 1 1 PIEZA DESCRIPCIÓN CANT PIEZA DESCRIPCIÓN CANT A G V K L Q O C B D F U P J M ...

Page 19: ...de nacimiento y otros daños al sistema reproductivo Para obtener mayor información visite www p65warnings ca gov PRECAUCIÓN Si tiene dudas sobre la instalación de esta lámpara o si el funcionamiento de la misma falla por completo sírvase ponerse en contacto con un electricista calificado y con licencia Todas las piezas deben usarse como lo indican estas instrucciones No reemplace las piezas no omi...

Page 20: ... baje la cubierta del tubo de soporte P sobre el tubo de soporte M Coloque el soporte del vidrio R contra el panel de vidrio N y fíjelo en su lugar con un tornillo para el soporte del vidrio S Repita para los paneles de vidrio restantes 1a 1b N N R T S Nota Se deberá tirar del cable eléctrico a través de las partes individuales a medida de que se instalan en este paso y en pasos posteriores 2 P M ...

Page 21: ...cas exteriores del bucle de cuello roscado I sobresalga encima de la cubierta A cuando esté montada Nota La cubierta se necesita solamente para determinar la posición del manguito roscado y del aro para colgar la lámpara Se instalará más tarde 5 B A 1 4 pulgadas I C 4 J F G 4 Atornille el aro de suspensión J al tubo roscado G Atornille el tubo roscado G al acoplamiento F 3 Baje el aro decorativo L...

Page 22: ...Atornille la tercera tuerca hexagonal D al manguito roscado C y apriétela contra el bucle de cuello roscado I Aditamentos utilizados Tornillo de la cubierta x 2 BB 7 Conecte el soporte de montaje B a la caja eléctrica con tornillos cortos para metal BB Caja de salida 8 J H I J K V C A B 7 BB 8 Usando los eslabones roscados V en la cadena K fije un extremo al bucle de cuello roscado I y el otro ext...

Page 23: ...azadera de montaje B Apriete el tornillo de puesta a tierra Cables de alimentación Conecte el conductor de alimentación Neutro Blanco de la caja eléctrica al cable Neutro de la lámpara Blanco o conductor paralelo en forma de D y acanalado Conecte el conductor de alimentación Vivo Negro de la caja eléctrica al cable Vivo de la lámpara Negro o conductor paralelo redondo y liso REMARQUE Los conductor...

Page 24: ...ra vidrio en la lámpara porque éste dañará el acabado metálico Las pantallas de vidrio se pueden lavar dentro de un lavabo recubierto con toallas usando agua tibia y jabón suave No lave las pantallas en un lavaplatos automático SOLUCIÓN DE PROBLEMAS La lámpara no se enciende 1 La lámpara puede estar incorrectamente cableada 1 Check wiring 2 La bombilla está quemada o rota 2 Reemplace la bombilla 1...

Reviews: