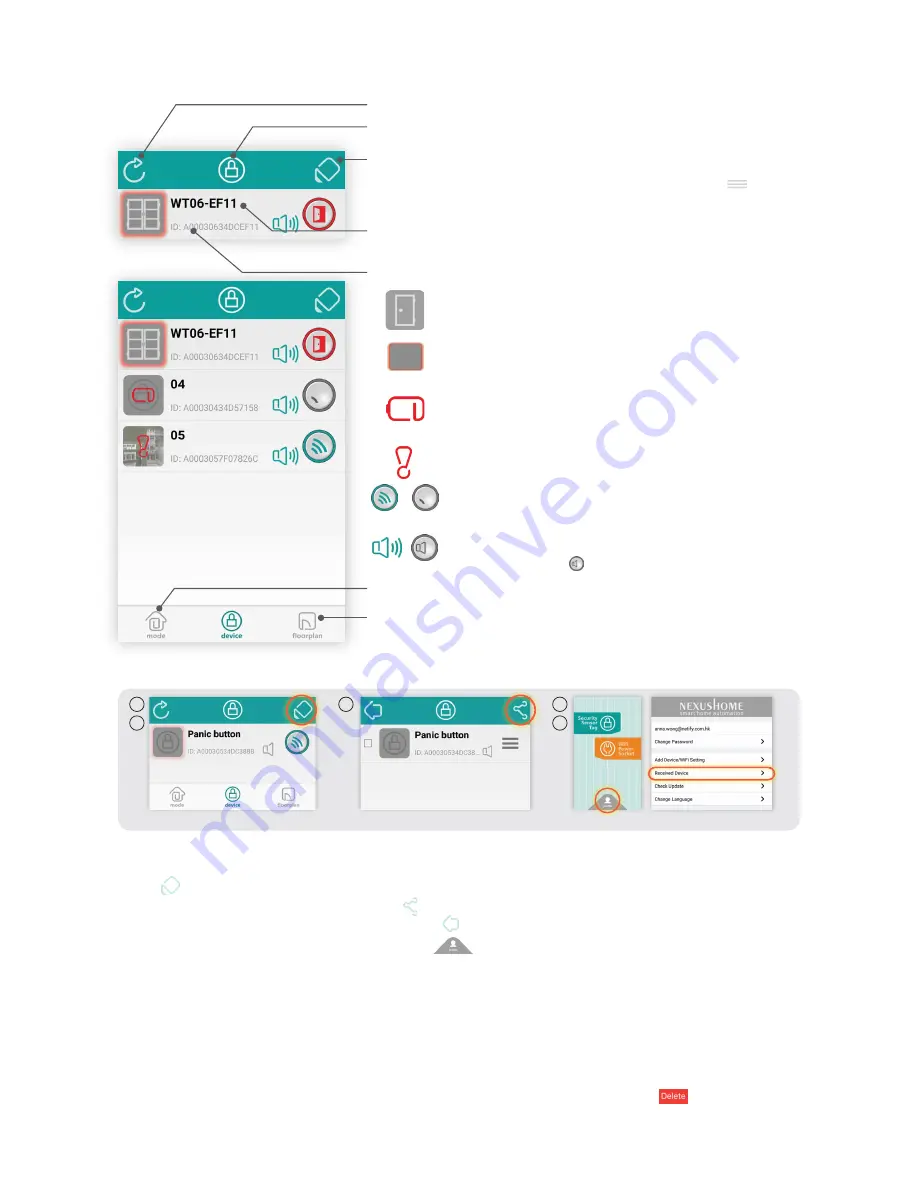
Advanced Information for the DEVICE PAGE
How to share an Alert Notification from a DEVICE with another Smartphone
1/
2/
3/
4/
5/
How to delete a DEVICE from the APP
Whilst on the DEVICE PAGE, hold and swipe the Devices Description to the left of your screen and press
Press this icon to return to the APP’s Alert Mode Screen.
Press this icon to take you to the APP’s Floorplan Screen.
Here you can create personalized Floorplans showing the locations of Doors and Windows
and individual Sensors (see below)
Ensure that the free ‘NEXUSHOME ‘ APP has been installed on the other Smartphone and complete the registration process,
following the procedure detailed in “Installing the APP” above.
Press at the top right of the Device Page in the APP on the Smartphone.
Now select the Sensor you wish to share, then press and complete the “Share Device to” box with the other user’s email
address they used when registering their user profile. Press to exit.
Open the APP on that other User’s Smartphone and press PROFILE at the bottom of the opening Home Page.
This will take you to the APP’s SETTINGS PAGE. In the section "Received Device" you will see a number in green. This denotes the
number of Devices that you have selected to share with that User.
Press "Received Device". This will take you to a list of those Devices. The new User can now choose whether to accept or reject
Notifications from those Devices. Note that the new User can select, separately, on their APP’s Device Alert Page whether such
notifications are Audible, Silent or Off.
Press to Refresh/Reset the Device Page and stop a flashing Sensor Icon.
Press this Icon, at the top of the page, to return to the APP’s Home Screen
(iOS only, for Android press back on smartphone).
Enables you to share Alert notifications for a Sensor with any other user who has already
downloaded the Nexus APP. See below for full details. Whilst in this section, you can
also alter the order in which the Devices are listed on your screen. Press on the
right of the Device whose order you wish to change and then drag it to its new position
on the screen.
A personalized description of the Sensor.
Press the Sensor’s Icon, to go to its HISTORY page and press “WTxx” seen just above the
ID. Complete CHANGE DEVICE NAME and save it.
This is the Device’s unique ID.
Personalized Icon or Photo for the Sensor.
Press the Sensor’s Icon to go to its HISTORY PAGE, then press its Icon
again on this page. Choose “Take photo”, “From album” or “Default
icons” to create a personalized Icon.
Flashing - Indicates a Sensor has sent an Alert notification.
Press the Icon to go to the Sensor’s HISTORY PAGE
Indicates a Low Battery.
Although batteries should continue to last for up to a month after this
Icon appears, you should change them immediately, respecting the
correct polarity and using good quality Alkaline batteries. Always test a
Sensor after replacing the batteries.
The Sensor sends a “heartbeat” signal to the Router every 4 hours.
This Icon indicates that contact has been lost between them.
Shows that a Device is active.
Click on this Icon to toggle the Device to be active or non-active
Indicates whether the Sensor is also sending an Alert Signal to the
optional Nexus Indoor Siren (sending a signal as shown). Press the
Sensor’s icon to go to DEVICE HISTORY, then press the Siren Icon on
that page to toggle Off
1
2
3
4
5
press edit
press share
press “Received Device”


