


Keysight E5053A Microwave Downconverter 17
Installation
Mounting front handles/flanges for rackmount
Mounting rackmount kit (Option 1CM)
The rackmount kit is a kit that contains 2 flanges (side plates for securing) to
mount the E5053A into the standard rack (width: 482.6 mm) of the EIA
standard. Follow these steps to mount it, referring to the
Step 1.
Remove the trim strips (1) stuck to both the sides of the front panel (stuck to
the frame).
Step 2.
Mount the flanges for rackmount (2) to both the sides of the front panel of the
E5053A with the attached screws.
Step 3.
Remove the four legs on the bottom of the E5053A (pull up the part with the
(
TAB
indication and slide it to the arrow direction).
Step 4.
Mount the E5053A into the rack.
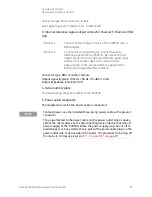
Mounting rackmount/handle kit (Option 1CP)
The rackmount/handle kit is a kit that contains both the flanges for rackmount
and the front handles for the E5053A. Follow these steps to mount it, referring
Step 1.
Remove the trim strips (1) stuck to both the sides of the front panel (stuck to
the frame).
Step 2.
Mount the front handles (3) and the flanges for rackmount (4) to both the
sides of the front panel of the E5053A with the attached screws.
Step 3.
Remove the 4 legs on the bottom of the E5053A (pull up the part with the
(
TAB
indication and slide it to the arrow direction).
Step 4.
Mount the E5053A into the rack.
Be sure to use both the front handles and the rack-mounting flanges at the
same time. Do not attempt to install flanges or handles separately with the
hardware provided, since this risks serious electrical damage to the
instrument.
Summary of Contents for E5053A
Page 1: ...User s Guide Keysight E5053A Microwave Downconverter...
Page 26: ...26 Keysight E5053A Microwave Downconverter Overview of Product Names and Functions of Parts 2...
Page 34: ...34 Keysight E5053A User s Guide Manual Changes Manual Changes...


