background image

Warm Up Exercises  

EXERCISE GUIDELINES 


WARNING

!   

Before beginning this or any exercise program, you should consult your physician. This is espe-

cially important for individuals over the age of 35 or individuals with pre-existing health problems. 


Warming up prepares the body for the exercise by increasing circulation, supplying more oxygen to the mus-
cles and raising body temperature.    Begin each workout with 5 to 10 minutes of stretching and light exercise 
to warm up.  The photos on this page show several forms of basic stretching you may perform before your 
workouts.  In order to achieve an adequate warm-up, perform each stretch three times. 

TOE TOUCH STRETCH 

Stand bending your knees slightly and slowly bend 

forward from your hips.  Allow your back and 
shoulders to relax as you reach down toward your 
toes as far as possible.  Hold for 15 counts, then re-
lax.  This will stretch your hamstrings, back of 
knees , and back.


HAMSTRING STRETCH


Sit with one leg extended.  Bring the sole of the op-

posite foot toward you and rest it against the inner 
thigh of your extended leg.  Reach toward your 
toes as far as possible.  Hold for 15 counts, then re-
lax.  This will stretch your hamstrings, lower back, 
and groin.


CALF/ACHILLES STRETCH 

With one leg in front of the other, reach forward and 

place your hands against a wall.  Keep your back 
leg straight and your back foot flat on the floor.  
Bend your front leg, lean forward and move your 
hips toward the wall.  Hold for 15 counts, then re-
lax.  To cause further stretching of the Achilles ten-
dons, bend your back leg as well.  This will stretch 
your calves, Achilles tendons, and ankles.


QUADRICEPS STRETCH 

With one hand against a wall for balance, reach 

back and grasp one foot with your other hand.  
Bring your heel as close to your buttocks as possi-
ble.  Hold for 15 counts, then relax.  This will 
stretch your  quadriceps and hip muscles. 

INNER THIGH STRETCH 
Sit with the soles of your feet together and your knees 
outward.  Pull your feet toward your groin area as far as 
possible.  Hold for 15 counts, then relax.  This will 

stretch your quadriceps and hip muscles. 


PAGE 6 

Summary of Contents for HealthTrainer HT500

Page 1: ...KEYS Fitness Products LP P O Box 551239 Dallas Texas 75239 OWNER S MANUAL HEALTHTRAINER 500 TREADMILL PART 15 0106...

Page 2: ...ctions 7 Power Requirements 8 Console Functions and Descriptions 9 Program and Operating Instructions 10 11 Program Descriptions and Profiles 12 Belt Adjustments and Tension 13 Maintenance Instruction...

Page 3: ...9 Speed Incline Toggles Switches Yes Power Incline 0 12 Roller Diameter 1 9 Cushioned Deck Yes Speed Range 0 10mph Belt Size 18 x 51 Side Hand Rails Yes Foot Print 29 x 62 Foot Print Folded 29 x 29 W...

Page 4: ...o plugging in your treadmill Keep the power cord away from the incline wheels and do not run the power cord underneath your treadmill Do not operate the treadmill with a damaged or frayed power cord W...

Page 5: ...heart problems you are not active and or are over the age of 35 years do not use the pre set treadmill programs or start an exercise program without first contacting and receiving approval from your...

Page 6: ...one leg extended Bring the sole of the op posite foot toward you and rest it against the inner thigh of your extended leg Reach toward your toes as far as possible Hold for 15 counts then re lax This...

Page 7: ...OUR BACK IN ORDER TO RAISE OR LOWER THE TREADMILL SAFELY YOU MUST BE ABLE TO LIFT 45 POUNDS 20KG IT IS SUGGESTED YOU ALWAYS USE THE AID OF A SECOND PERSON WHEN MOVING THE TREADMILL With the treadmill...

Page 8: ...ors can be purchased at most hardware stores The manufacturer recommends a single outlet surge protector with a UL 1449 rating as a Transient Voltage Surge Suppressor TVSS with a UL suppressed voltage...

Page 9: ...counting to 0 seconds SPEED WINDOW SPEED Indicates MPH miles per hour or KMH kilometer per hour in 1 increments DISTANCE CALORIES WINDOW DISTANCE Indicates Miles or Kilometers traveled in 01 incremen...

Page 10: ...out press START STOP button Belt will gradually slow to zero To pause your workout press PAUSE To re start after pausing Press the PAUSE button WARNING THE TREADMILL BELT WILL RESUME AT THE SPEED THE...

Page 11: ...essed You can now program the Time Speed and Incline in P1 mode which will be saved for future workouts 1 The TIME window will blink Use the SPEED TIME or arrows to select your workout time Press ENTE...

Page 12: ...8 9 10 SPEED INCLINE The Cardio Program is designed to vary the treadmill Speed while maintaining a constant Elevation 12 11 10 9 8 7 6 5 4 3 2 1 1 2 3 4 5 6 7 8 9 10 SPEED INCLINE The Warm Up Program...

Page 13: ...1 mph Using the hex key provided turn the right rear roller adjustment bolt turn in the clockwise direction Next run the treadmill at 2 5 mph You should see the belt start to correct itself moving bac...

Page 14: ...admill performance Every 30 days or 30 hours of operation lift the sides of the walking belt and feel the top surface of the walking board as far under as you can reach If you feel signs of silicone n...

Page 15: ...OFF on the console Do not unplug treadmill Attach the magnet safety key to the console 2 Activate the calibration mode switch by inserting the eraser end of a pencil into the opening in the backside o...

Page 16: ...er box and the circuit breaker for the room the treadmill is located in If it has tripped reset or have an electrician replace the breaker in home 3 If treadmill still will not operate please call Key...

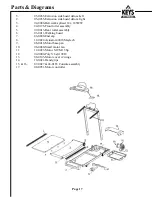
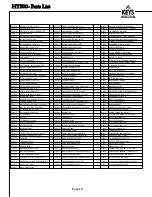
Page 17: ...assembly 5 09 0013 Rear roller assembly 6 03 0011 Walking board 7 06 0008 End cap 8 12 0022 Actuator 400lb Maytech 9 06 0018 Motor base pan 10 06 0080 Small motor fan 11 12 0023 Motor MCM 1 5hp 12 04...

Page 18: ...W 8x5 8 SD BLACK 1 14 0024 DECAL SAFETY LACH ALL FOLDS 1 19 0159 BRKT MTOR SUPPORT REVISED 19 0005 02 0092 SCREW PHTR 8x3 AB BLACK 7 14 0025 DECAL WARNING FOLDING AL FOLDS 1 20 0001 PROC PUNCHED RAME...

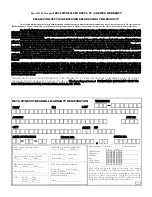
Page 19: ...parts not manufactured or sold by Keys c by modification of the Product or normal wear and tear d operation on incorrect power supplies or e as a result of service by anyone other than Keys or an auth...

Reviews: