background image

52

P

OR
TUGUÊS

ÍNDICE

SEGURANÇA 

53

EQUIPAMENTO 

53

MODELOS E CARACTERÍSTICAS 

54

DADOS TÉCNICOS 

54

MEDIDAS TOTAIS 

54

QUADRO DE CONJUNTO 

55

VERIFICAÇÕES PRELIMINARES 

55

FUNCIONAMENTO MANUAL 

56

INSTALAÇÃO 

56

FIXAÇÃO DO MOTORREDUTOR 

57

FIXAÇÃO DA CREMALHEIRA 

58

FIXAÇÃO DO FIM DE CURSO 

59

MANUTENÇÃO 

60

RECOMENDAÇÕES FINAIS 

60

ESTE MANUAL É DESTINADO APENAS AO INSTALADOR

A instalação deverá ser efectuada somente por pessoal profissionalmente qualificado em conformi

-

dade com quanto previsto pela lei vigente.

Summary of Contents for 900SC-200CS

Page 1: ...SANLEITUNG MANUAL DE INSTRUCCIONES MANUAL DE INSTRU ES Keyautomation S p A Motoriduttori per scorrevoli Gear motor for sliding gates Motoreducteur pour coulissants Getriebe f r Schiebegitter Motorredu...

Page 2: ...osservanza delle precauzioni elencate In caso di malfunzionamento spegnete subito l apparecchio In caso di riparazione assicuratevi di aver tolto tensione alla rete elettrica Non cercate di smontare l...

Page 3: ...Ogni installazione e uso difformi da quanto indicato nel seguente manuale sono da considerarsi vietate ATTENZIONE I dati e le informazioni indicate in questo manuale sono da ritenersi suscettibili di...

Page 4: ...C 150 C classe di isolamento 1 F 1 F servizio temporaneo 40 50 40 50 temperatura di esercizio 20 70 C 20 70 C 20 70 C 20 70 C peso 16 Kg 15 5 Kg 16 Kg 15 5 Kg Centralina consigliata Suggested control...

Page 5: ...il cancello non deve presentare eccessivi sbandamenti laterali 3 Il sistema di ruote rotaia inferiore e rulli guida superiore deve funzionare senza eccessivi attriti 4 Per evitare il deragliamento de...

Page 6: ...fissaggio Fare attenzione alla corsa dell anta non devono esserci ostacoli che ne impediscano il movi mento L anta non deve presentare attriti il movimento sia in apertura che in chiusura deve essere...

Page 7: ...canti per fissare il motore fig 6 Qualora la regolazione consentita dalla cremagliera non fosse sufficiente possibile com pensare l altezza del motoriduttore agendo sulle 4 viti pi esterne fig 6 Termi...

Page 8: ...anualmente il cancello portando il pignone in corrispondenza dell ultimo distanziale Fissare l elemento di cremagliera definitivamente Per un corretto posizionamento degli altri elementi e garantire l...

Page 9: ...staffe di finecorsa non entrino in collisione con il pignone Portare manualmente il cancello in apertura lasciando a seconda del peso del cancello una luce da 30 a 50 mm tra il cancello stesso e l arr...

Page 10: ...ocomandi etc possono inve ce contenere sostanze inquinanti Vanno quindi rimossi e consegnati a ditte autoriz zate al recupero e allo smaltimento degli stessi Prima di procedere sempre oppor tuno verif...

Page 11: ...11 ITALIANO NOTE ANMERKUNGEN NOTES NOTA NOTES OBSERVA ES...

Page 12: ...CHECKS 15 MANUAL OPERATION 16 INSTALLATION 16 FIXING OF REDUCTION GEAR 17 FIXING OF RATCHET 18 FIXING LIMIT DEVICE 19 MAINTENANCE 20 FINAL RECOMMENDATIONS 20 THIS BOOKLET IS TO BE USED ONLY BY THE INS...

Page 13: ...pro vided If the unit malfunctions shut it off immediately When making repairs make sure the electrical supply is disconnected Do not attempt to disassemble the unit if you are not an authorized inst...

Page 14: ...Kg thermoprotection 150 C 150 C 150 C insulation class 1 F 1 F temporary service 40 50 40 50 running temperature 20 70 C 20 70 C 20 70 C 20 70 C weight 16 Kg 15 5 Kg 16 Kg 15 5 Kg TECHNICAL DATA 900SC...

Page 15: ...opriate 2_During the run the gate must not present excessive side disbandment 3_The lower wheels rail and the higher roller guide systems must work without excessive friction 4_To avoid the disbandmen...

Page 16: ...that the travel of the shutter is not obstructed in any way The shutter must not have friction the movement in aperture and in closure must be free If stopped in any position it must not move During...

Page 17: ...the ratchet is not sufficient it is possible to compensate the height of the reduction gear working on the 4 more external screws fig 6 Once the adjustment is finished firmly fix the 4 locknuts makin...

Page 18: ...ate bringing the pinion in correspondance with the last tingle Definitively fix the element of the ratchet For the correct positioning of the other elements and to ensure they are straight it is neces...

Page 19: ...hat the limit devices do not collide with the pinion Manually open the gate leaving based on the weight of the gate a space between 30 a 50 mm between the gate and the mechanical stop Fix the limit de...

Page 20: ...label that instructs to keep children away from the moving door or place the appropriate symbol ISO 3864 see symbol FINAL RECOMMENDATIONS Keep the remote control out of the reach of children and do no...

Page 21: ...21 ENGLISH NOTE ANMERKUNGEN NOTES NOTA NOTES OBSERVA ES...

Page 22: ...LES PR LIMINAIRES 25 INSTALLATION 26 FIXATION DU MOTOR DUCTEUR 27 FIXATION DE LA CR MAILL RE 28 FIXATION DU FIN DE COURSE 29 MAINTENANCE 30 RECOMMANDATIONS FINALES 30 CE MANUEL EST EXCLUSIVEMENT DEST...

Page 23: ...es En cas de mauvais fonctionnement teindre imm diatement l appareil En cas de r paration v rifier d avoir coup le courant du r seau lectrique Ne pas essayer de d monter l appareil seuls les installa...

Page 24: ...poids 16 Kg 15 5 Kg 16 Kg 15 5 Kg CARACT RISTIQUES TECHNIQUES codice descrizione 900SC 200CS Motor ducteur lectrom canique irr versible 230 Vac 2500 kg Pour portes coulissantes dot es de centrale ave...

Page 25: ...e 2_La porte ne doit pr senter aucun cart lat ral excessif pendant la man uvre 3_Le syst me de galets rail inf rieur et de galets guidage sup rieur doit fonctionner sans frotte ments excessifs 4_Pour...

Page 26: ...r aucun obstacle ne doit emp cher la man uvre La porte ne doit subir aucun frottement et les man uvres d ouverture et de fermeture doivent pourvoir s effectuer librement La porte doit rester immobile...

Page 27: ...ll re r sulte insuffisant il est possible de compenser la hauteur du motor ducteur en intervenant sur les 4 vis les plus externes fig 6 Une fois le r glage termin fixer solidement les 4 crous frein et...

Page 28: ...llement en portant le pignon au niveau du dernier cran Fixer d finitive ment l l ment de cr maill re Pour bien positionner les autres l ments et en garantir une parfaite lin arit il est n cessaire de...

Page 29: ...ne puissent entrer en collision avec le pignon Amener manuellement la porte en position d ouverture en maintenant un espace de 30 50 mm entre la porte et l arr t m canique en fonction du poids de cel...

Page 30: ...iquette indiquant d loigner les enfants de la porte pendant les man uvres d ouverture et fermeture ou reporter le symbo le ISO 3864 voir symbole RECOMMANDATIONS FINALES Conserver la t l commande hors...

Page 31: ...31 FRAN AIS NOTE ANMERKUNGEN NOTES NOTA NOTES OBSERVA ES...
Page 32: ...TROLLEN 35 HANDBETRIEB 36 INSTALLATION 36 ANTRIEBSBEFESTIGUNG 37 ZAHNSTANGENBEFESTIGUNG 38 ENDSCHALTERBEFESTIGUNG 39 WARTUNG 40 ABSCHLIESSENDE EMPFEHLUNGEN 40 DIESES HANDBUCH IST NUR F R DEN INSTALLAT...

Page 33: ...er t sofort ausschalten Bei Reparaturarbeiten sicherstellen dass der Strom abgeschaltet ist Das Ger t darf nur von befugten Installateuren ausgebaut werden Das Ger t keinen Flammen oder sonstigen W rm...

Page 34: ...ur 20 70 C 20 70 C 20 70 C 20 70 C gewicht 16 Kg 15 5 Kg 16 Kg 15 5 Kg Centralina consigliata Suggested control unit TECHNISCHE DATEN 900SC 200CS Irreversibler elektromechanischer Antrieb 230Vac 2500K...

Page 35: ...lich ausfallen 3_Das untere Laufsystem R der Schiene und das obere mit Rollen F hrung muss ohne starke Reibung arbeiten 4_Um ein Entgleisen des Tors zu verhindern m ssen die Halteanschl ge sowohl an d...

Page 36: ...s d rfen keine Hindernisse vorhanden sein die die Bewe gung behindern k nnten Das Tor darf keine Reibung aufweisen bei der ffnung und Schlie ung muss es sich unbehindert bewegen k nnen Wenn es an eine...

Page 37: ...ieren Abb 6 Wenn die durch die Zahnstange m gliche Regulierung nicht ausreicht kann man die H he des Antriebs ber die 4 u eren Schrauben ausgleichen Abb 6 Nach der Einstellung die 4 selbstsichernden M...

Page 38: ...mit der Hand schieben und das Ritzel bis zum letzten Abstandhalter bringen Das Zahnstangenelement definitiv befestigen F r die richtige Anbringung der anderen Elemente und um ihre Geradlinigkeit zu ge...

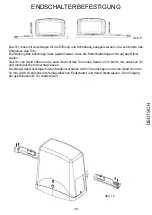
Page 39: ...die Endschalterb gel nicht auf das Ritzel prallen Das Tor von Hand ffnen und je nach Gewicht des Tors einen Spalt von 30 bis 50 mm zwischen Tor und mechanischem Anschlag lassen Den B gel des Anschlag...

Page 40: ...netikette versehen sein die darauf hin weist Kinder von dem in Bewegung befindlichen Tor fernzuhalten Als Alternative kann das entsprechende Symbol ISO 3864 siehe Symbol angebracht werden ABSCHLIESSEN...

Page 41: ...41 DEUTSCH NOTE ANMERKUNGEN NOTES NOTA NOTES OBSERVA ES...

Page 42: ...5 FUNCIONAMIENTO MANUAL 46 INSTALACI N 46 FIJACI N DEL MOTORREDUCTOR 47 FIJACI N DE LA CREMALLERA 48 FIJACI N DEL FIN DE CARRERA 49 MANTENIMIENTO 50 RECOMENDACIONES FINALES 50 ESTE MANUAL EST DESTINAD...

Page 43: ...o de las precauciones indicadas En caso de mal funcionamiento apague inmediatamente el aparato En caso de reparaci n aseg rese de haber cortado la tensi n de la red el ctrica No intente desmontar el a...

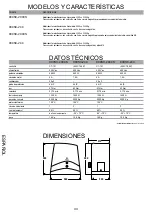
Page 44: ...16 Kg 15 5 Kg 16 Kg 15 5 Kg Centralina consigliata Suggested control unit DATOS T CNICOS codice descrizione 900SC 200CS Motorreductor electromec nico irreversible 230V ca 2500Kg Para cancelas correde...

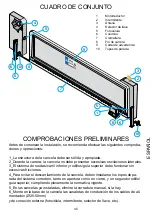
Page 45: ...a la cancela no debe presentar excesivas oscilaciones laterales 3_El sistema de ruedas carril inferior y rodillos gu a superior debe funcionar sin excesivas fricciones 4_Para evitar el descarrilamient...

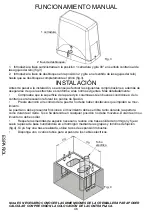
Page 46: ...os de fijaci n Preste atenci n al recorrido de la puerta no debe haber obst culos que impidan su mov imiento La puerta no debe presentar fricciones el movimiento debe ser libre tanto durante la apertu...

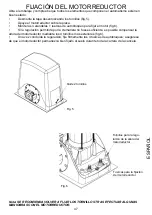
Page 47: ...allera no fuese suficiente es posible compensar la altura del motorreductor mediante los 4 tornillos m s exteriores fig 6 Una vez concluida la regulaci n fije firmemente las 4 tuercas de autobloqueo a...

Page 48: ...anualmente la cancela haciendo coincidir el pi n con el ltimo distanciador Fije de finitivamente el elemento de cremallera Para colocar correctamente los dem s elementos y garantizar que queden en l n...

Page 49: ...el fin de carrera no colisionen con el pi n Abra manualmente la cancela dejando una holgura de entre 30 y 50 mm dependiendo del peso de la cancela entre la cancela y el tope mec nico Fije la brida del...

Page 50: ...lazamiento deben estar provistos de una etiqueta que indique que es necesario mantener a los ni os alejados de la puerta en movimiento o situar el relativo s mbolo ISO 3864 v ase s mbolo RECOMENDACION...

Page 51: ...NOTE ANMERKUNGEN NOTES NOTA NOTES OBSERVA ES...

Page 52: ...PRELIMINARES 55 FUNCIONAMENTO MANUAL 56 INSTALA O 56 FIXA O DO MOTORREDUTOR 57 FIXA O DA CREMALHEIRA 58 FIXA O DO FIM DE CURSO 59 MANUTEN O 60 RECOMENDA ES FINAIS 60 ESTE MANUAL DESTINADO APENAS AO I...

Page 53: ...o das precau es relacionadas No caso de mau funcionamento desligue logo o aparelho No caso de repara o verifique de ter desligado a tens o na rede el ctrica N o tente desmontar o aparelho se n o fore...

Page 54: ...0 C 20 70 C funcionamento 16 Kg 15 5 Kg 16 Kg 15 5 Kg peso DADOS T CNICOS 900SC 200CS Motorredutor electromec nico irrevers vel 230Vac 2500Kg Para port es de correr com unidade de controlo com fim de...

Page 55: ...urante o percurso o port o n o deve sofrer uma excessiva inclina o lateral 3_O sistema de rodas carris inferior e rolos guia superior deve funcionar sem exces sivos atritos 4_Para evitar o descarrilam...

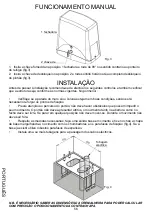
Page 56: ...este aten o ao percurso do port o n o deve haver obst culos que possam impedir o seu movimento O port o n o deve apresentar atritos o movimento tanto na abertura como no fecho deve ser livre Se parar...

Page 57: ...gula o consentida pela cremalheira n o for suficiente poss vel compensar a altura do motorredutor usando os 4 parafusos mais externos fig 6 Terminada a regula o fixe energicamente as 4 porcas autobloc...

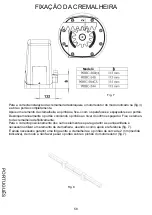
Page 58: ...e o port o colocando o pinh o ao n vel do ltimo espa ador Fixe o elemen to da cremalheira definitivamente Para o correcto posicionamento dos outros elementos e para garantir a sua linearidade necess r...

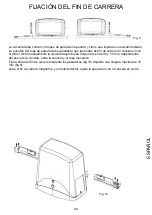
Page 59: ...bos de fim de curso n o entrem em colis o com o pinh o Abra completamente o port o manualmente deixando dependendo do peso do port o um espa o de 30 a 50 mm entre o port o e o batente mec nico Fixe o...

Page 60: ...ter uma etiqueta que indica para manter as crian as longe do port o em movimento ou ent o coloque o s mbolo apropriado ISO 3864 veja s mbolo RECOMENDA ES FINAIS Mantenha o controlo remoto longe do al...

Page 61: ...NOTE ANMERKUNGEN NOTES NOTA NOTES OBSERVA ES...

Page 62: ...guarantee to become invalid The guarantee takes effect from the date of purchase installation of the system and it lasts for 24 months We remind users that products will be covered by guarantee only i...

Page 63: ...Direttiva bassa tensione Low Voltage Directive 2006 95 EC Direttiva compatibilit elettromagnetica EMC Directive 2004 108 EC Risulta conforme a quanto previsto dalle seguenti norme armonizzate Appears...

Page 64: ...io Via Alessandro Volta 30 30020 Noventa di Piave Ve Italia T 39 0421 307 456 F 39 0421 656 98 info keyautomation it P IVA 03627650264 C F 03627650264 Capitale Sociale Euro 400 000 00 i v Reg Imprese...

Reviews: