


OSD MENUS
OSD Menus:
Now that you know how to navigate through the menus using the Remote Control or front-panel Pushbutton switches, learn the OSD
Menus. The OSD Menus allow the user to specifically configure Digital Magic to match your specific requirements. For example, if you are using
the Antenna A (also called Antenna 1) input, and want to display Composite Video (CV) to your 480i CV input displays, you can use the Navigation
system described previously and follow the OSD Menus to program your Digital Magic accordingly.
The user-friendly OSD Menu Structure for your Digital Magic unit is outlined below. The structure also gives you a clear idea of what aspects of
Digital Magic you can configure and control.
You can see that the first and second levels in the OSD Menu Structure includes user controls as listed in the following table.
You would use
the Down and Up arrows on the Remote Control or front-panel Pushbuttons to scroll through the first-level controls, then use the
Left
and
Right
arrows to move to the next level.
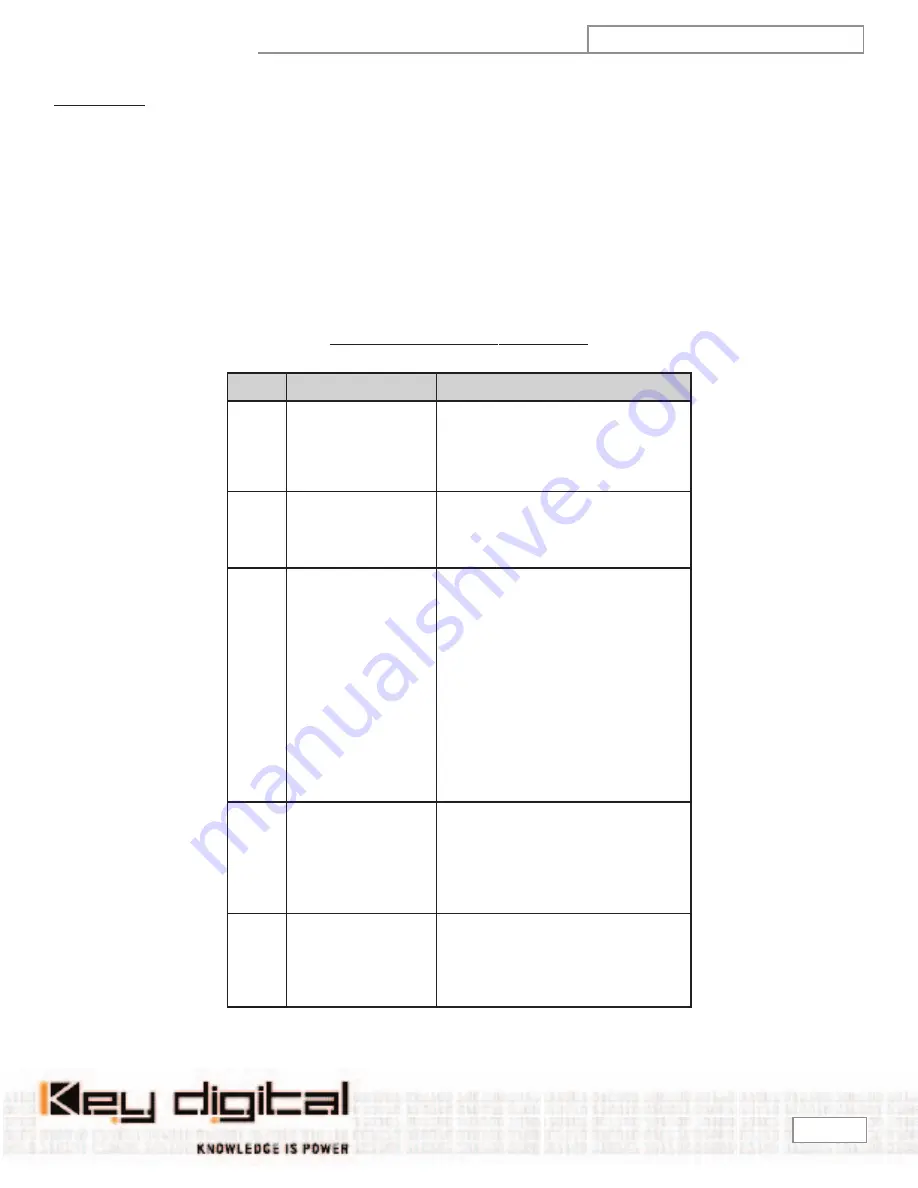
OSD MENU STRUCTURE LEVELS 1 AND 2
Level 1 is considered the Main OSD Menu, and each level thereafter provides further detail of the selected feature.
LEVEL 1 LEVEL 2
Description
Tuner
•CH Edit
•Signal Strength
•CH Search
•Time Zone
•EPG
•Show CH. List and Edit CH.
•Show Signal Strength
•Automatically searches for active channels
•Select your Time Zone
•Display the Electronic Program Guide
Input
•Ant 1 (Ant A on back of unit)
•Ant 2 (Ant B on back of unit)
•Component
•Composite
Select the type of Input Signal you want to process
and display
Video
•Aspect Control
•Position Control
•Resolution
•CV Out
•Select the Aspect Ratio to match your display and
desired mode, including 16:9, 4:3, Full-screen,
Letterbox
•Fine-tune the Horizontal Position (+/- 40) and
Vertical Position (+/- 20) of the output video, to prop-
erly fill your display screen
•Select the Output Resolution to match the native
resolution of your display, either 1080i, 720p, 480i, or
480p, and when prompted respond whether “Did you
change display mode: Yes/No”
•Select either Component Video (YPbPr) or
Composite Video (CV) out to drive up to 12 corre-
sponding displays
Audio
•Dual Mode
•Digital Out
•Vol Control Setup
•Audio Connection
•Ext. PCM
•Main/Sub, Main, Sub, Mono
•Select AC3 or PCM out
•On/Off, Volume Control by Set Top Box
•Select Digital or Analog (sets reference channel
input for Volume Control)
•SPDIF/Ext. PCM
Misc.
•Menu Opacity
•Factory Default
•Test Pattern
•Select Opacity 1 (minimum) to 4 (maximum)
•Resets all settings to Factory Default levels
•Select video test patterns to your output: Color
Bars, White Black, or Gray Bar
Digital Magic
OP E R AT ING IN S T R U C T ION S
Model KD-DH12
Page 10


