background image

2

3

Multi-Zone Amp

HDMI

HDMI

HDMI

HDMI

HDMI

HDMI

HDMI

HDMI

KD-Pro4x1

KD-Pro4x1

WiFi Router

Master Controller

Ethernet

RJ45

RJ45

RJ45

WiFi

KD-MC1000

WiFi Router

Ethernet

RJ45

RJ45

RJ45

WiFi

KD-MC1000

Multi-Zone Amp

4K Media Server

Visualizer

Laptop 1

Laptop 2

4K Media Server

Visualizer

Laptop 1

Laptop 2

HDMI

HDMI

PCM / L/R

Audio

Speakers

Speakers

Installation and Operation

Before permanently securing the unit for final installation, test for proper operation of the unit 
and cables in your system.  It is recommended that you leave enough ventilation space to 
provide sufficient airflow and cooling.

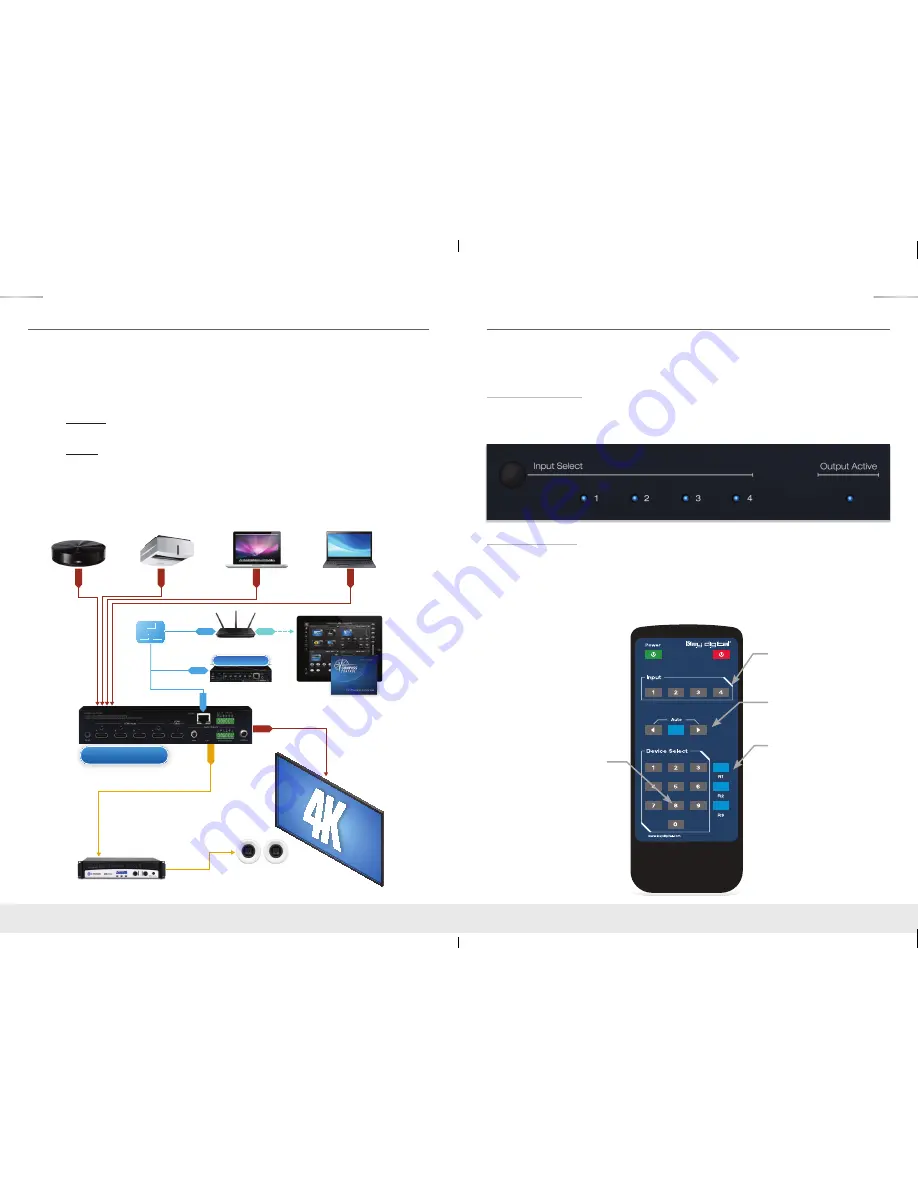
Pushbutton Control

The KD-Pro2x1/KD-Pro4x1 unit may be controlled via the push button on the front of the unit. 
Select the desired input by pressing the “Input Select” button. The front LED indicators (1, 2, 
3, 4) correspond to the input that has been selected.

IR Remote Control

The KD-Pro2x1/KD-Pro4x1 may also be operated using the IR Remote provided with the unit 
(the remote is powered by a CR2025 Battery). The KD-Pro2x1/KD-Pro4x1 switcher features 
an IR sensor on the front of the unit for reception of signals. Please note that some remote 
buttons may have no functionality. For example, the unit does not power down, therefore the 
Power Button has no function. 

Input Select

Input Select 
Scroll Up/Down

R1, R2, R3 

Numeric Keypad

Quick Setup Guide

Step 1:

   Find a safe and convenient location to mount or place KD-Pro2x1/KD-Pro4x1 unit

Step 2:

   Begin with the KD-Pro2x1/KD-Pro4x1 unit and all input/output devices  

turned off with power cables removed

Step 3: 

 Connect your HDMI source to the input port of KD-Pro2x1/KD-Pro4x1 unit

Step 4:

   Connect your HDMI displays to the output port of KD-Pro2x1/KD-Pro4x1 unit

Step 5:


 BEFORE connecting power supply to power outlet,

 screw-in the power supply  

to the KD-Pro2x1/KD-Pro4x1 unit

Step 6:


AFTER all connections are made, plug-in power supply to power outlets

Step 7:

  Power on input/output devices

Step 8:

   Operate the KD-Pro2x1/KD-Pro4x1 switcher via front panel buttons, Trigger In, 

Serial IR, Optical IR, RS-232, and TCP/IP Control.

KD-Pro2x1_4x1_Manual.indd   2-3

6/29/16   2:51 PM

Summary of Contents for KD-Pro2x1

Page 1: ...ystem Integrators Broadcasters Manufacturers and Consumers The Experts in Digital Video Technology and Solutions Rev 0 June 2016 KD Pro4x1 KD Pro2x1 Key Digital Systems 521 East 3rd Street Mount Verno...

Page 2: ...nal formats Full Buffer System Manages TMDS re clocking signal re generation HDCP authentication to source display and EDID Control handshake EDID Internal library with 15 default EDID handshakes for...

Page 3: ...the unit the remote is powered by a CR2025 Battery The KD Pro2x1 KD Pro4x1 switcher features an IR sensor on the front of the unit for reception of signals Please note that some remote buttons may ha...

Page 4: ...push button would be wired to Pins 1 and 3 on the 6 Pin Terminal Block Trigger In is Pin 1 Ground is Pin 3 The external push button would short these two pins and would operate the unit as the front...

Page 5: ...audio format must be 2ch Audio Input Signal Format Audio L R Output Digital Audio Output Coax and Optical 2ch PCM Pass Through Pass Though Multi Channel PCM MUTE MUTE Dolby DTS MUTE Pass Though HD Au...

Page 6: ...LED lights will blink once to confirm the HPD mode has been set EDID Control EDID Extended Display Identification Data is a data structure provided by a digital display to describe its capabilities t...

Page 7: ...io Output Network Setup xxx 000 255 zzzz 0001 9999 SPCETIPA xxx xxx xxx xxx Set Host IP Address to xxx xxx xxx xxx SPCETIPM xxx xxx xxx xxx Set Net Mask to xxx xxx xxx xxx SPCETIPR xxx xxx xxx xxx Set...

Page 8: ...eet rock provide proper screw support with bolts or sheet rock anchors Safety Instructions Please be sure to follow these instructions for safe operation of your unit 1 Read and follow all instruction...

Page 9: ...For technical questions about using Key Digital products please contact us at Phone 914 667 9700 E mail tech keydigital com Repairs and Warranty Service Should your product require warranty service o...

Page 10: ...16 17 KD Pro2x1_4x1_Manual indd 16 17 6 29 16 2 51 PM...

Reviews: