background image

Page 5

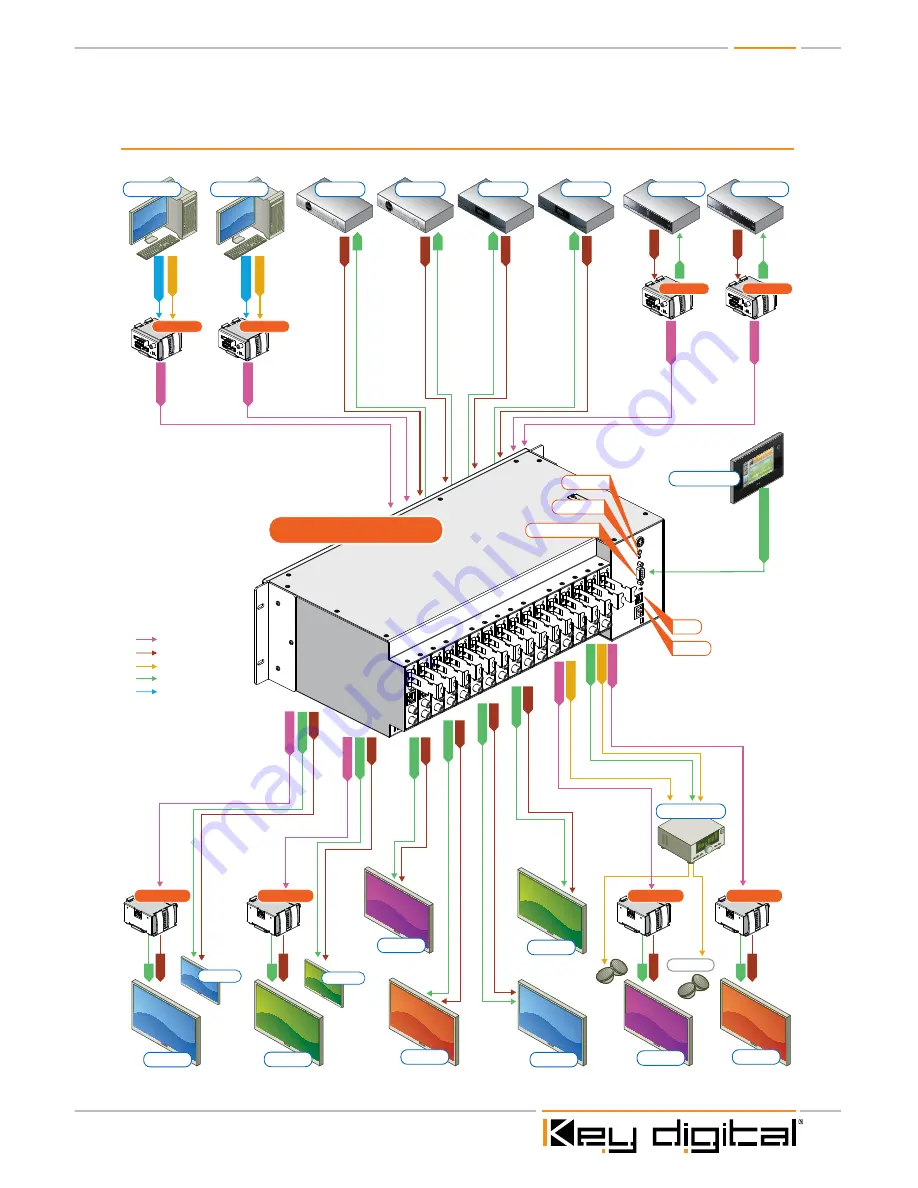
Application Example

D

V

I Video*

D

V

I Video*

L

/R/PCM

L

/R/PCM

C

AT5/5e/6

L

/R/PCM

C

AT5/5e/6

C

AT5/5e/6

C

AT5/5e/6

C

AT5/5e/6

L

/R/PCM

C

AT5/5e/6

C

AT5/5e/6

C

AT5/5e/6

Speakers

HD
M

I

HD
M

I

Blu-Ray

Satellite 1

Desktop PC

Desktop PC

Display 8

Display 4

Control System

DVI

HDMI/DVI

Audio

CAT5/6/7

IR/RS-232

IR

HD
M

I

HD
M

I

Blu-Ray

IR

IR

HD
M

I

IR

HD
M

I

IR

HD
M

I

IR

IR/RS-23

2

IR/RS-23

2 & 

TCP/I

P

IR

HD
M

I

IR

HD
M

I

IR

HD
M

I

IR

IR/RS-23

2

IR/RS-23

2

HD
M

I

HD
M

I

IR/RS-23

2

HD
M

I

IR/RS-23

2

HD
M

I

IR/RS-23

2

HD
M

I

IR/RS-23

2

HD
M

I

Display 7

Display 3

Display 2

Display 5

Display 1

Display 6

Display 2a

Display 1a

(mirrored)

(mirrored)

Satellite 2

Cable 1

Cable 2

KD-BBTX

KD-BBTX

KD-BBTX

KD-BBTX

KD-BBRX

KD-BBRX

KD-BBRX

KD-BBRX

KD-HDMS8X8

Transmits:

 »1080p/60Hz resolution up to 140 ft
 »1080p/24, 1080i, 720p and 480i/p resolutions up to 270 ft
 » When used with KD-BBRX Receiver Baluns

RS232 Control

Serial IR

USB

TCP/IP

Optical IR

Surround Rcvr.

*To connect DVI use HDMI to DVI adapters

270’

180’

200’

150’

Summary of Contents for KD-HDMS10X6

Page 1: ...ts to 8 independent Zones Outputs via HDMI and CAT5 Features card slot architecture providing flexible Input Output configurations KD HDMS8X8 8 Inputs to 8 Outputs HDMI Matrix Switcher Also Available in Configurable Models Below KD HDMS1X15 2X14 3X13 4X12 5X11 6X10 7X9 KD HDMS15X1 14X2 13X3 12X4 11X5 10X6 9X7 Set Up Guide ...

Page 2: ...up to 1080p 60Hz 50Hz SD HD 480i 480p 720p 1080i 1080p VESA VGA RGBHV From 640x480p up to 1920x1200p Full support for HDMI 1 3a b with HDCP 3D Ready 4K Resolution Support Supports lossless compressed digital audio Dolby TrueHD Dolby Digital Plus and DTS HD Master Audio Internal EDID Library features 8 default EDID configurations in addition to native EDID data from any Output Display Key Benefits ...

Page 3: ...status information Right Selector Use to access sub menus within the Main Menu see pg 8 for complete operating instructions Left Selector Use to access Main Menu and select sub menu choices see pg 7 for complete operating instructions IR Eye Rear Panel Serial IR Optical IR Front Panel Control Discrete Remote Codes RS 232 and TCP IP Supports major control systems such as AMX Colorado vNet Control4 ...

Page 4: ...rt TCP IP to RS 232 conversion routing and TCP IP to serial IR conversion routing Serial IR RS 232 Use the KD HDMS as a Control Router for devices integrated into your system Serial IR RS 232 Use the KD HDMS as a Control Router for devices integrated into your system Left Analog Audio PCM Audio Input Supports Left channel Analog Audio Input or use for Coaxial Digital Audio Input Left Analog Audio ...

Page 5: ...R HDMI IR HDMI IR HDMI IR IR RS 232 IR RS 232 HDMI HDMI IR RS 232 HDMI IR RS 232 HDMI IR RS 232 HDMI IR RS 232 HDMI Display 7 Display 3 Display 2 Display 5 Display 1 Display 6 Display 2a Display 1a mirrored mirrored Satellite 2 Cable 1 Cable 2 KD BBTX KD BBTX KD BBTX KD BBTX KD BBRX KD BBRX KD BBRX KD BBRX KD HDMS8X8 Transmits 1080p 60Hz resolution up to 140 ft 1080p 24 1080i 720p and 480i p resol...

Page 6: ...e for all Inputs The EDID control and HDMI input set up is stored in a non volatile memory back up and is only required during initial set up or when a new display or source is added to the system Establish a default handshake for ALL Inputs Using the 7 EDID Setup Menu select ALL Inputs and scroll to the Output number you wish to copy the EDID from HDMI CAT5 or a Default EDID setting and press the...

Page 7: ...roll to select CAT5 and press the right selector to enter your choice 2 Repeat procedure for any other input where a KD BBTX is being used 3 Once you have correctly configured the inputs to accept either HDMI and or CAT5 Balun you need to establish the correct HDMI handshake 4 See previous section on establishing an HDMI handshake Front Panel Menu Selection Controls Power On The unit will power up...

Page 8: ...ut Set Up 7 EDID Set Up 8 TCP IP Set Up 9 Factory Default Using the right selector push to enter the sub menu for any of the selected main menu options above Sub Menu Selections 1 Video Switch options Output 01 08 All Outputs Use the left selector to choose these For each Output number selected 01 08 and All there are Input sub menu choices Input 01 08 Use the right selector to choose these and pu...

Page 9: ... there are Audio Output sub menu choices Digital Analog Use the right selector to choose these and push to confirm choice These correspond to the RCA connectors only and choose which format will be passed to the Output selected 5 Audio Input Set Up options Input 01 08 plus All Inputs Use the left selector to choose these For each Input selected 01 08 and All there are Audio Input sub menu choices ...

Page 10: ... and push to confirm choice You will receive a Completed message when successful or a Failed message if unsuccessful 8 TCP IP options IP address Sub net Mask Port The default IP address is 192 168 000 233 This can be changed to accommodate your particular configuration or controller The default Sub net mask is 255 255 255 000 and may also be changed to accommodate your particular configuration The...

Page 11: ...2 Output Balance 20 Output Delay 00 EDID Choice of default EDID library 01 08 see menu 7 EDID Set Up for a list of default EDID choices pg 10 TCP IP 192 168 0 233 Power On Power OFF R1 Button R2 Button R3 Button All Mute Mute Balance Tone Controls Bass Middle Treble LipSync Delay All Restore Restore Arrow Up Down Left Right R4 Button Volume Numeric Keypad Video Mode Audio Mode ...

Page 12: ... Switch Audio source of Output Card by numeric keypad R1 XX Audio Mode ZZ Where ZZ is 01 HDMI 02 RCA COAX SPDIF 03 RCA ANALOG 04 CAT5 AUDIO Example To switch the audio source for output 2 to CAT5 press R1 02 AudioMode 04 Front Panel Commands Using Remote The Remote can be used to navigate through the front LCD display options Use the Left and Right Arrow keys to choose options normally made by rot...

Page 13: ...Balun s Both HDMI and CAT5 Outputs are active on Output Card Slots therefore no configuration is necessary to active the CAT5 Output for each Tx Card Slot 4 Establish an HDMI Handshake for Each Source Copy EDID to Rx Card xx from Tx Card yy using SP C EDID xx H C D yy Where xx Card Slot of desired Input 01 08 Where H HDMI C CAT5 or D Default EDID Library 01 08 Where yy Card Slot of of desired Outp...

Page 14: ...8 yy Input number 01 08 or U D U Up D Down To switch Video Inputs to an Output Example To switch Video at input 2 to output 6 issue the command SPO06SI02 Example To step through each input going up through the inputs issue the command SPO01SI U each time this command is issued the selected output 1 in this case will step through the inputs in ascending order starting with the presently selected in...

Page 15: ...3D 1080p 2CH PCM 08 DEFAULT8 3D 1080p every audio including HD audio Front Panel Buttons SPCFBE D E Enabled D Disabled To Enable or Disable the front panel buttons Example To Disable the front panel buttons issue the command SPCFBD Adjust EQ for CAT5 length per Input SPCCAT5IC xxyy xx Input number yy EQ Value 0 40 default is 20 To adjust CAT5 Input EQ for fine tuning Video signal if necessary Exam...

Page 16: ...elected at a time 1 When the PCM Output is selected and its source is from the external PCM Input PCM at 48 kHz will be in bypass mode to pass Dolby Digital DTS or 2Ch PCM and will be without audio control 2 The Analog Stereo Audio Input is processed at 48 kHz and will be converted to digital audio at the PCM Output if desired Full audio control will be available in this case 3 When HD Audio HD Do...

Page 17: ... RS 232 Wired IR Control Matrix Each input output section wired IR and unit wired IR can be switched into matrix in bi directional operation to any of the inputs outputs EQ adjustment On Rx Balun or CAT5 Input Precise auto adjustment distance measurement Compliance with HDMI Standards Supports HDMI 1 4 features 3D Ready 4K Resolution Support HDMI 1 3a b HDMI 1 2 HDMI 1 1 DVI 1 1 and HDCP Link and ...

Page 18: ...rock anchors Safety Instructions Please be sure to follow these instructions for safe operation of your unit 1 Read and follow all instructions 2 Heed all warnings 3 Do not use this device near water 4 Clean only with dry cloth 5 Install in accordance with the manufacturer s instructions 6 Do not install near any heat sources such as radiators heat registers stoves or other apparatus including amp...

Page 19: ...arranty Service Should your product require warranty service or repair please obtain a Key Digital Return Material Authorization RMA number by contacting us at Phone 914 667 9700 E mail rma keydigital com Feedback Please email any comments questions about the manual to E mail customersupport keydigital com Warranty Information All Key Digital products are built to high manufacturing standards and ...

Page 20: ...er Mike Tsinberg develops and manufactures high quality cutting edge technology solutions for virtually all applications where high quality video imaging is important Key Digital is at the forefront of the video industry for Home Theater Retailers Custom Installers System Integrators Broadcasters Manufacturers and Consumers Rev 0 Dec 2010 ...

Reviews: