background image

18

8

5

6

Ø 6 x 9,5

7

M 8

Ø 6 x 9.5

M 8 x 16

M 8 x 16

A

B

C

D

F

E

4

B

A

A

B

Summary of Contents for DX 1 PRO

Page 1: ...Montageanleitung DX 1 PRO Art Nr 07990 700 Der Umwelt zuliebe wir drucken auf 100 Altpapier F D GB NL I E PL Abb ähnlich ...

Page 2: ...nschluß darf nur an einer mit 10 A einzeln abgesicherten Schukosteckdose erfolgen Vor Inbetriebnahme des Gerätes ist darauf zu achten daß das richtige Steckernetzteil Kennzeichnung beachten ordnungsgemäß angeschlossen ist ACHTUNG Nehmen Sie niemals Eingriffe an Ihrem Stromnetz selber vor beauftragen Sie ggf qualifiziertes Fachpersonal ACHTUNG Bei allen Reparatur Wartungs und Reinigungsarbeiten unb...

Page 3: ... Sie die Originalverpackung des Gerätes gut auf damit sie später u U als Transportverpackung verwendet werden kann Aus fertigungstechnischen Gründen behalten wir uns die Vormontage von Bauteilen z B Rohrstopfen vor Ersatzteilliste Geben Sie bei Ersatzteilbestellungen bitte die vollständige Artikelnummer die Ersatzteilnummer die benötigte Stückzahl und die Seriennummer des Gerätes an Bestellbeispie...

Page 4: ... once a year by specialist retailers Instruct persons using the equipment in particular children on possible sources of danger during exercising The unit requires a power supply of 220 230 V 50 Hz It should be connected only to a safety socket with a single 10 A fuse Before commissioning the appliance pay attention to the fact that the correct plug in power supply unit observe marking has been con...

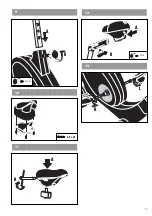
Page 5: ... is shown in the diagram inset Use the fastening material exactly as instructed The required tools are supplied with the equipment Bolt all the parts together loosely at first and check that they have been assembled correctly Tighten the locknuts by hand until resistance is felt then use spanner to finally tighten nuts completely against resistance locking device Then check that all screw connecti...

Page 6: ...urité générales relatives à la manipulation d appareils électriques Observez absolument de même les indications concernant le déroulement de l entraînement mentionnées dans les instruc tions relatives à l entraînement Nos produits sont constamment soumis à une assurance qualité innovatrice Nous nous réservons le droit de change ments techniques qui en résultent On cas de doute on est prié de s adr...

Page 7: ...ssurer que toutes les pièces liste récapitulative ont été fournies et que l envoi n a subi aucun dommage pendant le transport En cas de réclamation on est prié de s adresser á son concessionnaire Etudier les illustrations et procéder au montage dans l ordre prévu par les différentes figures Dans chacune d elles l ordre de montage est marqué par des majuscules L appareil doit être monté soigneuseme...

Page 8: ...ig te kunnen garanderen dient het aparaat regelmatig door één specialist vakhandelaar gecontroleerd en onder houden te worden één keer per jaar Wijs vooral kinderen op mogelijk gevaar tijdens de training Het toestel heeft een netspanning van 220 230 V en 50 Hz nodig en mag alleen worden aangesloten op een geaard veiligheids stopcontact met een eigen zekering van 10 A U gelieve erop te letten dat h...

Page 9: ...het recht voor sommige delen bij voorbeeld buisstoppen vóór te mon teren Onderdelenlijst ermeld bij de onderdelenbestellingen a u b het volledige arti kelnummer het onderdeelnummer het benodigde aantal en het serienummer aan Bestelvoorbeeld artikelnr 07990 700 onderdeelnr 10100030 2 stucks serienummer Belangrijk Vast te schroeven onderdelen worden in principe zonder schroefmateriaal berekend en ge...

Page 10: ... Instruya a las personas presentes en especial a los niños res pecto a los posibles peligros durante el entrenamiento El aparato requiere una tensión de alimentación de 239 V 50 Hz El aparato sólo se debe conectar a través de un enchufe tipo Schuko asegurado por separado de 10 A Antes de la puesta en marcha inicial del aparato hay que asegurarse de que el enchufe adecuado se haya conectado debidam...

Page 11: ...to en la tabla correspondiente Use el material de atornillamiento de forma exactamente correspon diente a la expuesta en la tabla Todas las herramientas necesarias las encontrará en la bolsita de piezas pequeñas Al principio atornille todas las piezas de forma floja y controle si todas están en su posición correcta Primero ator nille las tuercas autofijadores con la mano hasta la resistencia perce...

Page 12: ... regolarmente da uno specialista rivenditore specializzato nonché dovrebbero venire effettuati i necessari lavori di manutenzione una volta all anno Mettete al corrente le persone presenti circa i possibili pericoli mentre si svolgono gli esercizi soprattutto i bambini L attrezzo necessita una tensione di rete di 230 V 50 Hz Il collegamento deve avvenire esclusivamente a una presa con contatto di ...

Page 13: ...lo per usarlo in eventuali trasporti successivi Per motivi tecnici di fabbricazione ci riserviamo di montare a priori alcuni pezzi del veicolo per esempio i tappi dei tubi Lista di parti di ricambio Per l ordinazione di parti di ricambio indicate il completo numero di articolo della parte di ricambio il numero di unit necessario nonchè il numero di serie dell apparecchio Esempio di ordinazione art...

Page 14: ...nych zagrożeniach Przyrząd potrzebuje napięcia sieciowego 230 V 50 Hz Wolno go podłączać tylko do gniazda wtyczkowego ze stykiem ochronnym indywidualnie zabezpieczonym bezpiecz nikiem 10 A Przed uruchomieniem przyrządu należy spra wdzić czy przyłączony jest właściwy zasilacz uwaga na oznaczenie UWAGA Nigdy nie dokonuj sam manipulacji na sieci elektrycznej Prace takie zlecaj odpowiednio wykwalifiko...

Page 15: ... samozaklesz czające dokręć ręcznie do chwili aż opór stanie się odczu walny a następnie mocno dokręć kluczem przeciwko oporowi zabezpieczenie zaciskowe Po tej fazie montażu skontroluj wszystkie połączenia śrubowe pod względem prawidłowego zamocowania Uwaga poluzowane ponownie nakrętki samozakleszczające stają się bezużyteczne następuje zniszczenie zabezpieczenia zacis kowego i należy je wymienić ...

Page 16: ...16 Checkliste 4 2 1 1 1 1 1 1 1 1 1 Stck M 8 x 16 1 M 12 1 1 1 3 1 1 1 1 1 4 M 8 M 8 x 70 M 16 1 ø 24 M 3 9 x 25 1 1 1 1 2 1 ø 6 x 9 5 1 1a 1b 6 Pulsmesser Steckschlüssel ...

Page 17: ...suring help for screw connections Gabarit pour système de serrage Meethulp voor schroefmateriaal Referencia de medición para el material de atornilladura Misura per il materiale di avvitamento Wzornik do połączeń śrubowych GB F NL E I PL M 8 x 70 A B Ø 6 x 9 5 ...

Page 18: ...18 8 5 6 Ø 6 x 9 5 7 M 8 Ø 6 x 9 5 M 8 x 16 M 8 x 16 A B C D F E 4 B A A B ...

Page 19: ...19 MAX M 16 A B 9 10 11 A B 3 9 x 25 B A M 12 12 L L R 13 ...

Page 20: ...que signalétiqu Numèro de serie Typeplaatje Seriennummer Placa identificativa Número de serie Targhetta tecnica Numero di serie Tabliczka identifikacyna Numer serii Handhabung Handling Utilisation Handleiding GB F NL Aplicación Utilizzo Zastosowanie E I PL A B C C C ...

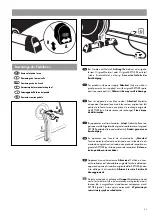
Page 21: ...ging En aparatos con fuente de alimentación Atención Funcionamiento solamente autorizado con la fuente de ali mentación original suministrada o con pieza de recambio ori ginal de KETTLER ver lista de piezas de recambio De lo con trario podría ocasionar daños Apparecchi con alimentatore Attenzione L utilizzo è cons entito soltanto con l alimentatore originale fornito in dotazione oppure con parte d...

Page 22: ...2 Ersatzteilzeichnung 17 20 12 21 50 23 24 48 25 11 28 10 13 7 5 8 38 32 39 6 1 41 51 49 29 9 46 43 27 22 9 11 45 31 4 2 3 14 36 22 56 55 53 37 52 54 58 44 26 20 35 34 15 40 33 57 18 47 16 30 19 42 17 59 ...

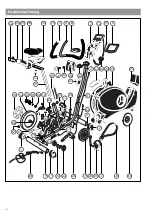
Page 23: ...29 Drehgriffschraube mit Rasterstift M16 1 91170291 30 Umlenkhebel mit Spannrolle und Befestigung 1 91140368 10 31 Stromkabel oben 1000 mm 1 67000126 32 Distanzhülse ø 16x4x12 mm zu Pos 4 1 97200562 33 Steuerung für Magnetspule mit Befestigung 1 91170428 34 Federscheibe ø 17 3 mm 2 10601003 35 Seegerring ø 17 mm 1 10709021 36 Lüfterscheibe 2359 1 70125785 37 Sattelrohr verchromt Abdeckungen 3374 3...

Page 24: ...24 HEINZ KETTLER GmbH Co KG Postfach 1020 D 59463 Ense Parsit docu 1033h 07 05 ...

Reviews: