


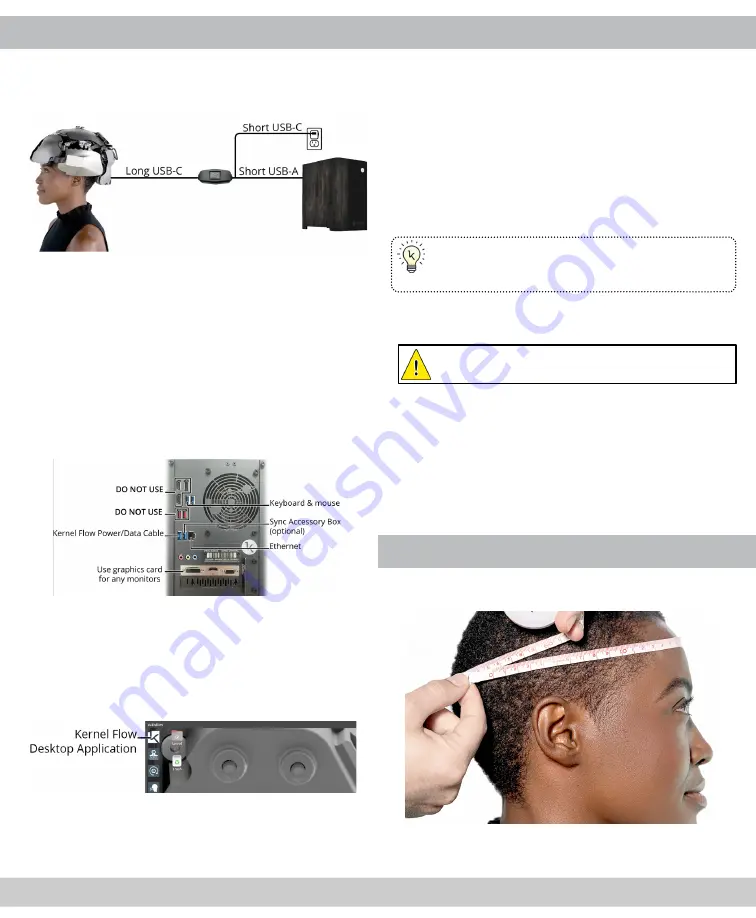
STEP 1: CONNECT THE HEADSET TO THE PC
Kernel Flow must be connected to the provided PC
to be configured and controlled. Follow the following
steps and diagrams to ensure successful operation.
1.
Plug the long USB-C end of the Power/Data
Cable into the USB-C connector on the back of
the headset.
2.
Plug the shorter USB-C end of the Power/Data
Cable into the Kernel Flow Power Supply.
3.
Plug the Power Supply into the
same outlet or
power strip
as the Kernel Flow Configuration PC.
4.
Plug the USB-A end of the Power/Data Cable into
the PC (
Do not use the red USB ports
).
The Flow device is now powered on.
NOTE: Even though a blue light illuminates on the
headset, all lasers remain off until they are enabled
using the Kernel Flow Desktop Application.
5.
Turn on the PC and launch the Kernel Flow
Desktop Application (the first icon in the Taskbar
as illustrated in the picture below).
NOTE: Your PC has been pre-configured by the
Kernel team prior to shipment so it is ready to
operate the Flow headset immediately. No login or
setup is required to run the Kernel Flow Application.
STEP 2: INITIALIZE THE HEADSET
1.
Be sure the headset is seated and tightened on
the Headset Stand.
2.
In the main window of the Kernel Flow desktop
application, click
Initialize
.
3.
A confirmation dialog appears. Click
Initialize
to
proceed.
Initialization performs a series of tests and pro-
cedures to ensure all modules are synchronized
and receiving adequate signal.
TIP: You may disregard the color of the modules
onscreen because the headset is not recording
brain activity at this stage in the setup process.
4.
When Initialization is complete, click
Close
to exit
the Initialization window.
IMPORTANT: Initialization must be performed
every time the headset is powered on.
NOTE: Kernel Flow’s lasers benefit from a warm up
period prior to recording a study. Often the process
of tuning and prepping a participant (while lasers
are enabled) provides sufficient warm-up time,
but you may consider enabling the lasers for 5-10
minutes while the headset is sitting on the Headset
Stand after Initialization. Just be sure to disable the
lasers prior to removing the Headset after this step.
STEP 3: MEASURE PARTICIPANT’S HEAD
1.
Wrap the supplied tape measure around the
participant’s head as illustrated below.
2.
Ensure the tape measure is snug and free of kinks
or twists and note the number of centimeters.
6
5


