5
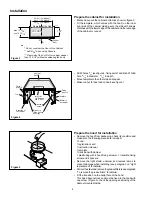
Conduit
Bottom of
the cabinet
Backside of
the cabinet
Backside
border
cutout for
1/2" Conduit
and 5" Duct
Blind hole
(Side Springs
Housing)
Fixing
point 1-2
Fixing
point 1-2
Cabinet
Door
Template
Template
Installation
Cabinet
Side Spring
Side Spring
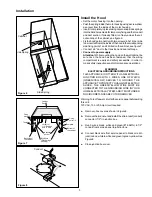
Figure 6
Figure 7
Figure 8
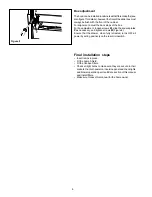
Install the Hood
• Set the motor housing into the opening.
• Push the spring inside the motor housing using a screw driver
as a lever from the inside of the motor housing.
• Insert it completely in place taking care to snap sides springs
into the blind holes made for temporary fixing and that conduit
and duct section, if already fitted, run freely across the cut-
outs on top of the cabinet, see figure 6.
• Fix the hood permanently with two screws (4.5x16) per side
to be inserted frome the inside of the hood to the corresponding
side fixing points 1 and 2 drilled on the cabinet, see figure 7.
• Connect a 5” duct to the transition and seal with tape.
• Connect to power supply
Attention! While mounting the hood on the wall cabinet be
sure once the hood has been fastened, that the wiring
compartment is easily and safely accessible, in order to
make safety inspections and/or maintenance operations.
WARNING!
ELECTRICAL GROUNDING INSTRUCTIONS
THIS APPLIANCE IS FITTED WITH AN ELECTRICAL
JUNCTION BOX WITH 3 WIRES, ONE OF WHICH
(GREEN/YELLOW) SERVES TO GROUND THE
APPLIANCE. TO PROTECT YOU AGAINST ELECTRIC
SHOCK, THE GREEN/YELLOW WIRE MUST BE
CONNECTED TO THE GROUNDING WIRE IN YOUR
HOME ELECTRICAL SYSTEM, AND IT MUST UNDER
NO CIRCUMSTANCES BE CUT OR REMOVED.
Warning: Turn off power circuit at the service panel before wiring
this unit.
120 VAC, 15 or 20 Amp circuit required.
a.
Remove j-box cover as shown in Figure 8.
b.
Remove the knockout and install the strain relief (conduit)
connector (1/2") in junction box.
c.
Run 3 wires; black, white and green (#16 AWG) in 1/2"
conduit from service panel to junction box.
d.
Connect black wire from service panel to black or red in
junction box, white to white and green to green-yellow. See
Figure 8.
e.
Close junction box cover.
Summary of Contents for Sirocco B81200 Series
Page 1: ...SIROCCO VENTILATION HOOD OWNER S GUIDE READ AND SAVE THESE INSTRUCTIONS Models B81200 Series ...
Page 9: ...9 ...
Page 10: ...10 ...
Page 11: ...11 ...
Page 12: ...LI1QVB Ed 05 02 ...


