background image

15

Operation

WARNING!

 To eliminate the risk of burns by 
reaching over heated surface units, 
cabinet storage space located above 
surface units should be avoided.  If 
cabinet storage is to be provided, the 
risk can be reduced by installing a 
range hood that projects horizontally 
a minimum of 5” beyond the bottom of 
the cabinets.

Before making the countertop cutout, check for 

clearance.  Check to see if the grill will clear 

the front and side walls of the base cabinet.  It 

is also important to provide enough ventilation.

Adequate ventilation of the space below the 

countertop must be provided to ensure proper 

operation of the grill.  Heat transferred from 

the grill bottom pan during operation will over-

heat an improperly ventilated area.

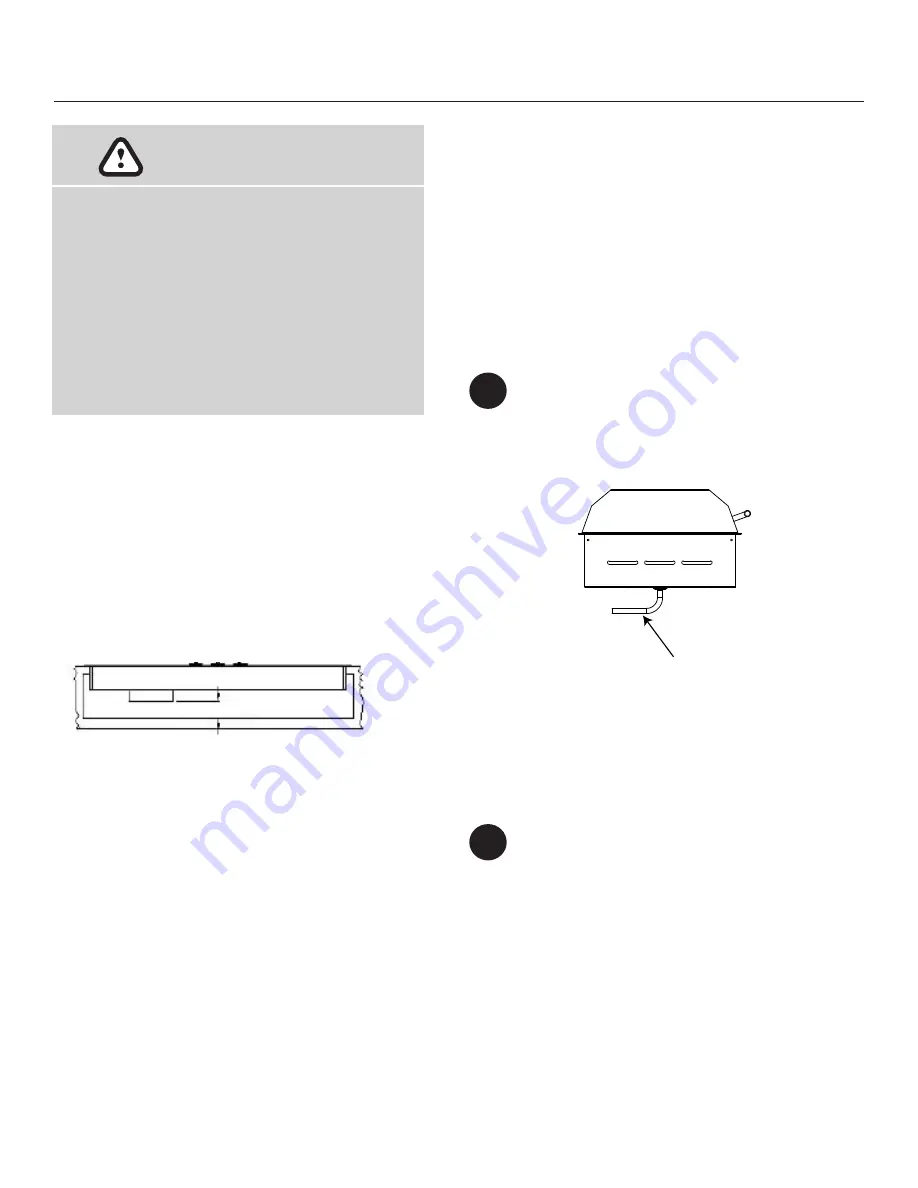
2 INCH (51mm) MINIMUM

When making countertop cutout, radius the 

corner to help prevent cracking of the countertop 

material. A 1/4 inch radius is typical, but follow 

the countertop manufacturer’s instructions 

regarding the minimum radius and any 

reinforcements required to prevent damage to 

the countertop over time.

Use Plumber’s Putty to seal grill to countertop. 

Plumber’s Putty is a soft, pliable sealing 

compound that is used to make watertight seals 

around faucets, drains, and other plumbing 

parts. The putty is hidden under the flange, lip, or 

edge of the grill and is not visible when the grill 

is installed. If caulk were used instead of putty, 

it would be difficult to access these areas to cut 

through the caulk to remove the part.

Drain Connection

4


For your convenience, the grill is equipped 

 with a 1/2” NPT brass pipe fitting and 90º 

brass elbow which you can attach the 5/8” ID 

flexible hose that came with your grill. 

5


Remove the protective plastic film from the 

lid, trim flange and glass panel. Clean the grill 

before you use it for the first time. A thorough 

cleaning with a stainless steel or glass cleaner 

will remove any traces of plastic film adhesives 

and manufacturing oils.

Wash the nonstick coated grates in warm 

soapy water before using the grill.

Final Preparations Prior 
to Use

Drain fitting for 5/8” ID hose

Plumber’s Putty is a very inexpensive material 

that is sold in small plastic tubs. It is always 

shaped by hand before it is applied. Follow 

the basic instructions on the container of the 

Plumber’s Putty. If your countertop is made of 

granite, marble, quartz, sandstone or Corian use 

a stain-free Plumber’s Putty to prevent staining 

of the countertop.

Summary of Contents for C70400WH

Page 1: ...Part 145639 Created May 11 2020 Revised June 9 2020 www CookWithKenyon com TEXAN KNOB CONTROL 240V OWNERS MANUAL ...

Page 2: ...on Final Preparations Prior to Use Warranty 3 5 6 7 9 9 9 9 9 10 11 12 12 13 13 14 15 15 16 Please read save these instructions Thank you for choosing Kenyon the world s leading manufacturer of specialty cooking appliances By following the instructions in this owners manual your grill will provide you with many years of reliable service To ensure our ability to continue serving you please use this...

Page 3: ...ccessory attachments not supplied by the manufacturer of the appliance may cause injuries Suitable shelter must be provided to prevent direct exposure to rain Do not let cord hang over edge of table or counter or touch hot surfaces Always place a minimum of two 2 cups of water in the drip tray prior to grilling Never leave children alone children should not be left unattended around the grill at a...

Page 4: ...s E l e c t r i c G r i l l T h e r e a r e a f e w s i m p l e s t e p s y o u c a n t a k e t o e n s u r e y o u r g o o d d e c i s i o n w i l l l e a d t o y e a r s o f W o r l d C l a s s G r i l l i n g Q U I C K S T A R T T I P S to purchase recipe books cooking utensils griddles grill covers and more VISIT OUR WEBSITE 1 2 3 4 5 6 7 8 Remove grate s and drip tray s clean both Insert the ...

Page 5: ... 13 3000 BURNER DATA Overall Cutout Dimensions 25 85in 657mm 4 85in 123mm 5 69in 145mm 11 43in 290mm DRAIN FITTING TO BACK OF FLANGE TO FRONT OF FLANGE A Height of lid fully open 20 1 511mm B Depth of grill with lid open 25 85 657mm C Depth of grill on counter 21 533mm D Width of grill on counter 29 5 749mm 28 00in 711mm 18 50in 470mm 3 90in 99mm 5 43in 138mm WITH DRAIN FITTING 7 25in 184mm 12 00i...

Page 6: ...r type of food Vegetables 3 4 bars Chicken pork and fish 4 5 bars Hamburgers 6 7 bars Steak 7 8 bars Close the lid s and cook Enjoy the best grilled food you have ever tasted Clean up After the grill has cooled to the touch take a few pieces of paper towel and place on the grilling surface Pour about one ounce of water on the towel and then using your high temperature nylon tongs swab the paper to...

Page 7: ...nless steel surfaces with a damp cloth to remove any residue from previous grilling sessions 13 7 Your Kenyon grill came with a sample bottle of stainless steel cleaner Use this cleaner once a month to keep your grill looking like new 14 ...

Page 8: ...d caution while cleaning as they may be hot enough to cause severe burns CLEAN GRILL AFTER EACH USE This appliance is equipped with removable disposable drip trays The drip trays MUST be removed and cleaned after each and EVERY use Do not allow grease to accumulate between cooking The drip trays and baffle tray MUST be used when cooking on the grill Excessive grease may spill over into the interio...

Page 9: ...enter with the highest being to the clockwise of center Each has a detent to indicate lowest and highest setting Power Level Graphic Depicts the level of heat output of the element The line sweeps from thin to thick indicating low to high power The line is broken into eight segments IMPORTANT Do not remove the control knobs for cleaning Use a soft cloth to clean under the skirt of the knob POWER O...

Page 10: ...mperature when placed on grill can affect cooking times The grill is designed and engineered for optimal cooking performance with the lid down or closed The Kenyon Texan Grill with Knob Control is a sealed unit that does not require regular maintenance Please follow our operating instructions as mentioned above If your grill requires service this must be preformed by Authorized Personnel only Plea...

Page 11: ...after each use When replacing the drip trays position the drip trays so that they are completely contained inside the baffle tray and insuring that the side or the rim of the drip trays do not protrude outside of the baffle tray To prevent the contents of the drip trays from smoking place 2 cups of water or enough to cover the bottom of the pan in the drip trays before cooking The replacement for ...

Page 12: ...and slide the lid away from the center of the grill until the outer hinge is free of it s pivot pin Once the lid s have been removed they can be washed in warm soapy water Installation is reverse of removal Handle Lock The handle lock allows the user to lock both lids together for ease of opening and accessing the entire grilling surface The lids can also be unlocked and opened individually for ac...

Page 13: ...rporated in the fixed wiring in accordance with the wiring rules Check the Electrical Supply Requirements PARTS INCLUDED Texan Grill with Knob Control 1 Stainless steel cleaner 3 feet of drain hose with brass fitting 9 Mounting screws IMPORTANT If the electrical supply does not meet the product specifications consult with a licensed electrician before proceeding with installation MAX CONNECTED LOA...

Page 14: ...t millboard covered with not less than No 28 MSG sheet steel 0 015 inch think stainless steel 0 024 inch thick aluminum or 0 020 inch thick copper E 6 inch minimum from backsplash of countertop to edge of grill refer to page 5 for overall grill dimensions 1 1 2 inches minimum from front of counter to grill It is important to plan ahead for installation of the grill keeping the following dimensions...

Page 15: ...r s Putty is a soft pliable sealing compound that is used to make watertight seals around faucets drains and other plumbing parts The putty is hidden under the flange lip or edge of the grill and is not visible when the grill is installed If caulk were used instead of putty it would be difficult to access these areas to cut through the caulk to remove the part Drain Connection 4 For your convenien...

Page 16: ... liable for any damage resulting from failures due to use of the product in applications for which they are not intended failures due to corrosion wear and tear abuse neglect improper installation or maintenance failures due to breakage of glass accidental or otherwise 4 The Company shall be responsible for ground shipping charges to the location of the appliance home within the Continental United...

Reviews: