20
Preparations
XD-DV series (EN/K,M,T,X,Y)/2
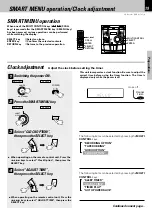
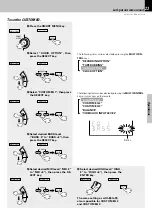
Display the clock
÷
When the
DISPLAY/DEMO
key is pressed while the power is
off, the present time will be displayed for about 5 seconds.
REMOTE
MAIN UNIT
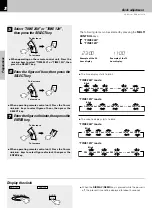
Select “TIME 24H” or “TIME 12H”,
then press the SELECT key.
Enter the figure of hour, then press the
SELECT key.
÷
When operating remote control unit, Press the Cursor
4
,
¢
keys to select figure of hour, then press the
SELECT key.
Enter the figure of minute, then press the
ENTER key.
÷
When operating remote control unit, Press the Cursor
4
,
¢
keys to select figure of minut, then press the
ENTER key.
To increase
To decrease
6
To increase
To decrease
÷
The time display starts to blink.
Blink
“TIME 24H” mode
0:00
j
1:00
j
2:00
j
•••••
j
22:00
j
23:00
AM 12:00
j
AM 1:00
j
AM 2:00
j
•••••
j
PM11:00
Blink
“TIME 12H” mode
÷
The minute display starts to blink.
Blink
“TIME 24H” mode
Blink
“TIME 12H” mode
19:00
j
19:01
j
19:02
j
•••••
j
19:58
j
19:59
PM 7:00
j
PM 7:01
j
PM 7:02
j
•••••
j
PM 7:59
5
÷
When operating on the remote control unit, Press the
4
,
¢
keys to select “TIME 24H” or “TIME 12H”, then
press the SELECT key.
The following items can be selected by pressing the
MULTI
CONTROL
keys.
“TIME 24H”
“TIME 12H”
Example of the 24
hour display.
Example of the 12
hour display.
23:00
11:00
7
To increase
To decrease
M
U
LT
I C
O
N
T
R
O
L
/P
.C
A
L
L
4
¢
EN
TER
SELECT
M
U
LT
I C
O
N
T
R
O
L
/P
.C
A
L
L
4
¢
SELECT
M
U
LT
I C
O
N
T
R
O
L
/P
.C
A
L
L
4
¢
DISPLAY/DEMO
DISPLAY/DEMO
DISPLAY
AUDIO
Clock adjustment


