background image

XD-981MD (En)

8

Preparation section

Basic section

Application section

Knowledge sections

Before applying power

Connect separately sold parts as shown in the figure.
Do not plug the power cord into the power outlet until all
of the required connections have been made.

Connection of Options 

(Optional Parts)

Cassette deck (etc)

(analog)

Playback output

System connection

Optical fiber cable

Audio cords

Remove cap.

DIGITAL OUTPUT

(OPTICAL)

Super woofer (SW-500)

Extremely low sound is played back powerfully. This
can be used with any type of playback.

DAT, DBS tuner, etc.

Digital component

ANTENNA

AM

FM

300

FM

75

GND

SUPER

WOOFER
PRE OUT

SPEAKERS

(6-1

6

)

R

L

+

-

-

+

R

L

AUX INPUT

DIGITAL

INPUT

OPTICAL

SUPER

WOOFER
PRE OUT

R

L

AUX INPUT

Summary of Contents for XD-981MD

Page 1: ...COMPONENT SYSTEM COMPACT HI FI SYSTEM INSTRUCTION MANUAL KENWOOD CORPORATION B60 3933 00 CH Q XD 981MD SY ...

Page 2: ...ESENCE OF IMPORTANT OPERATING AND MAINTENANCE SERVICING INSTRUCTIONS IN THE LITERATURE ACCOMPANYING THE APPLIANCE Units are designed for operation as follows U S A and Canada AC 120 V only Austraria AC 240 V only Safety precautions WARNING TO PREVENT FIRE OR ELECTRIC SHOCK DO NOT EXPOSE THIS APPLIANCE TO RAIN OR MOISTURE CAUTION The marking is located on the rear panel and says that the com ponent...

Page 3: ...pt for some areas 45 Searching for a desired program type PTY search 46 To be able to listen to the desired information at any time 48 Convenient Recording Methods 50 Selection of the Recording type 50 One touch recording of one CD One touch edit recording of all tracks 52 When a desired track is found only that track is recorded One touch edit recording of one track 53 Producing a MD collecting o...

Page 4: ...recorded in the desired sequence AI timer When the unit is turned ON by the timer the sound level increases gradually O T T A timer with easy setting which operates only once Sleep timer Useful when you want to go asleep while listening to music Speaker cords 2 Loop antenna 1 Unpacking Unpack the unit carefully and make sure that all accessories are put aside so they will not be lost Examine the u...

Page 5: ...o not touch the disc directly Do not touch the disc by opening the shutter with your hand The cartridge will be damaged if it is forced open Storage position Do not leave Mini Discs in place where the temperature and or humidity are extremely high for example in a place subject to direct sunlight Handling of Mini Disc As the Mini Disc is accommodated inside a cartridge it can be handled without ca...

Page 6: ...s is the method for connection between the main unit and the accessories Please connect correctly as shown in the figure Connection of the System Accessories AM loop antenna The supplied antenna is for indoor use Place it as far as possible from the main system TV set speaker cords and power cord and set it to a direction which provides the best reception Twist 3 2 1 4 Red Black Speaker cord Conne...

Page 7: ...unplug the power cord from the wall AC outlet if connec tion cords are plugged or un plugged with the power cord left plugged in malfunction or damage may result 3 Never short circuit the and speaker cords 4 If the left and right speaker connections or the and polarity are inverted the sound will be unnatural with unclear positioning of musical instru ments etc Be sure to connect them without mist...

Page 8: ...ve been made ConnectionofOptions Optional Parts Cassette deck etc analog Playback output System connection Optical fiber cable Audio cords Remove cap DIGITAL OUTPUT OPTICAL Super woofer SW 500 Extremelylowsoundisplayedbackpowerfully This can be used with any type of playback DAT DBS tuner etc Digital component ANTENNA AM FM 300Ω FM 75Ω GND SUPER WOOFER PRE OUT SPEAKERS 6 16Ω R L R L AUX INPUT DIGI...

Page 9: ...may not be produced or noise may interfere 2 Beforepluggingorunpluggingaconnec tion cord be sure to unplug the power cord from the wall AC outlet If connec tioncordsarepluggedorunpluggedwith the power cord left plugged in malfunc tion or damage may result 3 In case an associated system compo nentisconnected alsoreadtheinstruc tion manual of the component 4 While pushing the two sides of connec tor...

Page 10: ...noise reduction ON OFF switching is executed Cassette holder Press the area marked 0 PUSH OPEN to load or eject a tape TWIN REC key WE Simultaneous recording from CD to MD and cassette tape is possible ªO T E ONE TOUCH EDIT WE One touch CD recording is possible ºPlayback 2 3 key Stop 7 key 6 7 3DISC QUICK MOVE TITLE INPUT TITLE SEARCH MULTI JOG UP DOWN DELETE PUSH OPEN TWIN REC O T E 3D O T T ON S...

Page 11: ...used for repeated playback e At the time of unit OFF Used for timer setting f Fast forward fast reverse 1 keys At the time of CD MD and TAPE this is used for fast forward and fast backward At the time of TUNER this is used to tune a broadcasting station At the time of title input this is used for cursor movement ON STANDBY key The system is switched ON and STANDBY Display section MULTI CONTROL VOL...

Page 12: ...splay The presently played CD or MD track number is displayed Volume display section The volume level is displayed Display section for tuner application operation etc In addition to tuner display CD application operation timer playback etc also is displayed Character information display section dot display Indication of input switching volume level disc track title disc No and various other charac...

Page 13: ...h ENTER key Used for execution of editing processing confirmation of en tered titles etc 6TIME DISPLAY key The time display is switched DOT DISPLAY key This key switches the display mode of the dot display 7ON STANDBY key The system is switched ON and STANDBY 8N B natural bass key Very low sound is compensated 9Keys related to CD and MD Common keys for CD and MD function for CD or MD according to ...

Page 14: ...malfunction 1 Remove the cover Operation of remote control unit Notes Notes 2 1 2 1 30 6m 30 0 2 Insert batteries Insert two R6 AA size batteries following the polarity indications Operating range approx Remote sensor The CHANNEL SPACE setting is set to the correct setting that prevails in the area to which the unit is shipped However if the CHANNEL SPACE setting is not matched to the area where t...

Page 15: ...XD 981MD En 15 Preparation section Basic section Application section Knowledge sections Controls and indicators ...

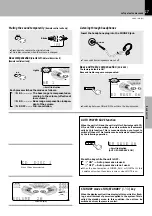
Page 16: ... is switched on when the CD MD and TAPE playback key or the tuner BAND key is pressed When the ON STANDBY key is pressed while the unit is ON the unit will be switched OFF Bass compensation Muting the sound temporarily Basic use method Sequentialswitchingeachtimethekey is pressed 1 TUNER Broadcasts 2 CD 3 MD 4 TAPE 5 AUX External input 8 6 DIGITAL IN OPTICAL input When CD or MD is selected playbac...

Page 17: ... the key while the unit is OFF 1 ON Auto power save is used 2 OFF Auto power save is not used Bass and treble compensation EX BASS The factory default is ON Bass and treble range are compensated 1 23 VOL DIGITAL MUTE N B PHONES N B CD N B 1 A Each press switches the modes as follows 1 N B 1 The bass range is compensated ac cording to the volume effective at low volume 2 N B 2 Bass range compensati...

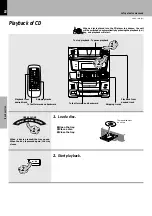
Page 18: ...the key is pressed again the tray closes When a disc is placed into the CD player in advance the unit will be switched on automatically by pressing the playback 6 key and playback will start Playback from desired track To fast forward and backward Playback from desired track Skipping tracks 1 1 OPEN CLOSE 0 3 0 2 0 1 6 2 2 The label side must be on top Skipping tracks To fast forward and backward ...

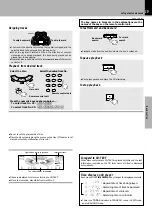
Page 19: ... from desired track Press the numeric keys as shown below To enter track No 23 003 To select track No 40 0000 Remote control unit Time display on CD player Each press of the TIME DISPLAY key changes the displayed contents There is no TOTAL indication in PROGRAM mode in EDIT mode and in RANDOM mode 1 Elapsed time of track being played 2 Remaining time of track being played 3 Elapsed time of entire ...

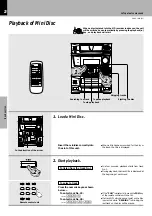
Page 20: ...h track If the PGM indicator is lit press the PGM key of the remote control unit to not lit If a track NO which does not exist on the disc is selected while READING is blinking the last track on the disc will be played Press the numeric keys as shown below To enter track No 23 003 To enter track No 40 0000 To select a track When a disc is placed into the MD recorder in advance the unit will be swi...

Page 21: ... C O DIGITAL EX BASS PGM 4 3 2 1 8 7 6 5 12 11 10 9 16 15 14 13 MD CD 880 12 00 1 VOL T R A C K I T I T L The display changes Disc title Skipping tracks The track in the direction of rotating the jog dial is skipped and the selected track will be played from the beginning When the jog dial is rotated a little in the direction of counter clockwise once during playback the track being played will be...

Page 22: ...E are displayed Track selection is possible with the MULTI JOG dial 4 on the main unit To abort operation press the TITLE SEARCH key again To smaller track No To larger track No Press during stop PGM TITLE SEARCH 4 P CALL 3 MD N B PGM CD A B C D E TOTAL DIGITAL TITLE SEARCH TUNED STEREO 880 00 00 1 N O T T I T L E TOTAL DIGITAL TITLE SEARCH TUNED STEREO 880 00 00 4 A B C D E F D C 1 TOTAL DIGITAL ...

Page 23: ...isplay 2 Track title display 3 Recordable time for the MD only during MD record ing For discs not conforming to CD TEXT 1 CD disc No 2 Recordable time for the MD only during MD record ing During MD recording 1 Normal display 2 Recordable time for the entire minidisc Elapsed time of track being played Remote control unit TIME DISPLAY 881 23 00 1 Remaining time of track being played Recordable time ...

Page 24: ...running direction changes each time the key is pressed If you load a tape s in a cassette deck s while the power is off simply pressing the tape play key turns power automatically ON and starts playback 0 PUSH OPEN 1 1 To wind tape at high speed To stop playback Selection of Dollby NR Selection of reverse mode UP 1 1 2 2 0 2 3 2 2 1Open the door 2Insert a tape and close the door CYBER TITLER A ...

Page 25: ...yed back endlessly The tape stops after recording onto both sides 3 Only one side is played back recorded and then the tape stops Press the 7 key to stop fast winding REV MODE Each press switches the modes as follows 1 DOLBY NR ON DOLBY NR is used 2 DOLBY NR OFF DOLBY NR is not used DOLBY NR To stop playback Do not take out the cassette tape until the tape transport has stopped completely 7 To fas...

Page 26: ... 5 times The DPSS may not function normally with the following kinds of tape Tapes containing several no sound intervals of more than 4 seconds such as conversation and talk tapes Tapes containing pianissimo sections such as classical music tape Tapes in which large noise is recorded in blanks between programs Tapes containing blanks between programs that are shorter than 4 seconds Tapes recorded ...

Page 27: ...XD 981MD En 27 Preparation section Basic section Application section Knowledge sections Let s put out some sound ...

Page 28: ...uning Press the key repeatedly or hold it depressed until a station is received Each press changes the band Select a station 1 FM 2 AM Every time the key is pressed the preset stations are switched over as follows Press for the order of 1 2 3 38 39 40 1 Press 4 for the order of 40 39 38 3 2 1 40 When no stations have been memorized When stations have been memorized preset call Remote control unit ...

Page 29: ...tions of the band presently being received will be preset When there are many stations and the intended station has not been preset please also use One by one presetting manual preset Keep the ENTER key depressed about 2 seconds 2Select one of the preset numbers from 1 to 40 ENTER 3Press the ENTER key again The TUNED indicator lights when a station is received Reception band indication The numbers...

Page 30: ...urce to be recorded Select an input source other than MD Each press switches the modes as follows 1 TUNER Broadcasts Only analog re cording 2 CD Digital or analog recording 3 MD Recording is not possible 4 TAPE Only analog recording 5 AUX tape etc Only analog recording 6 DIGITAL IN Optical input MD recording is possible as digital recording where the digital signal of the CD is used as it is and a...

Page 31: ...hen one of the following messages is displayed DISC FULL The minidisc is full Erase unrequired tracks ÁA PROTECTED The write protect tab is open Close it 5 PLAY ONLY The minidisc is only for playback Insert a recordable disc 4 4 0 4 Remove the minidisc after the end of recording Always remove the minidisc after recording For recording from a CD read ONE TOUCH EDIT recording WE Let s recording Stop...

Page 32: ...ERASE or ALL ERASE Á Note Note Press during recording DIGITAL goes off Let s recording When a part without sound continues for 2 sec or more during recording the track number is automatically increased by 1 when the next sound enters When classic music continues with low sound the track number may be increased by 1 The er roneously set track number can be erased later When it is desired to increas...

Page 33: ...XD 981MD En 33 Preparation section Basic section Application section Knowledge sections Let s put out some sound ...

Page 34: ...ssette deck cannot record onto Metal tapes 1Open the door of deck 2insert a tape 3Close the door 3 Set the recording condition 1 Press the play key 2 Press the play key again 3 Stop playback Note Note 0 PUSH OPEN 1 1 2 3 2 2 REV MODE 3 3 Differentiation between normal TYPE ø and high TYPE tape is set automatically Remove tape slack before loading To reverse the transport direction Check the tape t...

Page 35: ...R DOLBY NR Lit when DOLBY NR is ON Each press switches the modes as follows 1 DOLBY NR ON DOLBY NR is used 2 DOLBY NR OFF DOLBY NR is not used Blinks Pressing the key pauses recording after leaving a non recorded space of about 4 seconds If the key is pressed again in less than 4 seconds after it has been pressed recording resumes from that instant Points in CD recording Where recording CD tracks ...

Page 36: ...ack To select tracks from more than one disc repeat 1 2 and 3 Up to 32 tracks can be programmed When FULL is dis played no more tracks can be programmed If you make a mistake press the PGM key to quit the program mode and restart from step 2 PGM DISC SELECTOR 6 C D Listening in the desired sequence program playback Any titles on the discs in the tray can be listened to in the desired sequence Max ...

Page 37: ...o is entered the track will be added to the end of the existing program 1Select the disc 2Select the track 7 DISC SELECTOR 1 3 2 4 5 6 7 8 9 10 0 PGM Go to step 2 within 8 seconds Press to clear tracks from the end To clear all track CLEAR Each time the key is pressed the last track in the program is cleared 3Confirm the selection PGM N B PGM CD C D C D D I S C Goes off Press in stop mode ...

Page 38: ...current mode of the CD player starts REPEAT PGM CD C D D I S C DISC SELECTOR Confirm that this is not lit REPEAT DISC ALL CD C D P E D I S C P Lights REPEAT To repeat a disc 1Confirm that the PGM indicator is not lit 2Specify DISC REPEAT 3Select the disc If the PGM indicator is lit press the PGM key to turn it off Each press switches the repeat mode 1 REPEAT 2 DISC REPEAT 3 ALL REPEAT 4 Repeat OFF...

Page 39: ...player starts REPEAT 6 C D To repeat only one track 1Confirm that the PGM indicator is not lit 2Select REPEAT If the PGM indicator is lit press the PGM key to turn it off Each press switches the repeat mode 1 REPEAT 2 DISC REPEAT 3 ALL REPEAT 4 Repeat OFF To stop repeated playback Press the REPEAT key three times The REPEAT indicator goes off and the playback following the current mode of the CD p...

Page 40: ...ck in the middle of playing one To cancel random playback Press so that the RANDOM indicator goes off Select the CD input Listening to an unexpected title sequence random playback As the titles each time are selected randomly the music can be enjoyed without getting tired of it Confirm that the PGM indicator is not lit 1 2 Each press switches the modes as follows 1 DISC RANDOM Random play of one d...

Page 41: ...w To enter track No 23 003 To select track No 40 0000 Lights 1Selectthetracknumbertobeplayed Select track numbers in the order you want to play them Up to 32 tracks can be programmed More than 32 tracks cannot be selected If you made a mistake press the CLEAR key and enter the track No again An extremely short track cannot be programmed is displayed when the total programmed period has attained 10...

Page 42: ... the end of the existing program The entire program is cleared Each time the key is pressed the last track in the program is cleared or Main unit Remote control unit Press in stop mode Clearing all tracks Press in stop mode PGM EDIT TOTAL DIGITAL TITLE SEARCH TUNED STEREO P 14 P G M E M D R E R 0 1Sequentially select the track num bers to be added 2Confirm the selection PGM Repeat 1 and 2 for sele...

Page 43: ... executed Press in stop mode All of the programmed tracks will be repeated In case only one track is programmed only that track will be repeated 1Make the PGM display go out To stop repeated playback Press the REPEAT key again The REPEAT indication goes out and program playback is executed REPEAT PGM CD T I T L E I S C REPEAT PGM light REPEAT PGM CD T I T L E I S C PGM goes off REPEAT light PGM RE...

Page 44: ...XD 981MD En R D S 44 Application section ...

Page 45: ...n an RDS broadcast is received the station name is automatically displayed EON Enhanced Other Network i When the information to be received is set in advance and any RDS station in the same network starts broadcasting of such information the reception automatically will be switched to that station MHz TP TA NEWS INFO PTY DIGITAL R D S EON 4 3 2 1 8 7 6 5 12 11 10 9 16 15 14 13 TUNED STEREO AUTO MD...

Page 46: ...am type is shown on the display If no PTY data is available or if the station is not an RDS station NONE is displayed A 1 keys 1 DOWN UP M O R Music Middle of the Road Music Program type table Display POP M ROCK M M O R M LIGHT M CLASSICS OTHER M NEWS AFFAIRS INFO SPORT EDUCATE DRAMA CULTURE SCIENCE VARIED WEATHER FINANCE CHILDREN SOCIAL A RELIGION PHONE IN TRAVEL LEISURE JAZZ COUNTRY NATION M OLD...

Page 47: ...inks When a station is received Goes off Program type name display No sound is heard while PTY is blinking If a program of the desired type cannot be found NO PROG is displayed then after several seconds the display returns to the original display Ifaprogramofthedesiredtypeisfound thatprogramisreceived and the program type name display changes temporarily to the station name display CD S PTY R D S...

Page 48: ...VOL T U N E R S P 0 1 Lights when INFO is selected When EON does not light although an RDS station is re ceived that station is not transmitting EON data Please select a different station When TA is desired select a station where the TP display lights MHz TP INFO DIGITAL R D S EON 4 3 2 1 8 7 6 5 12 11 10 9 16 15 14 13 TUNED STEREO AUTO MD CD 90 0O F M VOL T U N E R S P 0 2 RDS and EON are lit Tob...

Page 49: ...TAPE playback has been inter rupted it will be continued from the point of interruption Wait for the desired information 4 CD MD or TAPE playback may also be started As long as the unit is ON the unit is always ready for the reception In case of waiting for information with an RDS sta tion without EON function When there is no EON display with the operations of steps 3 and 4 and the desired inform...

Page 50: ...after listening One touch edit one track Program recording one CD One touch edit all tracks BEST HITS Select and record the desired tracks Program recording several CDs Are only the first tracks of several CDs to be recorded No Yes Yes No Yes No Yes No No Yes No Yes Many convenient recording functions have been provided Please select them according to the application It is possible to record desir...

Page 51: ... track Recording from CD is possible to tape or MD and simulta neously to MD and tape This is convenient for recording of desired tracks from a disc being heard for the first time From one CD Selected tracks are recorded from several CDs to MD From 2 or more CDs D Recording of one CD or several CDs CD MD Program recording Y Recording in the programmed sequence from CD to tape From one CD Selected ...

Page 52: ...to stopped condition 2Start recording Pressbeforeplayback of the CD starts When the O T E key is pressed after playback has started only the track being played at that time will be recorded Note Note With recording onto tape the track will be interrupted for the part of the guide tape at the tape reversal where recording is not possible Please use a different recording method if this is to be avoi...

Page 53: ...e beginning of the track being played and recording starts At the end of the recording MD recorder Stop Cassette deck Stop is executed after an unrecorded portion of about 4 sec has been produced To record another track repeat the steps 2 and 3 Simultaneous recording from CD to MD and tape 1Load a tape 2Select the tape transport direction 2 or 3 3Select p two side recording 4Select the Dolby NR mo...

Page 54: ... recorded discs can be exchanged This is convenient for collecting from a large number of single CDs BEST HITS 0 3 0 2 0 1 O T E 0 3 0 2 0 1 Exchange discs as required 4 1Exchange the disc 2Close the tray OPEN CLOSE 0 3 0 2 0 1 0 3 0 2 0 1 When the discs are exchanged sequentially recording can be continued without interruptions 0 3 0 2 0 1 To end recording EDIT TOTAL DIGITAL TITLE SEARCH TUNED ST...

Page 55: ...elect the tape transport direction 2 or 3 3Select p two side recording 4Select the Dolby NR mode 5Select CD with the INPUT SELECT key 6Insert disc s in the CD player 7Confirm that the PGM indicator is not lit 0 3 0 2 0 1 O T E EDIT TOTAL DIGITAL TITLE SEARCH TUNED STEREO C80 00 d0 1 H I T S D 1 2 3 With recording onto tape the track will be inter rupted for the part of the guide tape at the tape r...

Page 56: ...s the CLEAR key and enter the track No from the beginning 1 Always remove the disc after recording 1Select the disc 2Select the track To edit tracks from more than one CD repeat 1 2 3 for each CD Displays the entered track No Light the PGM indicator 2 Lights Lights If it is in play mode TheMDrecordingispausedwhiletheCDisexchangedinthetray When the PGM key is pressed to cancel the edited contents t...

Page 57: ...he track To edit tracks from more than one CD repeat 1 2 3 for each CD Light the PGM indicator 2 Lights If it is in play mode ThetaperecordingispausedwhiletheCDisexchangedinthetray Tracks programmed in excess of the tape recording time will be cut off When the PGM key is pressed to cancel the edited contents the entire editing contents will be erased Go to step 2 within 8 sec onds 7 PGM DISC SELEC...

Page 58: ...XD 981MD En 58 Preparation section Basic section Application section Knowledge sections Convenient Recording Methods ...

Page 59: ...olling Displayed area All cannot be displayed Scrolling image A K E N W O O D M I N I D I S C K E N W O O D M I N I D I S C R E C O R D E R M I N I D I S C R E C O R D E R Reordering tracks by moving them Dividing a track combining two tracks TRACK DIVIDE TRACK COMBINE ˇ Erasing track s Moving several tracks at a time QUICK MOVE Moving a single track TRACK MOVE Dividing a track into two Erasing a ...

Page 60: ...t 3Set the selection 1Enter the title in memory 2Complete the operation Input the title characters by repeating 1 to 3 for each of them To advance Activate the title input mode 1 It takes a while because data should be read out of the disc In case of disc title In case of track title Example of disc title EDIT TOTAL DIGITAL TITLE SEARCH TUNED STEREO C80 00 I S I S O S T R E O C d EDIT TOTAL DIGITA...

Page 61: ...demonstration ON OFF DELETE key The character at the cursor is deleted erased and the following characters move up by one character each Titles can be erased easily by continuous pressing or by holding the key down for repeated input EDIT TOTAL DIGITAL TITLE SEARCH TUNED STEREO C80 00 dI S O M O P N W H K E Always remove the minidisc after title input or editing The names in brackets in the explan...

Page 62: ...ck to the unit while this message is displayed 0 3 0 2 0 1 2Set the reordered range 2Set it 1Select a track number 0 3 0 2 0 1 800 90 00 5 C O M P L E T E E SET To increase track No To decrease track No QUICK MOVE 22 23 24 25 26 27 28 1 2 3 4 5 6 7 EDIT TOTAL DIGITAL TITLE SEARCH TUNED STEREO 02 40 00 5 M O V E T A R E A EDIT TOTAL DIGITAL TITLE SEARCH TUNED STEREO 00 50 00 5 A B C D T A R E R The...

Page 63: ...ck to the unit while this message is displayed 2Set it 2Set it 1Select a track number Each press switches the operation 1 MOVE 2 COMBINE 3 ALL ERASE 4 Editing cancelled Editing is aborted if no operation has been performed for 8 seconds Track to be moved Inserted immediately afterdestinationtrack Insertedimmediatelybefore destination track When moved to a position after current position When moved...

Page 64: ...he data associated with recording or editing is being written on the disc Do not apply vibration or shock to the unit while this message is displayed Each press switches the operation 1 DIVIDE 2 COMBINE 3 ERASE 4 Editing cancelled This operation is also possible during play pause There is no blank space left between the two tracks When the track to be split has a title the two tracks will have the...

Page 65: ...number Each press switches the operation When pressed in stop mode 1 MOVE 2 COMBINE 3 ALL ERASE 4 Editing cancelled If you combine tracks during playback go to step 3 Connecting tracks 2 and 3 Track No is adjusted Track No and title of the second track are cleared Track No and title of the first track are left Should be approx 2 sec or longer A B D 1 2 3 A B D 1 2 4 3 C EDIT TOTAL DIGITAL TITLE SE...

Page 66: ...se the tracks cannot be recovered once the entire minidisc has been erased All tracks on a disc are erased together with the disc title 0 3 0 2 0 1 TRACK EDIT 3 MD To erase one track TRACK ERASE 00 5 C O M P L E T E E C O M P L E T E E B L A N R D I S C K Editing is aborted if no operation has been performed for 8 seconds Select ERASE Each press switches the operation 1 DIVIDE 2 COMBINE 3 ERASE 4 ...

Page 67: ...CK DIVIDE becomes one track Execute TRACK DIVIDE twice Part to be erased TRACK DIVIDE The space left after erasing is filled by sub sequent tracks which move along Part to be erased Track No is adjusted ExecuteTRACKERASE once TRACK ERASE Á 2Erase the part to be erased 3After editing eject and remove the mini disc Use the TRACK ERASE function to erase the track part you want to erase made in step 1...

Page 68: ... volume Input level This adjusts the input level for the external equipment video deck etc connected to the AUX input terminal Adjust so that the volume becomes approximately the same as from a CD or an MD Input level adjustment MODE 0 3 0 2 0 1 0 3 0 2 0 1 BALANCE adjustment The right volume is decreased The left volume is decreased DIGITAL 4 3 2 1 8 7 6 5 12 11 10 9 16 15 14 13 MD CD 0 12 0 1 VO...

Page 69: ...QUALIZER 0 3 0 2 0 1 In regard to the DISPLAY DEMO key The operation display of the spectrum analyzer of the display section can be switched three ways The key is used for demonstration ON OFF when the power is OFF Recording with applied equalizer effect is not possible DIGITAL EX BASS PGM 4 3 2 1 8 7 6 5 12 11 10 9 16 15 14 13 MD CD 880 11 0 1 VOL DIGITAL EX BASS PGM 4 3 2 1 8 7 6 5 12 11 10 9 16...

Page 70: ...etc 1 Select the frequency band The level increases LOW MID and HIGH each can be ad justed by repeating 1 and 2 3Memorize the setting Continue to step 2 within 3 seconds The individual frequency bands can be adjusted in the range from 8 to 8 EQUALIZER 0 3 0 2 0 1 2 Adjust the level ENTER 0 3 0 2 0 1 DIGITAL PGM 4 3 2 1 8 7 6 5 12 11 10 9 16 15 14 13 MD CD 880 00 0 1 VOL M A N U A L S C 1 DIGITAL P...

Page 71: ...trength level LEVEL will be displayed 800 90 00 5 S U R R U N D O N 3D O T T 0 3 0 2 0 1 ON OFF is switched each time the key is pressed DIGITAL PGM 4 3 2 1 8 7 6 5 12 11 10 9 16 15 14 13 MD CD 880 12 0 1 VOL L E V E L I S 1 0 5 Each press switches the modes as follows 1 BALANCE 2 LEVEL 3 INPUT 4 VOLUME 5 Normal displayed Recording with applied 3D surround effect is not possible The level increase...

Page 72: ...a mistake restart from the beginning To adjust correct time press the ENTER key at the same moment as a time announcement The time display flashes when a power failure has occurred or when the power plug has been pulled and inserted again In such a case set the clock again 0 3 0 2 0 1 EDIT TOTAL DIGITAL TITLE SEARCH TUNED STEREO 18 45 0A M A D J U S T R E R EDIT TOTAL DIGITAL TITLE SEARCH TUNED ST...

Page 73: ...steps of 5 minutes Press the 3D O T T key twice while the unit is OFF To cancel Sleep timer SLEEP Set the number of minutes after which the unit is to be turned OFF 1Turn the unit ON 2Set the time Turn the unit OFF or press the SLEEP key until the sleep time is cancelled To cancel The unit is turned OFF automatically after the set time has elapsed Each press decreases the time by 10 minutes The ma...

Page 74: ...systems PROG 1 PROG 2 which can be used every day are available In each of PROG 1 and PROG 2 the timer data including the operating period and played contents can be set and selected to be activated or not as required 1 2 3 4 The selected program No lights If a program No under which a timer program has already been reserved it is replaced by the new timer program 1 2 Each press of the key switche...

Page 75: ...Select REC 2 Enter it 1 Select the preset station No 2 Enter it The time is advanced 2 Enter it The time is returned For timer playback or AI timer playback For timer recording 1Select the mode 4Select the recording equipment 3Select the broadcast station only when TUNER is selected above 1 MD 2 TAPE 1 Select 2 Enter it 1 Select the source to be played EDIT TITLE SEARCH P L A Y T I M E R EDIT TITL...

Page 76: ...play content appears again Restart the procedure of Timer programming from the beginning Each press of the key switches the program numbers as follows 1 PROG 1 Program 1 operates 2 PROG 2 Program 2 operates 3 PROG 1 2 Programs 1 and 2 operate 4 Not lit No program operates The reservation contents are held in memory Each press of the key switches the program numbers as follows 1 PROG 1 Program 1 op...

Page 77: ...lug is unplugged from power outlet Amplifier section ON STANDBY status ON or STANDBY Input selection Volume control value Balance setting Equalizer user memory 3D surround level Tuner section Receiving band Frequency Preset stations Program timer setting contents MD recorder section Memory backup function Reference Maintenance Maintenance of the Set When the front panel the case etc becomes dirty ...

Page 78: ...ent the recorded contents from being erased or recorded on acci dentally For B side For A side To store cassette tapes Do not store the tapes in a place which is subject to direct sunlight ornearequipmentthatgeneratesheat Keepthecassettetapesaway from any magnetic field To re record Apply tape only to the position where the tab has been removed When there is slack in the tape In such a case insert...

Page 79: ... disconnected The BALANCE is set completely to the left or right channel 6 6 ˆ Remedy Cause Symptom Tuner section Adjust the present time again Adjust the present time again Adjust the present time referring to Clock adjustment Set the timer ON time and OFF time Press the O T E key to set up the execution Connect antennas Select a band Tune to the frequency of the desired sta tion Install the outd...

Page 80: ...ted The time which has been recorded on the MD and the remaining time do not add up to the maximum recording time 60 or 74 min When search is performed in a track which has been compiled by editing the sound is sometimes interrupted The track numbers are not assigned correctly READING is displayed for an abnormally long time The time display becomes inaccurate with a monaurally recorded disc Input...

Page 81: ... Perform ALL ERASE operation If this is not possible use another disc Perform editing following the restric tions Press the ENTER key to execute edit ing Cancel the write protection Insert a minidisc for recording Return to normal condition is made by switchingtheunitoffandthenonagain NO DISC CAN T COPY DISC FULL TITLE FULL BLANK DISC NO TRACKS READING WRITING DISC ERROR CAN T EDIT blinking PROTEC...

Page 82: ...placed The disc is extremely dirty The disc is scratched Dew is condensed on the optics lens The disc has not been placed The player is not put to the play mode The disc is extremely dirty The disc is scratched The disc is dirty The disc is scratched The player is subject to vibration 5 j 5 5 CD player section in regard to message display Displayed Message Meaning Action Err indicates a number Thi...

Page 83: ...ration key is pressed No operation occurs even when an opera tion key is pressed The DPSS malfunctions The cassette holders cannot be opened by pressing the 0 PUSH OPEN area Sound is harsh or high frequencies are not reproduced Sound is distorted Noise is noticeable Sound vibrates Recording cannot be started by pressing the record key k l k k k k fi The head is dirty The tape is wound too tight du...

Page 84: ...0 tape KENWOOD follows a policy of continuous advancements in development For this reason specifications may be changed without notice Sufficient performance may not be exhibited at extremely cold locations where water freezes CD player section Laser Semiconductor laser D A Conversion 1 Bit Wow flutter Less than unmeasurable limit General Power consumption 140 W Dimensions W 270 mm 10 5 8 H 330 mm...

Reviews: