background image

XD-9581MD (En)

7

Preparation section

Basic 

section

Application section

Knowledge sections

Before applying power

− +

3

3

OPTICAL

DIGITAL
OUTPUT

OPTICAL

1

OPTICAL

2

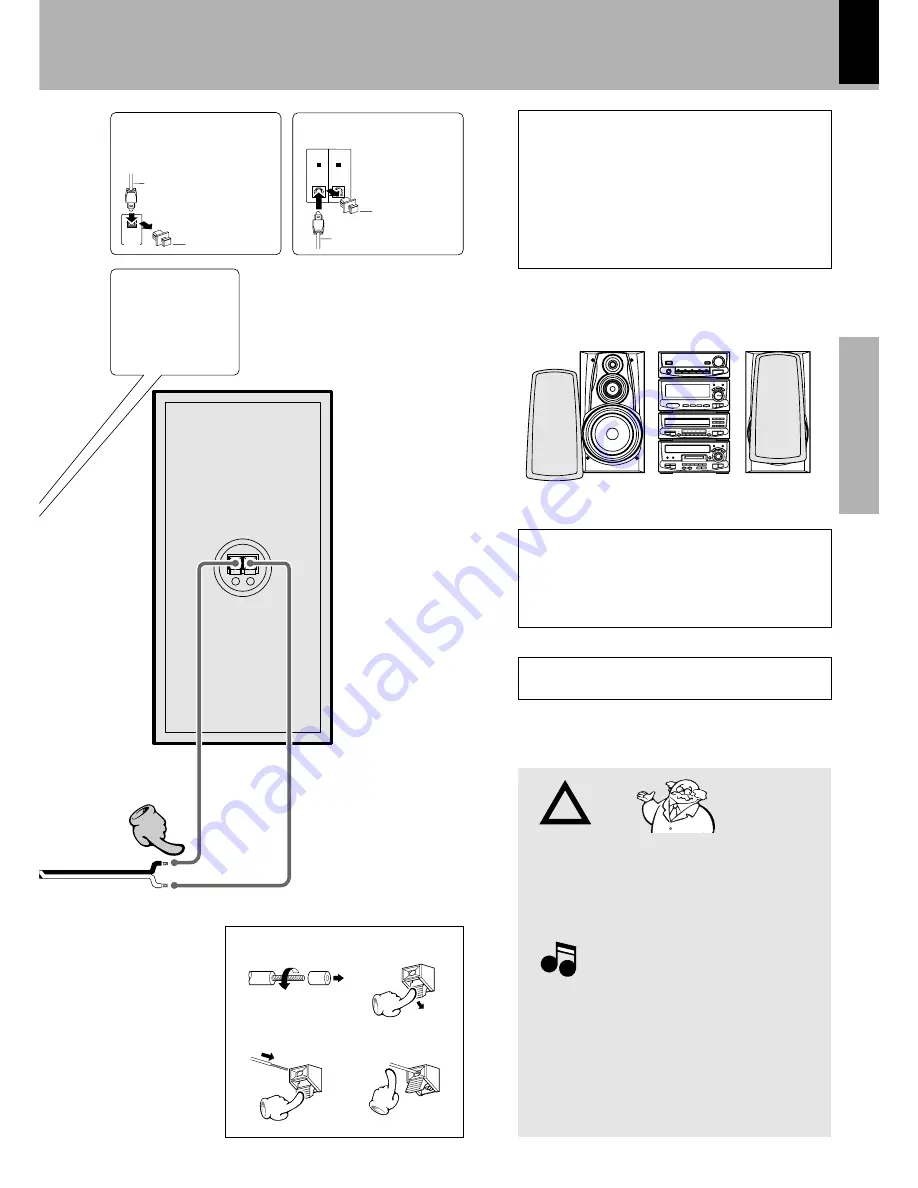
System connection

1. Be sure to insert all connection cords securely. If their

connections are imperfect, the sound may not produced or
noise may interfere.

2. Before plugging or unplugging a connection cord, be sure to

unplug the power cord from the wall AC outlet, if connection
cords are plugged or unplugged with the power cord left
plugged in, malfunction or damage may result.

1.When arranging the system units in a vertical, stacked

configuration, observe the stacking order indicated in the
system connection diagram.

2. In case an associated system component is connected, also

read the instruction manual of the component.

3. Align the front panels of the unit flush.
4. Never short-circuit the + and – speaker cords.
5. If the left and right speaker connections or the + and – polarity

are inverted, the sound will be unnatural with unclear position-
ing of musical instruments, etc. Be sure to connect them
without mistake.

Notes

Notes

Twist

1

4

To maintain proper ventilation, be sure to leave a space
around the unit (from the largest outer dimensions in-
cluding projections) equal to, or greater than, shown
below.

Top panel : 50 cm, Rear panel : 10 cm, Left and right panel
: 10 cm

Caution regarding placement (Front view)

Note on connection of optical-fiber cable

÷

Insert the optical-fiber cable straight into the connector until
it clicks.

÷

Be sure to attach the protection cap when the connector is
not used.

÷

Never bend or bundle the optical-fiber cable.

÷

All of the optical-fiber cables sold in audio stores cannot
always be used.

÷

If the cable you purchased cannot be connected to this unit,
please consult your dealer or KENWOOD distributor.

Caution

Caution

3

Speaker (left)

Speaker Section

Speaker cord

Connect cor to + and - to -.

2

Always execute
the connection be-
tween DP-MH5 and
DM-H5 at this posi-
tion.

Digital input terminal

Optical fiber cable

Remove cap

Remove the protection
cap for use.
(Take care not to lose
the cap.)

Digital output terminal

Remove the protection cap for use.
(Take care not to lose the cap.)

Optical fiber cable

Remove cap

Please install as shown, as otherwise fire may be caused
by overheating.

Summary of Contents for XD-9581MD

Page 1: ...COMPONENT SYSTEM COMPACT HI FI SYSTEM DIGITAL AUDIO COMPACT INSTRUCTION MANUAL KENWOOD CORPORATION B60 3841 00 00 MA T 99 12 11 10 9 8 7 6 5 4 3 2 1 98 12 11 10 9 8 7 6 5 4 XD 9581MD M C ...

Page 2: ...eans that the unit is utilizing laser beams that are of a weaker class There is no danger of hazardous radiation outside the unit CLASS 1 LASER PRODUCT The marking of products using lasers Except for some areas Before applying power Caution Read this page carefully to ensure safe operation Factory fitted moulded mains plug 1 The mains plug contains a fuse For replacement use only a 13 Amp ASTA app...

Page 3: ...nvenient Recording Methods 44 Selection of the recording type 44 One touch recording of one CD MD One touch edit recording of all tracks 46 When a desired track is found only that track is recorded One touch edit recording of one track 47 Producing an MD or a tape collecting only the first titles BEST HITS function 49 Recording of one CD or several CDs CD MD Program edit recording 50 Recording of ...

Page 4: ...cording of one CD or MD or one track by pressing a single key TWIN RECORDING function Simultaneous recording of one CD to MD and tape BEST HITS function Sequential recording of the first track of each CD onto MD or tape Program recording Any desired tracks can be recorded in the desired sequence Time edit recording Recording so that no track will be interrupted within the specified time only from ...

Page 5: ...e Write protect tab To protect recorded contents against accidental erasure set the write protect tab of the disc open Return the tab to the original position when you want to record signals on the disc Care Wipe periodically dust and dirt attached on the cartridge with a dry cloth Write protect tab Slide close Recording enabled Disc back side Do not touch the disc directly Do not touch the disc b...

Page 6: ...indoor antenna The accessory antenna is for temporary indoor use only For stable signal reception we recommend using an outdoor an tenna Remove the indoor antenna if you connect one out doors The supplied antenna is for indoor use Place it as far as possible from the main system TV set speaker cords and power cord and set it to a direction which provides the best reception AM loop antenna 1Locate ...

Page 7: ...Be sure to connect them without mistake Notes Notes Twist 1 4 To maintain proper ventilation be sure to leave a space around the unit from the largest outer dimensions in cluding projections equal to or greater than shown below Top panel 50 cm Rear panel 10 cm Left and right panel 10 cm Caution regarding placement Front view Note on connection of optical fiber cable Insert the optical fiber cable ...

Page 8: ...on cords securely If their connections are imperfect the sound may not be produced or noise may interfere 2 Before plugging or unplugging a connection cord be sure to unplug the power cord from the wall AC outlet If connection cords are plugged or unplugged with the power cord left plugged in malfunc tion or damage may result Caution Caution 1 In case an associated system component is connected al...

Page 9: ...ICAL 1 OPTICAL 2 SYSTEM CONTROL R L TAPE AUX INPUT REC OUT PLAY IN OPTICAL 1 OPTICAL 2 DIGITAL INPUT Audio output MD Recorder Audio input MD recorder sec tion DM H5 CD player section DP MH5 Amplifier section A H5 Tuner equalizer section C H7 Always execute the connection be tween MD recorder player and DM H5 at this position Cassette deck X H9 optional Audio cord X H9 accessory Optical output Digi...

Page 10: ...ding to the status at that time 6TUNING UP DOWN key Normally used for station selection Depending on the purpose function switching is possible with the MODE key 7PTY key Used at the time of program type detection 8O T T key a Used for O T T timer setting 9RDS DISP key Switches the contents of RDS related display 0TA NEWS INFO key w At the time of unit ON Used at the time of EON reservation At the...

Page 11: ...e music being played or display of the presently applied equalizer pattern 3Music calendar display 4Display section for tuner application operation etc In addition to tuner indication CD and MD application operation etc also is indicated 5Display for RDS related information 6Character information display section Input switching frequency indication volume level CD disc No time indication etc are i...

Page 12: ...s also can be used for adjustment of the input level SOURCE DIRECT VOLUME CONTROL PHONES AUX MD TAPE TUNER CD N B CIRCUIT ON STANDBY STEREO INTEGRATED AMPLIFIER A H5 DOWN UP 2 1 3 4 7 5 6 4PHONES jack Headphones sold separately can be connected 5Input selection keys The input source is selected When CD or MD is selected and a disc has already been set playback will start automatically 6Input selec...

Page 13: ...ld 2TWIN REC key i Simultaneous recording of a CD to MD and tape 3OPEN CLOSE 01 06 keys Used to insert and remove CDs 4SEARCH 1 key Used for quick title search forward and reverse 5SKIP 4 keys Used to skip titles or to jump back to the start of a title 6RAMDOM key indicator Used for random playback 7DISC SELECTOR DISC 1 DISC 6 keys indicators Selects the disc to be played or recorded The indicator...

Page 14: ...for track search and editing 0Fast forward fast reverse 1 keys Y At the time of playback this is used for fast forward and fast backward At the time of title input this is used for cursor movement O T E key y When this key is pressed during CD playback only the track being played at that time will be recorded to MD When this key is pressed in stopped condition the CD selected at that time will be ...

Page 15: ...indication Y This flashes during title input title search and title editing 8SEARCH indication This flashes during title search TITLE SEARCH MANU PGM REPEAT TOTAL SINGLE REMAIN DIGITAL 1 2 8 1 1 8 8 8 L R 40 30 21 18 15 12 9 7 5 3 1 0 OVER dB 2 1 3 4 0 9 8 7 6 5 9MANU indication º This lights when MANU is selected with the AUTO MANU key 0PGM indication fi This lights at the time of program playbac...

Page 16: ... is used at the time of title search REC INPUT key CHARACTER Skip 4 keys Q MOVE CHECK Record key Q MOVE CLEAR Pause 8 key TIME DISPLAY key The time display type is switched L CURSOR R Fast forward fast reverse 1 keys CHARACTER SPACE Stop 7 key CHARACTER DELETE Playback 3 key 4Keys related to CD tuner tape deck option BAND key tuner key P CALL skip 4 keys tuner CD These are used to receive memorize...

Page 17: ...ey again for OFF STANDBY Only the time display will remain lit and standby status will be reached 1 The provided batteries are intended for use in operation checking and their service life may be short 2 When the remote controllable distance becomes short replace both of the batteries with new ones 3 If direct sunlight or the light of a high frequency fluorescent lamp inverter type etc is incident...

Page 18: ...C 6 TWIN REC OPEN CLOSE DIGITAL AUDIO COMPACT 6 DISC CHANGER SOURCE DIRECT VOLUME CONTROL PHONES AUX MD TAPE TUNER CD N B CIRCUIT ON SATNDBY STEREO INTEGRATED AMPLIFIER A H5 DOWN UP ENTER SET C HARACTER TITLE SEARCH TITLE INPUT MINIDISC RECORDER DM H5 3 7 0 1 8 TIME DISPLAY DISPLAY CURSOR R L O T E BEST HITS CD MD REPEAT REC INPUT Q EDIT SPACE DELETE TRACK EDIT EJECT CHARACTER AUTO LOADING MECHANI...

Page 19: ...ncellation Switching between ON and OFF each time the key is pressed EX BASS kHz MHz RDS EON TA NEWS INFO TP PTY TOTAL SPACE X SLEEP O T T ECHO P B C EQ ON MANU R s A V E O N E O T T SLEEP MAX PGM MEMO EDIT AUTO TUNED DISC ALL STEREO RDS EON TA NEWS INFO TP PTY TOTAL SPACE PROG 12 MUTE N B 16 12 13 14 15 17 18 19 20 kHz MHz MANU P B C ECHO VOL MUSIC CALENDAR V O L 2 1 2 3 4 5 11 6 7 8 9 10 EQ ON S...

Page 20: ... Q EDIT SPACE DELETE TRACK EDIT EJECT CHARACTER AUTO LOADING MECHANISM 4 CHARACTER REC LEVEL fsconverter TUNER GRAPHIC EQUALIZER C H7 PTY O T T RDS DISP TA NEWS INFO BAND AUTO ENTER EX BASS SRS 3D TUNING UP DOWN MOD E EFFECT EQ DISPLAY DEMO SOUND RETRIEVAL SYSTEM S T E R E O R D S EON REMOTE CONTROL UNIT RC H9R REC INPUT TIME DISPLAY 0 AUTO MANU 10 SET 100 7 8 9 4 5 6 ENTER INPUT SEARCH Q MOVE TRA...

Page 21: ...l is pressed There is no TOTAL indication in PROGRAM mode in EDIT mode and in RANDOM mode 1 Elapsed time of track being played 2 Remaining time of track being played 3 Elapsed time of entire disc 4 Remaining time on entire disc 4 To skip backward To skip forward DISC 1 DISC 2 DISC 3 DISC 4 DISC 5 0 10 7 8 9 4 5 6 1 2 3 PTY SEARCH DISC SKIP 1Select the disc 2Select the desired track No Remote contr...

Page 22: ...EARCH REPEAT P MODE P CLEAR P CHECK RANDOM EDIT SRS 3D EX BASS EQ N B BAND AUTO RDS DISP CHECK CLEAR CDØMD O T E ENTER DISC SKIP TIME CHARACTER L CURSOR R 1 2 3 PTY TA NEWS INFO MUTE SLEEP INPUT TAPE TITLE Q MOVE SPACE DELETE CHARACTER P CALL TUNING VOLUME CONTROL MD CD TUNER TAPE RANDOM REPEAT MULTIPLE COMPACT DISC PLAYER DP MH5 6 7 01 02 03 04 05 06 4 1 DISC 1 DISC 2 DISC 3 DISC 4 DISC 5 DISC 6 ...

Page 23: ... a little in the direction of counter clockwise once during playback the track being played will be played from the beginning If it is rotated within 1 second from the start of a track the previous track to the current track will be played from the beginning The minidisc comes out from the minidisc insertion slot To skip backward To skip forward Discs with application of equalizer or SRS 3D ef fec...

Page 24: ...SINGLE 0 0 0 K E N W O O D M I N I D I PGM 2 DIGITAL 1 S MANU PGM REPEAT TOTAL REMAIN SINGLE 0 0 0 0 0 1 A R E Y O U A TITLE SEARCH 2 DIGITAL 1 MANU PGM REPEAT TOTAL REMAIN SINGLE 0 0 0 0 0 2 W H O I S T H E TITLE SEARCH 2 DIGITAL 1 TITLE SEARCH MANU PGM REPEAT TOTAL REMAIN SINGLE 0 1 5 0 0 2 W H O I S T H E 2 DIGITAL 1 Titles can also be selected with the keys 4 and In regard to automatic title s...

Page 25: ...layed Recordable time for the entire minidisc REMAIN lights TITLE SEARCH MANU PGM REPEAT TOTAL REMAIN SINGLE 2 3 0 0 1 K E N W O O D M I N 4 2 DIGITAL 1 TITLE SEARCH MANU PGM REPEAT TOTAL REMAIN SINGLE 2 4 9 2 DIGITAL 1 TITLE SEARCH MANU PGM REPEAT TOTAL REMAIN SINGLE 2 3 0 0 1 M I N I D I S C R E 9 2 DIGITAL 1 TITLE SEARCH MANU PGM REPEAT TOTAL REMAIN SINGLE 2 4 0 0 1 S C R E C O R D E R 4 2 DIGI...

Page 26: ... SEARCH REPEAT P MODE P CLEAR P CHECK RANDOM EDIT SRS 3D EX BASS EQ N B BAND AUTO RDS DISP CHECK CLEAR CDØMD O T E ENTER DISC SKIP TIME CHARACTER L CURSOR R 1 2 3 PTY TA NEWS INFO MUTE SLEEP INPUT TAPE TITLE Q MOVE SPACE DELETE CHARACTER P CALL TUNING VOLUME CONTROL MD CD TUNER TAPE RANDOM REPEAT MULTIPLE COMPACT DISC PLAYER DP MH5 6 7 01 02 03 04 05 06 4 1 DISC 1 DISC 2 DISC 3 DISC 4 DISC 5 DISC ...

Page 27: ...IT RDS EON TA NEWS INFO TP PTY TOTAL SPACE VOL AUTO TUNED STEREO MHz 3 F M 8 9 EQ ON MEMO 20 11 12 13 14 15 16 17 18 19 MUSIC CALENDAR MUTE 12 PROG N B 1 2 3 4 5 6 7 8 9 10 SLEEP O T T ECHO P B C MANU kHz MAX DISC ALL PGM EDIT RDS EON TA NEWS INFO TP PTY TOTAL SPACE VOL AUTO TUNED STEREO MHz 1 F M 8 9 EQ ON MEMO MUSIC CALENDAR 20 MUTE 12 PROG N B 1 2 3 4 5 11 12 13 14 15 16 17 18 19 6 7 8 9 10 SLE...

Page 28: ...LEAR CDØMD O T E ENTER DISC SKIP TIME CHARACTER L CURSOR R 1 2 3 PTY TA NEWS INFO MUTE SLEEP INPUT TAPE TITLE Q MOVE SPACE DELETE CHARACTER P CALL TUNING VOLUME CONTROL MD CD TUNER TAPE RANDOM REPEAT MULTIPLE COMPACT DISC PLAYER DP MH5 6 7 01 02 03 04 05 06 4 1 DISC 1 DISC 2 DISC 3 DISC 4 DISC 5 DISC 6 TWIN REC OPEN CLOSE DIGITAL AUDIO COMPACT 6 DISC CHANGER SOURCE DIRECT VOLUME CONTROL PHONES AUX...

Page 29: ...while this message is displayed 5 Start recording 1Press the record key 2Playthemusicsourcetoberecorded 8 3 7 In regard to display messages Recording is not possible when one of the following messages is displayed DISC FULL The minidisc is full Erase unrequired tracks PROTECTED The write protect tab is open Close it 5 UNRECORDABLE The minidisc is only for playback Insert a recordable disc j 4 CHAR...

Page 30: ... 1 3 7 A N A L O G REMAIN TOTAL TITLE SEARCH MANU PGM REPEAT SINGLE 6 1 3 7 D I G I T A L 1 REMAIN 1 DIGITAL 2 Tips for recording from a CD When recording is started according to the following proce dure recording MD andplayback CD willstartatthesame time and there is no worry of sound being skipped 1Select the disc or the track to be recorded 4 8 6 7 5Start CD playback 4Bring the MD recorder to r...

Page 31: ...be listened to in the desired sequence Max 32 titles Go to step 2 within 8 seconds AUTO 0 10 7 8 9 4 5 6 1 2 3 PTY SEARCH TOTAL PGM kHz MHz 17 18 19 16 12 13 14 15 20 MUTE 12 PROG N B SLEEP O T T MANU ECHO P B C MAX MEMO EDIT AUTO TUNED DISC ALL STEREO RDS EON TA NEWS INFO TP PTY SPACE EQ ON VOL MUSIC CALENDAR D 1 1 1 2 3 4 5 6 7 8 9 10 11 17 18 19 16 12 13 14 15 20 2 3 4 5 6 7 8 9 10 11 kHz MHz M...

Page 32: ... 8 9 10 11 kHz MHz 20 MUTE 12 PROG N B SLEEP O T T MANU ECHO P B C MAX MEMO EDIT AUTO TUNED DISC ALL STEREO RDS EON TA NEWS INFO TP PTY TOTAL SPACE EQ ON VOL MUSIC CALENDAR D 1 2 P 2 2 PGM SPACE TOTAL kHz MHz 17 18 19 16 12 13 14 15 20 MUTE 12 PROG N B SLEEP O T T MANU ECHO P B C MAX MEMO EDIT AUTO TUNED DISC ALL STEREO RDS EON TA NEWS INFO TP PTY EQ ON VOL MUSIC CALENDAR D 1 1 1 2 3 4 5 6 7 8 9 1...

Page 33: ...P O T T ECHO P B C MANU 12 13 14 15 16 17 18 19 20 VOL MUSIC CALENDAR D 1 1 1 2 3 4 5 6 7 8 9 10 EQ ON 11 PGM DISC SKIP Confirm that this is not lit Lights REPEAT You can repeatedly listen to a favorite track or disc REPEAT 2Let the REPEAT indicator light 3Start playback 1Program the track sequence accord ing to steps 1 to 3 of Listening in the desired sequence To repeat only the programmed tracks...

Page 34: ... unexpected title sequence random playback As the titles each time are selected randomly the music can be enjoyed without getting tired of it Confirm that the PGM indicator is not lit 1 2 Each press switches the modes as follows 1 DISC RANDOM Lights Random play of one disc 2 ALL RANDOM Lights Random play of all discs 3 Normal playback Goes off P CALL Confirm that this is not lit P MODE RANDOM SPAC...

Page 35: ...o 23 003 To select track No 40 0000 Lights 1Select the track Select track numbers in the order you want to play them Up to 25 tracks can be programmed More than 25 tracks cannot be selected If you made a mistake press the P CLEAR key and enter the track No again An extremely short track cannot be programmed is displayed when the total programmed period has attained 200 minutes or more Tracks will ...

Page 36: ...ll be added to the end of the existing program The entire program is cleared Each time the key is pressed the last track in the program is cleared Each press displays the next track in the program or Main unit Remote control unit Clearing all tracks Press in stop mode P CHECK P MODE TOTAL REMAIN REPEAT TITLE SEARCH MANU 0 0 0 P 0 1 C L E A R 1 DIGITAL 2 SINGLE PGM 0 EJECT 2Confirm the selection P ...

Page 37: ...one track is programmed only that track will be repeated 1Confirm that the PGM indicator is not lit To stop repeated playback Press the REPEAT key again The REPEAT indicator goes off and the playback following the current mode of the MD recorder TOTAL REMAIN TITLE SEARCH MANU 0 0 0 0 5 P G M S 0 1 7 4 2 1 DIGITAL 2 PGM REPEAT SINGLE REPEAT PGM light TOTAL REMAIN TITLE SEARCH MANU 0 0 0 0 0 1 S C R...

Page 38: ...XD 9581MD En 38 Preparation section Basic section Application section Knowledge sections Playback of MD ...

Page 39: ...1 2 5 EQ ON The RDS indicator lights up when an RDS broadcast signal is received Some functions may not be provided or be given different names depending on countries or areas To switch the display contents RDS DISP Pressing the RDS DISP key changes the display contents kHz MHz TA NEWS INFO EON TP PTY MUSIC CALENDAR PGM MEMO EDIT TOTAL SPACE DISC ALL MUTE 12 PROG N B 1 2 3 4 5 11 12 13 14 15 16 17...

Page 40: ...11 12 13 14 15 16 17 18 19 20 6 7 8 9 10 MAX SLEEP O T T ECHO P B C MANU VOL RDS PTY AUTO TUNED STEREO N E W s EQ ON When an RDS broadcast is received the program type is shown on the display If no PTY data is available or if the station is not an RDS station NONE is displayed TUNING keys 1 DOWN UP M O R Music Middle of the Road Music Program type table Display POP M ROCK M M O R M LIGHT M CLASSIC...

Page 41: ...ation is received Goes off Program type name display No sound is heard while PTY is blinking If a program of the desired type cannot be found NO PROG is displayed then after several seconds the display returns to the original display Ifaprogramofthedesiredtypeisfound thatprogramisreceived and the program type name display changes temporarily to the frequency display and then to the station name di...

Page 42: ...z EON RDS INFO TP Lights when INFO is selected When EON does not light although an RDS station is re ceived that station is not transmitting EON data Please select a different station When TA is desired select a station where the TP display lights PTY MUSIC CALENDAR PGM MEMO EDIT TA NEWS TOTAL SPACE DISC ALL kHz MUTE 12 PROG N B 1 2 3 4 5 11 12 13 14 15 16 17 18 19 20 6 7 8 9 10 MAX SLEEP O T T EC...

Page 43: ...ayback has been interrupted it will be continued from the point of interruption Wait for the desired information 4 CDorMDplaybackmayalsobestarted As long as the unit is ON the unit is always ready for the reception In case of waiting for information with an RDS sta tion without EON function When there is no EON display with the operations of steps 3 and 4 and the desired information is selected in...

Page 44: ... recording only TAPE One touch edit all tracks BEST HITS Select and record the desired tracks Program recording several CDs Are only the first tracks of several CDs to be recorded Yes No Yes No No Yes No Yes No Yes Yes No No Yes No Yes Many convenient recording functions have been provided Please select them according to the application It is possible to record desired tracks in the desired se que...

Page 45: ... of tape sides A and B Up to 32 tracks F Fade out Fade in at the tape reversal CD TAPE only Fade edit recording R CD tracks are recorded in the order they are recorded The tune interrupted at the end of tape side A is faded out and side B starts with fading in from the middle of that tune Side A What is CCRS only cassette deck X H9 option This is a function for one touch recording of a CD onto tap...

Page 46: ...D MD 1Select the target disc CD player and MD recorder must be brought to stopped condition 2Start recording Pressbeforeplayback of the CD starts When the O T E key is pressed after playback has started only the track being played at that time will be recorded u Note Note With recording onto tape the track will be interrupted for the part of the guide tape at the tape reversal where recording is n...

Page 47: ...uring playback Return is made to the beginning of the track being played and recording starts At the end of the recording MD recorder Stop Cassette deck Stop is executed after an unrecorded portion of about 4 sec has been produced The unit on the playback side CD player or MD recorder pauses To record another track repeat the steps 2 and 3 MD TAPE 1Load a tape 2Select the tape transport direction ...

Page 48: ...on carefully Recording and playback are stopped when the 7 key of the CD player is pressed 1 When the TWIN REC key is pressed while the CD player is playing the playback will be stopped and CCRS setting edit recording preparation will begin 2 The automatic setting of the recording level for edit recording uses the portions of the set CD suitable for setting the recording level 3 If the deck is set...

Page 49: ...ect p two side recording 4Select the Dolby NR mode 5Select CD with the input selection key 6Insert disc s in the CD player 7Adjust the recording level 1 2 CD MD 3 1Insert a recordable disc into the MD recorder 2Select CD with the input selection key 3Insert disc s in the CD player Insert CDs in the order to be recorded from tray 1 on Press in stop mode Producing an MD or a tape collecting only the...

Page 50: ...r 2 Lights If it is in play mode The MD recording is paused while the CD is exchanged in the tray Tracks programmed in excess of the MD recording time will be cut off Go to step 2 within8seconds Note Note When equalizer SRS 3D or any other effect is applied to the sound the sound with applied effect can be re corded except for digital recording from CD to MD Á 3Confirm the selection The selected d...

Page 51: ...l be adjusted automatically in approx 60 seconds variable depending on CD contents after which recording starts For editing from two or more CDs CCRS setting is executed each time the disc is changed Go to step 2 within8seconds 3Confirm the selection Go to step 3 within8seconds 1 When the CCRS key is pressed during playback of CD the playback stops and the CCRS setting preparing edited recording s...

Page 52: ...ts after which recording starts The tape and CD stop automatically when recording has com pleted Editing is cancelled in case of waiting for 8 sec or more Selection of 46 54 60 or 90 min tape can be done easily by pressing the TIME ENTER key CD of the remote control repeatedly After entry press the EDIT key then proceed to step 4 Note Note 3Entertherecordinglengthofthe tape PGM EDIT and SPACE are ...

Page 53: ...e of program recording all editing contents also are erased when a disc tray is opened At the time of time editing all editing contents are erased only when the edited disc is removed Automatic Space Function This is a convenient function for playback from a cassette deck option At the time of CD time edit recording an unrecorded space of several seconds is produced between titles With recording t...

Page 54: ... deck is set for one side recording the processing at the tape end is applied only on side A 4 When the last tune of tape side B is faded out the ending part of the last but one tune may sometimes be faded out if the space between it and the last tune is short Notes Notes Goes off 3Start edit recording The recording level will be adjusted automatically in approx 60 seconds variable depending on CD...

Page 55: ...Erasing track s Moving several tracks at a time QUICK MOVE I Moving a single track TRACK MOVE O Dividing a track into two Erasing several tracks at a time QUICK ERASE Combining two tracks into one D C B A D A B C Assigning a Title to a Disc or a Track Y Title input is possible simply by selecting one character after an other from the characters shown on the display As the entered title is compatib...

Page 56: ...the characters used in the title 3Execute title assignment 3Set the selected character To abort operation press the TITLE INPUT key again 1Press the TITLE INPUT key 2Select whether the disc title or track title input 3Set the selection 1Enter the title in memory 2Complete the operation Input the title characters by repeating 1 to 3 for each of them To advance Activate the title input mode 1 It tak...

Page 57: ...HARA key C H A R A C T E R SPACE key CHARACTER DELETE key 4SET key 3Select the correct character 4Confirm the character Title input section Cursor All characters of a title can be changed by repeating steps 1 to 4 The title scrolls ENTER SET C HARACTER TITLE SEARCH TITLE INPUT MINIDISC RECORDER DM H5 3 7 0 1 8 TIME DISPLAY DISPLAY CYBER TITLER CURSOR R L O T E BEST HITS CD MD REPEAT REC INPUT Q ED...

Page 58: ...editing eject and remove the mini disc DISC WRITING displayed during the minidisc ejection operation indicates that the data associated with recording oreditingisbeingwrittenonthedisc Donotapplyvibration or shock to the unit while this message is displayed 2Set the reordered range 2Set it 1Select a track number Selected track No To increase track No To decrease track No To cancel press the Q EDIT ...

Page 59: ... number Each press switches the operation 1 ALL ERASE Erasing of all tracks 2 MOVE Moving a single track 3 COMBINE Combining tracks 4 Editing cancelled Editing is aborted if no operation has been performed for 8 seconds Track to be moved Destination track No Inserted immediately afterdestinationtrack Insertedimmediatelybefore destination track When moved to a position after current position When m...

Page 60: ... playback pause will be reached When you don t want to execute fine adjustment of the division point press the ENTER key after step 2 and then go to step 4 DIVIDE ok will be displayed 3Execute fine adjustment for the division location Preview function Fine adjustment can be made while listening to the sound The possible adjustment range is 32 steps before and after from the pause location where th...

Page 61: ...ack made from the second half of the divided track There is no blank space left between the two tracks Up to 255 track numbers can be inserted additionally by repeat ing 1 to 4 for each of them Should be approx 2 sec or longer Track number is incremented Divided track first half Divided track second half Preview playback image Point selected by fine adjustment Section played back by the first prev...

Page 62: ...CK EDIT CHARA key while the first of the two titles to be combined is being played The title being played will be combined with the immediately following title If the operation is started during playback it pauses automatically Editing is aborted if no operation has been performed for 8 seconds COMBINE can not be selected during playback of the last title of an MD If you combine tracks during play...

Page 63: ...xt track number is shown 1SelectQ ERASE 2Set it SwitchingisexecutedeachtimetheQ EDITkeyispressed 1 Q MOVE Moving several tracks at a time 2 Q ERASE Erasing several tracks at a time 3 Editing canceled Repeat the steps 1 and 2 to select the titles to be erased Confirmation or cancellation of selected titles 1PresstheQ MOVECHECKkeyforcon firmation 2Press the Q MOVE CLEAR key during display of the tit...

Page 64: ... be erased Be careful in using this operation because the tracks cannot be recovered once the entire minidisc has been erased All tracks on a disc are erased together with the disc title To erase one track TRACK ERASE Editing is aborted if no operation has been performed for 8 seconds 1Select ERASE Each press switches the operation 1 ERASE Erase one track 2 DIVIDE Dividing a track 3 COMBINE Combin...

Page 65: ...the desired part of a track Should be approx 2 sec or longer Shouldbeapprox 2sec orlonger The part divided with TRACK DIVIDE becomes one track Execute TRACK DIVIDE twice Part to be erased TRACK DIVIDE P The space left after erasing is filled by sub sequent tracks which move along Part to be erased Track No is adjusted ExecuteTRACKERASE once TRACK ERASE 2Erase the part to be erased 3After editing e...

Page 66: ... 2 Spectrum analyzer display switching DISPLAY 3 Left and right volume balance Adjustment is possible in the range from 10 to 10 Pleasesetasdesiredaccordingtothetitlesbeingplayedbacketc SRS3DstereoON OFFswitchingisnotpossibleduringrecording 2 Adjust the strength of the effect The level decreases 2Adjust the effect strength level 1 LEVEL will be displayed The level increases ON OFF is switched each...

Page 67: ...connected to the TAPE jacks Lights Equalizer frequency band adjustment The setting items for each frequency band are displayed only when the equalizer is set to MANUAL user memory 1Display MANUAL Confirm 2Adjust the equalizer pattern 1 Select the frequency band The level increases The level decreases 3 Repeat the steps 1 and 2 and ad just the individual items 3Memorize the setting Continue to step...

Page 68: ... level decreases The level increases The right volume is decreased The left volume is decreased Indicates the center Indicates the balance setting Set level Adjustment is possible over the range from 5 to 0 When the input level is adjusted the recording level from the external equipment connected to the AUX input termi nal or the TAPE PLAY terminal also changes Recording on MD 1Select balance adju...

Page 69: ...en SRS 3D is ON 2Select the desired spectrum ana lyzer display The numbers decrease The numbers increase DISPLAY MO DEMO DISPLAY MO DEMO MAX MUTE 12 PROG N B 12 13 14 15 kHz MHz TOTAL SPACE EDIT PGM MEMO AUTO TUNED DISC ALL STEREO RDS EON TA NEWS INFO TP PTY D E M O O N 1 2 3 4 5 11 6 7 8 9 10 MHz MANU D 1 0 1 1 5 0 EQ ON kHz SLEEP O T T ECHO P B C MAX MUTE 12 PROG N B 12 13 14 15 16 17 18 19 20 R...

Page 70: ...he time display flashes when a power failure has occurred or when the power plug has been pulled and inserted again In such a case set the clock again To decrease the figure To increase the figure AUTO TUNING UP DOWN ENTER 1 2 To decrease the figure To increase the figure TUNING UP DOWN ENTER VOL MUSIC CALENDAR PGM MEMO EDIT RDS EON TA NEWS INFO TP PTY TOTAL SPACE AUTO TUNED DISC ALL STEREO kHz MH...

Page 71: ...timer setting is possible even when the unit is OFF STANDBY Press the O T T key twice To cancel ON time display Sleep timer Set the number of minutes after which the unit is to be turned OFF STANDBY 1Turn the unit ON 2Set the time Turn the unit OFF STANDBY or press the SLEEP key un til the sleep time is cancelled To cancel The unit is turned OFF STANDBY automatically after the set time has elapsed...

Page 72: ...used every day are available In each of PROG 1 and PROG 2 the timer data including the operating period and played contents can be set and selected to be activated or not as required For tape timer operation please read the operation manual of the cassette deck X H9 option carefully 1 2 3 4 The selected program No lights If a program No under which a timer program has already been reserved it is r...

Page 73: ...t 1 SelectthepresetstationNo 2 Enter it The time is advanced 2 Enter it The time is returned For timer playback or AI timer playback Timer recording of radio broadcasts 1Select the mode 3Select the recording equipment 2Select the broadcast station 1 MD 2 TAPE Optionalcas sette deck X H9 only 1 Select 2 Enter it 1 Select the source to be played MAX VOL PGM MEMO EDIT AUTO TUNED DISC ALL STEREO RDS E...

Page 74: ...re cleared only when they are changed Check the reservation content To change the reserved contents The reserved contents will be displayed for 3 seconds per item After this the previous display content appears again Restart the procedure of Timer programming from the beginning Each press of the key switches the program numbers as follows 1 PROG 1 Program 1 operates 2 PROG 2 Program 2 operates 3 P...

Page 75: ...XD 9581MD En 75 Preparation section Basic section Application section Knowledge sections Adjust the clock before setting the timer Timer operation ...

Page 76: ...setting Equalizer user memory Tuner equalizer section Receiving band Frequency Preset stations Program settings SRS 3D level MD recorder section Display mode Recording level A Memory backup function Sound Retrieval System manufactured under licence from SRS Labs Inc SOUND RETRIEVAL SYSTEM and the SRS Symbol are trademarks of SRS Labs Inc Purchase of this product does not convey the right to sell r...

Page 77: ... only Mini Disc This type of MD can be used only for playback and is used by the commercially available music MD software packages The playback only MDisanopticaldiscliketheCompactDisc CD Thesignalsarerecorded as the presence or absence of small pits and read out by an optical non contact pickup High efficiency coding technology ATRAC The Mini Disc has only a half the size of the Compact Disc but ...

Page 78: ...om all sources Note that digital recording is not possible with the following case In case the source contains the copy prohibit code SCMS Serial Copy Management System 001 SCMS is displayed and the unit enters the record pause mode SCMS Serial Copy Management System Designed for copyright protection the SCMS is a prescription that copying of digital signals as they are in the digital form between...

Page 79: ... is set completely to the left or right channel The AUTO POWER SAVE function has operated 6 6 6 ˆ Remedy Cause Symptom Tuner equalizer section Adjust the present time again Adjust the present time again Adjust the present time referring to Clock adjustment Set the timer ON time and OFF STANDBY time PresstheSRS3Dkeytosetuptheexecution Connect antennas Select a band Tune to the frequency of the desi...

Page 80: ...e remaining time do not add up to the maximum recording time 60 or 74 min When search is performed in a track which has been compiled by editing the sound is sometimes interrupted The track numbers are not assigned correctly DISC READING is displayed for an abnormally long time The time display becomes inaccurate with a monaurally recorded disc Input of 1792 title characters is not possible MD rec...

Page 81: ...ion Perform ALL ERASE operation If this is not possible use another disc Perform editing following the restric tions Press the ENTER key to execute edit ing Cancel the write protection Insert a minidisc for recording NO DISC 001 SCMS DISC FULL TITLE FULL BLANK DISC NO TRACKS DISC READING DISC WRITING DISC ERROR CAN NOT EDIT ok blinking PROTECTED UNRECORDABLE MD recorder section Displayed messages ...

Page 82: ...ced in the player but it cannot be played Sound is not produced Sound skips The disc is placed upside down The disc position is displaced The disc is extremely dirty The disc is scratched Dew is condensed on the optics lens The disc has not been placed The player is not put to the play mode The disc is extremely dirty The disc is scratched The disc is dirty The disc is scratched The player is subj...

Page 83: ...PRE OUT 2 V 2 2 kΩ SOURCE DIRECT KENWOOD follows a policy of continuous advancements in development For this reason specifications may be changed without notice Sufficient performance may not be exhibited at extremely cold locations where water freezes Notes Notes FM tuner section Tuning frequency 87 5 MHz 108 MHz Sensitivity DIN MONO 1 8 µV 75 Ω 16 2 dBf 40 kHz dev S N 26 dB MW tuner section Tuni...

Page 84: ...mbers whenever you call upon your dealer for information or service on this product Model Serial Number MD recorder unit DM H5 Laser Semiconductor laser Recording method Field modulation overwrite method Audio compression ATRAC Adaptive TRansform Acoustic Coding D A conversion 1 bit Oversampling 128 fs 4096 kHz 5644 8 kHz 6144 kHz A D conversion method sigma delta method Sampling frequency 32 kHz ...

Reviews: