background image

45

 EN

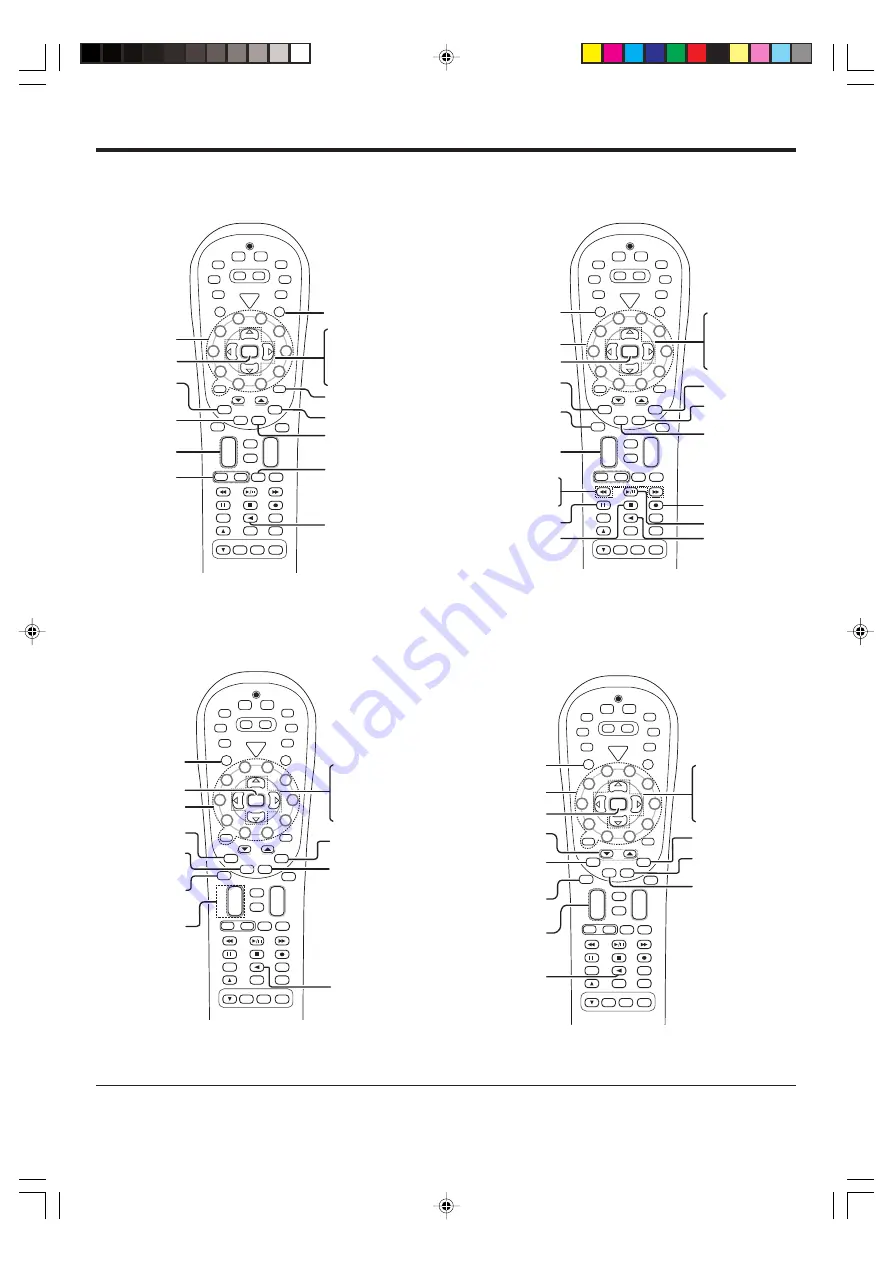
Basic remote control operations for other components

Refer to the following for the type of remote control operations available for each component.

TV operation keys

VCR operation keys

S

RC

Pow

er

TV

Powe

r

5

6

8

9

4

3

2

1

0

7

Tune –

Tune +

Dimmer

Band

Setup

Top Menu

Auto

Info / Flip

Input
Mode

Loudness

Active

EQ

Remote

Setup

Sound

THX

TV Input

Bass

Boost

TV

VOL

Mute

4

¢

CH

+

VOL

+

Disc Skip

Menu

Disc Sel.

OSD

Guide

Return

Exit

Page

TV Mute

Last / AB

+ 10

+ 100

Multi

Multi

P. Call

P. Call

Enter

TV

PHONO

POWER

RCVR

VID2

VID1

DVD
6CH

CD

DVD

MD

TAPE

+

TUNER

AV AUX

VID3

Stereo

Listen Mode

DSP

Mode

Speaker 

EQ

Input Sel.

TV Power

TV mute

TV Input

Enter

Guide

CH + / – 

(Channel  + / –)

Numeric keys

%

(Cursor up)

(Cursor down)

@

(Cursor left)

#

(Cursor right)

Menu

Exit

TV VOL

2

(Display)

LAST

(Last channel)

S

RC

Pow

er

TV

Powe

r

5

6

8

9

4

3

2

1

0

7

Tune –

Tune +

Dimmer

Band

Setup

Top Menu

Auto

Info / Flip

Input
Mode

Loudness

Active

EQ

Remote

Setup

Sound

THX

TV Input

Bass

Boost

TV

VOL

Mute

4

¢

CH

+

VOL

+

Disc Skip

Menu

Disc Sel.

OSD

Guide

Return

Exit

Page

TV Mute

Last / AB

+ 10

+ 100

Multi

Multi

P. Call

P. Call

Enter

TV

PHONO

POWER

RCVR

VID2

VID1

DVD
6CH

CD

DVD

MD

TAPE

+

TUNER

AV AUX

VID3

Stereo

Listen Mode

DSP

Mode

Speaker 

EQ

Input Sel.

SRC Power

(Source power)

Numeric keys


1


(Rewind)

¡


(Fast Forward)

8


(Pause)

3

/

8

 (

3

 Play)

7


(Stop)

 (Record)

Enter

Exit

Input Sel.

(Input selection)

CH + / – 

(Channel  + / –)

2

 (Display)

Guide

Last

(Last channel)

Menu

%

(Cursor up)

(Cursor down)

@

(Cursor left)

#

(Cursor right)

Notes
1. Certain codes may only operate some of the function available on a given model.
2. The above show the typical type functions available for each component. Some manufacturers use different key combinations to perform similar

functions. For that reason, we have programmed extra functions on some of the unused number keys to help you control your equipment.

DSS operation keys

Cable operation keys

S

RC

Pow

er

TV

Powe

r

5

6

8

9

4

3

2

1

0

7

Tune –

Tune +

Dimmer

Band

Setup

Top Menu

Auto

Info / Flip

Input
Mode

Loudness

Active

EQ

Remote

Setup

Sound

THX

TV Input

Bass

Boost

TV

VOL

Mute

4

¢

CH

+

VOL

+

Disc Skip

Menu

Disc Sel.

OSD

Guide

Return

Exit

Page

TV Mute

Last / AB

+ 10

+ 100

Multi

Multi

P. Call

P. Call

Enter

TV

PHONO

POWER

RCVR

VID2

VID1

DVD
6CH

CD

DVD

MD

TAPE

+

TUNER

AV AUX

VID3

Stereo

Listen Mode

DSP

Mode

Speaker 

EQ

Input Sel.

SRC Power

(Source power)

CH + / – 

(Channel  + / –)

Numeric Keys

Enter

Exit

Input Sel.

(Input selection)

Page 

/

5

(Page down or up)

Info

(Information)

Guide

Last

(Last channel)

Menu

%

(Cursor up)

(Cursor down)

@

(Cursor left)

#

(Cursor right)

S

RC

Pow

er

TV

Powe

r

5

6

8

9

4

3

2

1

0

7

Tune –

Tune +

Dimmer

Band

Setup

Top Menu

Auto

Info / Flip

Input
Mode

Loudness

Active

EQ

Remote

Setup

Sound

THX

TV Input

Bass

Boost

TV

VOL

Mute

4

¢

CH

+

VOL

+

Disc Skip

Menu

Disc Sel.

OSD

Guide

Return

Exit

Page

TV Mute

Last/ AB

+ 10

+ 100

Multi

Multi

P. Call

P. Call

Enter

TV

PHONO

POWER

RCVR

VID2

VID1

DVD
6CH

CD

DVD

MD

TAPE

+

TUNER

AV AUX

VID3

Stereo

Listen Mode

DSP

Mode

Speaker 

EQ

Input Sel.

SRC Power

(Source power)

Numeric keys

%

(Cursor up)

(Cursor down)

@

(Cursor left)

#

(Cursor right)

Enter

Menu

CH + / – 

(Channel  + / –)

Last

(Last channel)

Exit

Info

(Information)

Guide

Input Sel.

(Input selection)

*5453/38-48/EN

04.6.16, 3:48 PM

45

Summary of Contents for VR-8070

Page 1: ...tructions and obtain a proper understanding of the remote control and how to switch its operation modes etc Using the remote control without completely understanding its design and how to switch the operation modes may result in incorrect operations AUDIO VIDEO SURROUND RECEIVER VR 8070 INSTRUCTION MANUAL KENWOOD CORPORATION B60 5453 00 00 MA K P 0404 Register Online Register your Kenwood Home Aud...

Page 2: ...ou have registered your components with the proper setup codes you ll be able to operate both this receiver and your other AV components TV VCR DVD player CD player etc using the remote control supplied with this receiver Additional Information Shows you additional information such as In case of difficulty troubleshooting and Specifications FCC WARNING This equipment may generate or use radio freq...

Page 3: ... channel input 14 Connecting the speakers 15 PRE OUT connections 16 Connecting to another room ROOM B 17 Connecting the external IR Repeater 18 Connecting to the AV AUX jacks 19 Connecting the antennas 19 Preparing for surround sound 20 Speaker settings 20 Normal playback 24 Preparing for playback 24 Listening to a source component 24 Adjusting the sound 25 Recording 27 Recording audio analog sour...

Page 4: ...both batteries with new ones 3 Placing the remote sensor in direct sunlight or in direct light from a high frequency fluorescent lamp may cause malfunction In such a case change the location of the system installation to prevent malfunction Before applying the power Unpacking Unpack the unit carefully and make sure that all accessories are present FM indoor antenna 1 AM loop antenna 1 Remote contr...

Page 5: ...rete 6 1 produce the discrete surround back which is completely independent and DTS ES Matrix 6 1 produces the surround back which synthesized within the left and right surround channels using matrix technology DTS ES has perfect compatibility with the conventional 5 1 channels surround system 6 1 channels surround with an additional surround back presents a more natural presence and surround effe...

Page 6: ... between the full auto digital and analog inputs 0 DIMMER key Use to select the REC MODE Use to adjust the brightness of the display fi VOLUME CONTROL knob MUTE key Use to temporarily mute the sound PHONES jack Use for headphone listening Input Selector keys DVD 6CH CD DVD PHONO TUNER VIDEO 1 VIDEO 2 VIDEO 3 MD TAPE Use to select input sources SOUND key fi Use to adjust the sound quality and the amb...

Page 7: ... key Use to operate the DVD component Guide key Use to operate other components Menu key Use to operate other components Mute key Use to temporarily mute the sound THX key Use to switch the status of THX Sound key fi Use to adjust the sound quality and the ambience effects VOL keys Use to adjust the receiver s volume ª Bass Boost key Use to select the maximum adjustment setting for the low frequenc...

Page 8: ...hes the setting as follows In DTS play mode 1 FULL AUTO digital input analog input 2 DIGITAL MANUAL digital input In CD DVD VIDEO 2 VIDEO 3 or DVD 6CH play mode 1 FULL AUTO digital input analog input 2 DIGITAL MANUAL digital input 3 6CH INPUT DVD 6CH input 4 ANALOG analog input Digital input Select this setting to play digital signals from a DVD CD or LD player Analog input Select this setting to ...

Page 9: ...listening position Front speakers are required for all surround modes Center Speaker Place front and center This speaker stabilizes the sound image and helps recreate sound motion Required for surround playback Surround Left and Right Speakers Place at the direct left and right or slightly behind the listening position at even heights approximately 1 meter above the ears of the listeners These spe...

Page 10: ...e receiver unit It can only be used when an other equalizer amplifier is con nected CAUTION Be sure to adhere to the following or proper ventilation will be blocked causing damage or fire hazard Do not place any objects impairing heat radiation onto the top of the unit Leave some space around the unit from the largest outside dimension including projection equal to or greater than shown below Top ...

Page 11: ...t the S VIDEO Jacks Use the S VIDEO Jacks to make connections to video components with S VIDEO IN OUT Jacks If you use the S VIDEO jacks to connect your video playback components be sure to use the S VIDEO jacks when connecting your monitor and video recording components VIDEO IN OUT OUT Setting up the system OUT OUT DVD Player or LD Player A video component with digital audio outputs should be co...

Page 12: ...onent with DTS Dolby Digital or PCM COAXIAL DIGITAL OUT Connect the video signal and analog audio signals to the VIDEO 3 jacks See Connecting video components To connect an LD player with a DIGITAL RF OUT connect the LD player to a RF digital demodulator commercially available Next connect the DIGITAL OUT jacks of the demodulator to the DIGITAL IN jacks of the receiver Connect the video signal and...

Page 13: ... component with COMPONENT jacks you can get a better picture quality than by connecting to the S VIDEO jacks When connecting the TV to the COMPONENT jacks be sure to connect all the other components to the COMPONENT jacks Monitor TV with component jacks Video Recorder DVD Recorder Satellite Cable Tuner Game Player with component jacks DVD Player with component jacks Video Recorder DVD Recorder Sat...

Page 14: ...EO 3 OPTICAL MONITOR CD DVD DIGITAL IN DIGITAL OUT DVD 6CH VIDEO 2 ROOM B MONITOR DVD DVD MONITOR Connecting a DVD player 6 channel input If you have connected a DVD player to the receiver with digital connection be sure to read the Input mode settings section carefully 8 FRONT OUT L R S VIDEO OUT COAXIAL DIGITAL OUT AUDIO DVD Player S VIDEO cord SURROUND OUT L R VIDEO OUT CENTER OUT SUBWOOFER OUT...

Page 15: ...er speaker terminal of SURROUND BACK L or SURROUND BACK R and increase the volume level of the test tone by 3 dB for the channel which has been connected In this case when Dolby PRO LOGICIIx is selected at LISTEN MODE sound is output at the connected channel only FRONT B R L SUB WOOFER CENTER GRAY SURROUND R L BLUE TAN R L BROWN GREEN WHITE RED R L CENTER FRONT A SURROUND BACK Right Front Speakers...

Page 16: ...S A key to the ON position This model is designed on the assumption that a pair of Surround Back Speakers is connected When use only one Surround Back Speaker connect it with either speaker terminal of SURROUND BACK L or SURROUND BACK R and increase the volume level of the test tone by 3 dB for the channel which has been connected In this case when Dolby PRO LOGICIIx is selected at LISTEN MODE sou...

Page 17: ...n allows you to connect your main system to a monitor TV and speaker system located in another area ROOM B Power Amplifier Front Speakers Room B Monitor TV Room B ROOM B ROOM A Main system The sound from ROOM B PRE OUT jacks is the same as that of the Front Speakers When listening in another room ROOM B set the LISTEN mode to STEREO 5453 10 19 EN 04 6 16 3 39 PM 17 ...

Page 18: ...ter To AC wall outlet IR IN IR OUT is free Connecting IR repeater 1 Connect the IR repeater to the device as described in the repeater s manual 2 Connect the IR repeater cable s to the IR REPEATER OUT jack s Notes IR repeaters send a signal similar to the device s own remote con trol Xantech repeaters models 282 00 286 00 or 283 00 are com patible with your new audio video receiver Shape of plug t...

Page 19: ...less the antennas are connected Connect the antennas correctly as instructed below AM loop antenna Place the supplied loop antenna as far as possible from the receiver TV set speaker cords and power cord and adjust the direction for best reception AM antenna terminal connections 1 Push lever 2 Insert cord 3 Release lever FM indoor antenna The supplied indoor antenna is for temporary use only For s...

Page 20: ... the setting SUBW OFF is selected the Front Speakers are automatically set to FRNT LARGE and the procedure skips to step 6 Before step 6 press the SETUP key to accept the setting When Subwoofer output sound is required select FRNT NML THX or select both FRNT LARGE and SW RE MIX ON 3 Press the key or key to accept the setting The Front Speakers setting indication FRNT appears L SL S SB SR C R SP MU...

Page 21: ...TO DETECT THX AUTO RDS RTY MEMO STEREO TUNED Surround EX SW LFE 2 Use the MULTI CONTROL knob or Multi fi keys to adjust the bass peak level to 30dB The adjustment range is from 30dB to 0dB and OFF Preparing for surround sound 8 Use the MULTI CONTROL knob or Multi fi keys to select the appropriate Surround Speaker setting If you selected LARGE as the Center Speaker setting 1 SURR NML THX Average size...

Page 22: ...EREO TUNED Surround EX SW LFE The allowable setting range is 1 to 30 feet 0 3 to 9 0 m adjustable in 1 foot 0 3 m increments 4 Repeat steps 3 to input the distance for each of the speakers 5 Press the SETUP key again to return to main setup displays The speakers you have selected should appear on the display Confirm that all the speakers have been correctly selected 8Adjust the LFE LEVEL Low Frequ...

Page 23: ...OUND and keys or keys repeatedly until the INPUT indication appears 3 Use the MULTI CONTROL knob or Multi fi keys to adjust the input level L SL S SB SR C R SP MUTE OPTICAL 6CH INPUT COAXIAL ANALOG 96kHzfs CINEMA EQ ACTIVE EQ DSP MODE DTS MATRIX DISCRETE DOLBY DIGITAL PRO LOGIC NEO 6 CSII A B CLIP AUTO DETECT THX AUTO RDS RTY MEMO STEREO TUNED Surround EX LFE PRO LOGIC The adjustment mode is displa...

Page 24: ...peakers connected to the SPEAKERS B terminals on the rear panel No sound will be heard from the subwoofer A B ON Sound from both the speakers connected to the SPEAKERS A and B terminals on the rear panel A B OFF No sound from the speakers Use this setting when listening with headphones for stereo sound in all playback modes The display segments are different depending on the type of input signal T...

Page 25: ...in the sound quality or ambience effects adjustment mode This function is available only for speakers connected to FRONT A terminals Switching back to the previous setting Press the Bass Boost key again Adjusting the LOUDNESS mode remote control only You can adjust the Loudness function which controls the low volume settings to maintain the music s richness The adjustment can be made when the rece...

Page 26: ... EQ indicator lights up 3 SPEAKER EQ OFF The SPEAKER EQ function is turned OFF The SPEAKER EQ indicator goes off SPEAKER EQ will scroll from right to left SPEAKER EQ function will not be available when in REC MODE or when searching or presetting radio stations SPEAKER EQ function will not be available when LARGE is selected for Front Speaker at the speaker settings Listening with headphones 1 Pres...

Page 27: ...or recording 3 REC MODE MANUAL The input signal type at the moment this mode is selected is held throughout this mode When the REC MODE MANUAL is selected the digital input signal is converted to stereo signals down mix But once the digital signal is changed to other signal no signal is output When the REC MODE AUTO is selected the digital input signal is converted to stereo signals even if the di...

Page 28: ...ights when a broadcast is being received in stereo TICAL 6CH INPUT AXIAL ANALOG 96kHzfs CINEMA EQ ACTIVE EQ DSP MODE DTS MATRIX DISCRETE DOLBY DIGITAL PRO LOGIC STEREO LOUDNESS NEO 6 CSII AUTO DETECT THX AUTO RDS RTY MEMO Surround EX STEREO TUNED TUNED is displayed when a station is received Auto tuning The next station is tuned automatically Manual tuning Turn the knob or use the Multi fi keys to ...

Page 29: ...eceiving preset stations 1Press the TUNER key to select tuner as the source 2Enter the number of the preset station you want to receive up to 40 Press the numeric keys in the following order For 15 press 0 5 For 20 press 0 0 If you make a mistake entering a two digit number press the 10 key repeatedly to return to the original display and start again L SL S SB SR C R LFE SP MUTE OPTICAL 6CH INPUT ...

Page 30: ...akers Even if the speaker configuration is different from above this receiver will let you enjoy Dolby Digital and DTS sources in a suitable condition for every speaker configuration Manufactured under license from Dolby Laboratories Dolby Pro Logic Surround EX and the double D symbol are trade marks of Dolby Laboratories L Front Left speaker SW Subwoofer C Center speaker R Front Right speaker SL ...

Page 31: ...orama mode extends the front stereo image to include the surround speakers for an exciting wraparound effect with side wall imaging The GAME mode provides surrounded and exciting sound when you enjoy game or TV Especially in PRO LOGIC IIx GAME mode base sound not only from Front and Center but also from Surround channel is added to Subwoofer This provides even more dynamic surround effects DTS The...

Page 32: ...velop ment The surround sounds will also collapse into the closest speaker as you move away from the middle seating position Adaptive Decorrelation slightly changes one surround channel s time and phase relationship with respect to the other surround channel This expands the listening position and creates with only two speakers the same spacious surround experience as in a movie theatre THX Select...

Page 33: ...OLBY D EX DOLBY DIGITAL EX surround DOLBY DIGITAL indicator lights up 3 ŸD PLIIx MOVIE DOLBY DIGITAL PRO LOGIC IIx surround MOVIE mode DOLBY DIGITAL and PRO LOGIC indicators light up 4 ŸD PLIIx MUSIC DOLBY DIGITAL PRO LOGIC IIx surround MUSIC mode DOLBY DIGITAL and PRO LOGIC indicators light up 5 PLIIx MOVIE PRO LOGIC IIx surround MOVIE mode DOLBY DIGITAL and PRO LOGIC indicators light up 6 PLIIx ...

Page 34: ...ound MOVIE mode PRO LOGIC indicator lights up 2 PLIIx MUSIC PRO LOGIC IIx surround MUSIC mode PRO LOGIC indicator lights up 3 PLIIx GAME PRO LOGIC IIx surround GAME mode PRO LOGIC indicator lights up 4 PLII MOVIE PRO LOGIC II surround MOVIE mode PRO LOGIC indicator lights up 5 PLII MUSIC PRO LOGIC II surround MUSIC mode PRO LOGIC indicator lights up 6 PLII GAME PRO LOGIC II surround GAME mode PRO ...

Page 35: ...CONTROL DVD 6CH VOL Ambience effects Adjusting the sound You can make further adjustments to the sound while listening to playback in the surround mode 1 For the remote control press and hold the TUNER key for more than 3 seconds to switch to receiver mode 2 Press the SOUND key and then use the keys or keys until the desired item appears in the display Each time you press the keys or keys the menu...

Page 36: ... Press the SOUND key then press the keys or keys until DIMENSION appears on the display 2 Use the MULTI CONTROL knob or Multi fi keys to adjust the soundfield towards the rear or the front Soundfield is adjusted towards the front L R LFE SP MUTE OPTICAL 6CH INPUT COAXIAL ANALOG 96kHzfs CINEMA EQ ACTIVE EQ DSP MODE DTS MATRIX DISCRETE STEREO LOUDNESS NEO 6 CSII A B CLIP AUTO DETECT THX AUTO RDS RTY ...

Page 37: ...might find this useful if you darken your room to watch movies or listen to music Each time you press the DIMMER key the display brightness changes among the three available settings Select the brightness level you find most pleasing L R SP MUTE OPTICAL 6CH INPUT COAXIAL ANALOG 96kHzfs CINEMA EQ ACTIVE EQ DSP MODE DTS MATRIX DISCRETE DOLBY DIGITAL PRO LOGIC LOUDNESS NEO 6 CSII A B CLIP AUTO DETECT...

Page 38: ... register additional components until all components have been registered Note Although each setup code is designed to work with a number of different models certain codes may not work with some models Also certain codes may only operate some of the functions available on a given model Searching for your codes If you component does not respond after trying all the codes listed for your component o...

Page 39: ...VID1 Refer to the table in the previous page for the combination of source keys and the other components assignment 4To re assign other device keys repeat steps 1 through 3 by substituting the key sequence from the below chart for the most popular components 5To clear the re assignment and reset the remote control to its original operation mode 1 Press and hold the Remote Setup key until the LED b...

Page 40: ...TS 0042 Samsung 0045 Sanky 0039 0048 Sansui 0067 0209 Basic remote control operations for other components Setup code chart VCR setup codes Maker Setup Codes Sanyo 0047 0104 Scott 0043 0045 0121 0184 Sears 0035 0042 0047 0104 Semp 0045 Sharp 0048 Sonic Blue 0614 0616 Sony 0032 0033 0035 0636 1032 Sylvania 0035 0043 0081 Technics 0035 0162 Teknika 0035 Tivo 0618 0636 Toshiba 0043 0045 Vector 0045 V...

Page 41: ...30 0092 0178 0802 Noblex 0804 Onwa 0180 Optimus 0154 0166 0250 0802 0812 0815 Optonica 0093 Maker Setup Codes AOC 0019 0030 Admiral 0093 0463 Adventura 0800 Aiko 0092 Aiwa 0701 0800 0802 Akai 0030 Alaron 0179 America Action 0180 Ampro 0751 Anam 0180 Apex Digital 0748 0765 0767 Asha 0804 Audiovox 0092 0180 0451 0623 0802 Baysonic 0180 Belcor 0019 Bell Howell 0016 0154 Beaumark 0804 Bradford 0180 Br...

Page 42: ...0 0056 0154 0178 0180 0800 0802 Runco 0017 0030 0251 0497 0603 SSS 0019 0180 Sampo 0030 Samsung 0019 0030 0056 0060 0178 0766 0804 Sansei 0451 Sansui 0463 0800 0817 0901 Sanyo 0154 0804 Scimitsu 0019 Scotch 0178 Scott 0019 0178 0179 0180 0236 Sears 0047 0054 0056 0154 0156 0171 0178 0179 0747 0800 0802 0814 Semivox 0180 Semp 0156 Sharp 0093 0688 0689 0807 0900 Shogun 0019 0804 Signature 0016 Sony ...

Page 43: ... Pioneer 0525 0571 Polk Audio 0539 Proscan 0522 RCA 0522 0571 0717 Rowa 0823 Sampo 0698 Samsung 0573 Sanyo 0670 Shinsonic 0533 Sony 0533 Sylvania 0675 Technics 0490 Theta Digital 0571 Toshiba 0503 Urban Concepts 0503 Yamaha 0490 0539 0545 Zenith 0503 0591 Basic remote control operations for other components Maker Setup Codes Kenwood 0070 0071 0092 0183 0205 0233 0234 0251 0386 Setup code chart DTV...

Page 44: ...isc skip S RC Po w e r T VPow e r 5 6 8 9 4 3 2 1 0 7 Tune Tune Dimmer Band Setup Top Menu Auto Info Flip Input Mode Loudness Active EQ Remote Setup Sound THX TV Input Bass Boost TV VOL Mute 4 CH VOL Disc Skip Menu Disc Sel OSD Guide Return Exit Page TV Mute Last A B 10 100 Multi Multi P Call P Call Enter TV PHONO POWER RCVR VID2 VID1 DVD 6CH CD DVD MD TAPE TUNER AV AUX VID3 Stereo Listen Mode DSP...

Page 45: ...es may only operate some of the function available on a given model 2 The above show the typical type functions available for each component Some manufacturers use different key combinations to perform similar functions For that reason we have programmed extra functions on some of the unused number keys to help you control your equipment DSS operation keys Cable operation keys S RC Po w e r T VPow...

Page 46: ...al operating condition Unplug the power cord from the wall outlet then plug it back in while holding down the POWER ON STANDBY key Please note that resetting the microcomputer will clear the contents of the memory and returns the unit to the state it was in when it left the factory Cause The speaker cords are disconnected VOLUME is set to the minimum position MUTE is ON The SPEAKERS switches are s...

Page 47: ... to the operation mode for the component you wish to control Remedy Register a setup code at the respective input s Press any of the Input Selector keys to select the appropriate operation mode Replace with new batteries Operate the remote control unit within the controllable range Place the tape or CD in the source component which you want to play Wait until recording has completed Press any of t...

Page 48: ... CHANNEL 1 V 500 Ω PRE OUT SURROUND BACK CHANNEL 1 V 500 Ω PRE OUT SUBWOOFER 1 V 500 Ω Tone control BASS 10 dB at 100 Hz TREBLE 10 dB at 10 kHz DIGITAL AUDIO section Sampling frequency 32 kHz 44 1 kHz 48 kHz 96 kHz Input level impedance wave length Optical 15 dBm 24 dBm 660 nm 30 nm Coaxial 0 5 Vp p 75 Ω Output level impedance wave length Optical 21 dBm 15 dBm 660 nm 30 nm 100 watts per channel mi...

Reviews: