TKR-850
5
4-3. Programming
1. Start up the programming software (Fpro. exe).
2. Set the communications speed (normally, 115200 bps)
and communications port in the configuration item.
3. Set the firmware to be updated by file name item.
4. Turn the TKR-850 power on with the [PF1] key held down.
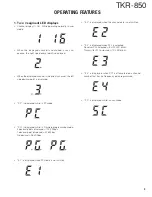
Hold the key down for one second until the 7-segment
display changes to “P.G.”. When “P.G.” appears, release
your finger from the key.
5. Check the connection between the TKR-850 and the per-
sonal computer, and make sure that the TKR-850 is in the
program mode.
6. Press write button in the window. A window opens on
the display to indicate progress of writing.
7. If writing ends successfully, the TX LED on the TKR-850
lights.
8. If you want to continue programming other TKR-850s, re-
peat steps 3 to 6.
Notes :
This mode cannot entered if the firmware program mode
is set to disable in the programming software (KPG-91D).
4-4. Function
If you press the [PF1] key (front panel), both decimal point
on the 7-segment display will disappear. The writing speed is
38400 bps (low-speed mode). If you press the [PF1] key
again, the right hand decimal points will light. The writing
speed is 57600 bps (middle-speed mode).
Note :
Normally, write in the high-speed mode (115200 bps).
REALIGNMENT / INSTALLATION
INSTALLATION
1. External Power Supply Connection
(Rear Connectors)
This unit has two external power supply connectors : Main
DC and Backup.
If an external DC power supply is connected to the main
DC connector and a backup battery is connected to the
Backup connector at the same time, the DC power supply
switches to the battery automatically if power failure occurs.
Therefore, the operation of the repeater can be continued.
If the battery is used, but both the battery and power sup-
ply need not be connected (if an external switch is used or if
only a solar battery is used), connect it to the Backup connec-
tor, not the Main DC connector. Current consumption can be
reduced by approx. 120mA because the relay is not used.
If it is installed when the temperature at the repeater site
is below freezing, check whether the switch (relay) works
properly after installation.
2. Voice Scrambler
It operates only during base operation. The voice is not
scrambled when it is repeated.
2-1. Modification
1) Remove R742 and R653 on the TX-RX unit (B/2) : control
section.
2-2. Connection
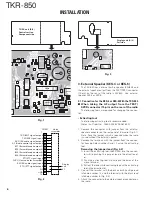
1) The functions of pins of CN601 on the TX-RX unit (B/2) :
control section are shown in the figure.
2) Join the CN601 connector to the voice scrambler board via
the E37-0808-05 connector cable.
When the operation is checked in PC test mode after the
modification, and the maximum deviation is adjusted, the
voice from the local microphone is not modulated. In this
case, remove the CN601 12-pin (PTO) cable and connect it to
the land of the display unit (X54-333) from the voice scram-
bler. The voice from the local microphone can be modulated
in PC test mode.

