background image

R-SG7/DP-SG7/X-SG7 (EN)

38

Preparation section

Basic section

Application section

Knowledge sections

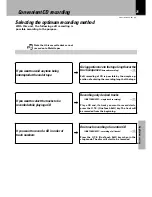
Convenient CD recording

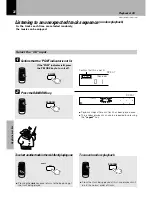
Press the O.T.E. key.

1

2

To end recording in the middle

÷

Both the cassette deck and CD player stop.

Step 

2

 also can be executed after the order of the

tracks has been programmed.

÷

Recording of CD starts at the same time as playback.

÷

When the tape direction is changed at the end of the

tape, no sound is recorded on the guide tape. When
interruption of a track is to be avoided, restart recording
from the very beginning of the reverse side according to

Recording

”.

When the O.T.E. key is pressed while the CD
player is in the stop mode, recording of a CD can
be started at the same time as playback.

One-touch recording of an entire CD 

(ONE TOUCH EDIT.....recording of all tracks)

If it is in play mode

Check that the CD player is in the stop mode.

Recording preparations are required.

 (Steps 1 to 4)

When the DM-SG7 (option) is connected and
the input selector is set to “MD”, the same pro-
cedure can be used to make a one-touch record-
ing of the entire MD on tape.

7

O.T.E.

7

÷

When recording a CD, set the input selector to CD.

Summary of Contents for R-SG7

Page 1: ...FM AM RECEIVER TEXT DIGITAL AUDIO COMPACT INSTRUCTION MANUAL KENWOOD CORPORATION B60 4358 00 R SG7 CD PLAYER CASSETTE TAPE DECK DP SG7 X SG7 EN ...

Page 2: ...on lead or adapter or consult your dealer If nonetheless the mains plug is cut off remove the fuse and dis pose of the plug immediately to avoid a possible shock hazard by inadvertent connection to the mains supply IMPORTANT The wires in the mains lead are coloured in accord ance with the following code Blue Neutral Brown Live Do not connect those leads to the earth terminal of a three pin plug Eu...

Page 3: ...Collective presetting of stations auto preset 27 One by one presetting manual preset 27 Recording 28 Recording 28 Playback of CD 31 Listening in the desired sequence program playback 31 Repeated playback 33 Listening to an unexpected title sequence random playback 34 Convenient CD recording 35 Selectingtheoptimumrecordingmethod 35 Giving preference to the tape length over the tarck sequence time e...

Page 4: ...liance should not be used near water for example near a bathtub washbowl kitchen sink laundry tub in a wet basement or near a swimming pool etc 6 Temperature The appliance may not function properly if used at extremely low or freezing temperatures The ideal ambient temperature is above 5 C 41 F IMPORTANT SAFEGUARDS 7 Heat The appliance should be situated away from heat sources such as radiators he...

Page 5: ...id has been spilled into the appliance C The appliance has been exposed to rain or water D The appliance does not appear to operate normally by following the instruction manual Adjust only those controls that are covered by the instruction manual as an improper adjustment of other controls may result in damage and will often require extensive work by a qualifiedtechniciantorestoretheappliancetoits...

Page 6: ...ne is not possible There are also other convenient functions like one touch edit recording for CD and MD etc Timer Operation The clock function of the receiver can be used for timer playback and timer recording of source equipment CD player cassette deck MD recorder High grade Micro Component Series components R SG7 receiver X SG7 cassette deck DP SG7 CD player DM SG7 MD recorder About the Instruc...

Page 7: ...u directly notify the shipping company without delay Only the consignee the person or company receiving the unit can file a claim against the carrier for shipping damage We recommend that you retain the original carton and packing materials for use should you transport or ship the unit in the future The wake up timer and the sleep timer can be set easily A daily program timer also can be reserved ...

Page 8: ...n method R SG7 DP SG7 Basic System MD recorder R SG7 DP SG7 DM SG7 Seen from the front Installation method DP SG7 R SG7 Basic System Cassette Deck R SG7 DP SG7 X SG7 Seen from the front Installation method X SG7 optional DP SG7 R SG7 Full System R SG7 DP SG7 DM SG7 X SG7 Seen from the front Installation method R SG7 DP SG7 DM SG7 optional DM SG7 optional X SG7 optional When the power of the R SG7 ...

Page 9: ...temporary indoor use only For stable signal reception we recommend using an out door antenna Remove the indoor antenna if you connect one outdoors 1 Connect it to the antenna terminal 2 Locate the position providing good reception condition 3 Fix the antenna AM loop antenna The supplied antenna is for indoor use Place it as far as possible from the main system TV set speaker cords and power cord a...

Page 10: ...onnectionofaudiocord Malfunction of microcomputer If operation is not possible or erro neous display appears even though all connections have been made properly reset the microcomputer re ferring to In case of difficulty W DIGITAL OUTPUT OPTICAL DIGITAL IN OPTICAL Connection with Optical Fiber Cable This is used for digital connections Digital trans mission permits recording without loss of the hi...

Page 11: ...end coil or bundle the optical fiber cable Notes Notes Caution for Connection Do not plug the power cord into a wall AC out let until the connection has been completed Connect the equipment as shown in the figures DP SG7 DM SG7 optional Optical fiber cable Supplied with DM SG7 Audio cord x2 Supplied with DM SG7 CAUTION Be sure to adhere followings Or proper ventilation will be blocked causing dama...

Page 12: ... outlet until the connection has been completed 3 Connection of speakers 1 Cord preparation 2 Loosen 3 Insert 4 Secure R SG7 Never short circuit the and speaker cords The protection circuit will operate and no sound will be put out If the left and right speaker connections or the and polarity are inverted the sound will be unnatural with unclear localization of musical instruments etc Be sure to c...

Page 13: ...ector While pushing the two sides of connector in pull it straight out Unplugging the connector To wall AC outlet To wall AC outlet To wall AC outlet To wall AC outlet System control cord SuppliedwithR SG7 System control cord SuppliedwithX SG7 R SG7 DM SG7 optional DP SG7 X SG7 optional Insert the power cord plug into a wall AC outlet after all other connections have been completed 5 Power Cord Co...

Page 14: ...5 7 8 9 0 5 3 6 0 front loading mechanism 2 4 6 TUNED RDS EON PTY TP ST AUTO MUTE N B SLEEP TA NEWS INFO A P S O T T kHz MEMO MHz PROG D R I V E with 24bit D A converter 24bit Fine D R I V E Controls and indicators Main Unit Memory indicator Display REPEAT indicator Playback Pause indicator RANDOM indicator Display Frequency level display and Character information display Program mode indicator Tr...

Page 15: ...ewind the tape direction flashes green 5 Open Close key 0 This opens the tape tray for tape insertion and removal 7 enter key r This key is used in many operations including the tone adjustment station presetting clock adjustment and timer setting 8 input selector key This selects the input source When TAPE CD or MD is selected and a tape or disc already has been set playback starts automatically ...

Page 16: ...n set playback starts automatically 9 N B TONE key This is used for bass and treble compensation 0 SLEEP key t Use to set the sleep timer on standby key The power for the receiver is switched ON and OFF standby At the time of system connection the power is switched ON and OFF for the entire system DISPLAY key Switches the display on the AMP TUNER R SG7 between the clock display and the input displ...

Page 17: ...urned ON press the key of the function to be operated 1 The provided batteries are intended for use in operation checking and their service life may be short 2 When the remote controllable distance becomes short replace both of the batteries with new ones 3 If direct sunlight or the light of a high frequency fluorescent lamp inverter type etc is incident to the remote sensor malfunction may occur ...

Page 18: ...Selecting the desired output When the on standby keyispressedwhilethepower is ON the power will be switched OFF Listening through headphones Bass and treble compensation Muting the sound temporarily Basic use WhenCD TAPEorMDisselected playback will start when a disc or a tape already has been inserted 1 TUNER 2 CD 3 TAPE 4 MD 5 AUX 2 2 1 1 3 3 on standby 1 1 input selector 2 2 5 up down volume con...

Page 19: ...s function can be made active or not active by the following operation Each press switches the modes as follows 1APS ON Autopowersaveisused 2APS OFF Autopowersaveisnotused Press when the power is OFF Volume display R SG7 R SG7 R SG7 Muting the sound temporarily Remotecontrolunitonly MUTE phones pure MUTE C D V O L 2 Bass and treble compensation N B Natural Bass circuit Lights R SG7 Theindicationch...

Page 20: ... a disc 3 Close the tray When the power is ON and a disc has been set in ad vance to the CD player playback will start just by set ting the input selection to CD To stop playback Skipping tracks Playback from desired track The tray opens when the key is pressed and closes when the key is pressed again To fast forward and backward The label must be on top 2 2 1 1 0 1 1 1 1 6 2 2 ...

Page 21: ...rom desired track Press the numeric keys as shown below To enter track No 23 003 To select track No 40 0000 Select the desired track No Remote control unit To backward To forward Time display on CD player Each press of the time key changes the displayed contents 1 Elapsed time of track being played 2 Remaining time of track being played 3 Elapsed time of entire disc 4 Remaining time on entire disc...

Page 22: ...the power is ON and a cassette has been set in advance to the cassette deck playback will start just by setting the input selection to TAPE Press the key for the running direction to be played Selection of DOLBY NR Selection of reverse mode To stop playback To wind tape at high speed Side where tape is exposed Top side Playback of the top side Playback of the reverse side 2 2 1 1 0 1 1 2 3 2 2 Rev...

Page 23: ...advances when playback or recording is started automatically by the easy op eration function etc This direction is the direction stored in memory when the tape was last stopped To change the direction press the key for the de sired playback direction and then press the 7 key The Dolby NR system minimizes the hiss noise heard when playing tape Each press switches the modes as follows 1 lit Both sid...

Page 24: ...4th program before the current program Press 5 times During playback of reverse side while 2 is lit To return to the beginning of the current program Press once To play the 4th program before the current program Press 5 times Skip search Plays the desired music program from the beginning by skipping programs until you reach the desired program Up to 16 programs can be skipped Listening with fast f...

Page 25: ...ed by cross fade recording in which the beginning of next program is overlapped on the end of previous program Notes Notes Plays a single music program repeatedly up to 16 times One program repeat playback Rewind playback Rewinds tape to the beginning and restarts playback from there During playback of reverse side while 2 is lit Press simultaneously During playback of top side while 3 is lit Pres...

Page 26: ...e frequency To increase frequency 2 2 3 3 1 1 band 1 1 tuning 3 3 Every time the key is pressed the preset stations are switched over as follows Press for the order of 1 2 3 38 39 40 1 Press 4for the order of 40 39 38 3 2 1 40 When stations have been memorized preset call Remote control unit Select a station P CALL 4 Normally use the AUTO Auto tuning mode Each press alternates the mode 1 AUTO lit ...

Page 27: ...setting manual preset Up to 30 stations can be memorized For use of the RDS function stations must be memo rized by RDS auto presetting RDS stations are given priority during auto presetting If there is memory left after presetting the receiver contin ues presetting regular FM stations For memorizing of stations other than RDS stations FM AM memorize the stations according to chapter One by one pr...

Page 28: ... I and high TYPE II tape is set automati cally Remove tape slack before loading 1 Presstheplaybackkeyforthedirectiontobeplayed lightsgreen 2 Stop playback lights red 1 Select the reverse mode 2 Select the DOLBY NR mode Check the tape transport direction indicator Note that this cassette deck cannot record onto Metal tapes Note Note Top side Reverse side To reverse the transport direction 5 5 4 4 2...

Page 29: ...be recorded 2 Start recording 4 Select the source to be recorded 5 Start recording When the CD input is selected and if a disc has been set in the CD player its playback starts immediately The input source component to be recorded should be displayed To interrupt recording An unrecorded section of about 4 sec is produced directly after the recording has been interrupted Press the record key to res...

Page 30: ...hen the cassette deck is set to record pause status in advance 1 Pause the CD or MD to be played 2 Use the skip keys 4 to select the title to be recorded Pause will be reached at the beginning of the selected title 3 Bring the cassette deck to recording pause condition 4 Start playback of the CD or MD Synchro recording will start The recording is stopped when the stop key of the playback unit is p...

Page 31: ...ns to the beginning of the current track being played 1Check that the CD player is in the stop mode 2 3 4 1 Select the track 2 Confirmation 3 Repeat steps 1 and 2 Up to 32 tracks can be programmed When FULL is displayed no more tracks can be programmed When an error has been made press the CLEAR key and select again Lights Blinks Listening in the desired sequence program playback Any tracks on the...

Page 32: ... programming of tracks a non recorded space of a few seconds will be created between tracks The SPACE indicator flashes By recording tracks with these spaces on tape the search and repeat play operations of tape using the DPSS function which works by searching the non recorded spaces can be performed reliably Even when the performances of two tracks are continu ous which occurs with classical or l...

Page 33: ...playback Ifthe PGM indicatorislit press the P MODE key to turn it off Lights To stop repeated playback Press the repeat key again The REPEAT indicator goes off and the playback following the current mode of the CD player starts To stop repeated playback Confirm that this is not lit Desired tracks or discs can be played back re peatedly DP SG7 DP SG7 2 Press the repeat key DP SG7 Press the repeat k...

Page 34: ...key once returns to the beginning of the track being played From the track being played at this time playback will be in the normal order of tracks Toselectanothertrackinthemiddleofplayingone To cancel random playback Select the CD input Listening to an unexpected track sequence random playback As the tracks each time are selected randomly the music can be enjoyed Confirm that the PGM indicator is...

Page 35: ...ode The disc will start to be recorded Recording only desired tracks ONE TOUCH EDIT single track recording Play a CD and if a track you want to record starts press the O T E One Touch Edit key The track will be recorded from the beginning Giving preference to the tape length over the track sequence time edit recording fl Edit recording of CD is possible by the simple op eration of entering the rec...

Page 36: ...red Steps 1 to 4 1 3 2 1 Confirm that the PGM indicator is not lit If the PGM indicator is lit press the P MODE key to turn it off To cancel the EDIT mode press the P MODE key of the remote control unit Confirm that this is not lit When the tape recording time is specified record ing is executed with changing the track sequence so that no track will be interrupted when the tape direction is change...

Page 37: ...r temporary stop condition Recording only desired tracks ONE TOUCH EDIT single track recording At the time of CD playback any desired track can be selected immediately for recording 1 2 In case the key is pressed with track No 3 To end recording in the middle Both the cassette deck and CD player stop Lights DP SG7 DP SG7 To record a different track repeat the steps 1 and 2 Recording preparations a...

Page 38: ...ruption of a track is to be avoided restart recording from the very beginning of the reverse side according to Recording When the O T E key is pressed while the CD player is in the stop mode recording of a CD can be started at the same time as playback One touchrecordingofanentireCD ONE TOUCH EDIT recording of all tracks If it is in play mode Check that the CD player is in the stop mode Recording ...

Page 39: ...w When the information to be received is set in advance and any RDS station in the same network starts broadcasting of such information the reception automatically will be switched to that station The RDS indicator lights up when an RDS broadcast signal is received Some functions may not be provided or be given different names depending on countries or areas To switch the display contents RDS DISP...

Page 40: ...c LIGHT M 5 Serious Classical Music CLASSICS 6 Other Music OTHER M 7 News NEWS 8 Current Affairs AFFAIRS 9 Information INFO 0 Sport SPORT Education EDUCATE Drama DRAMA Culture CULTURE Science SCIENCE Varied Speech VARIED Weather WEATHER Finance FINANCE Children s programmes CHILDREN Social affairs SOCIAL Religion RELIGION Phone in PHONE IN Travel TRAVEL Leisure LEISURE Jazz music JAZZ Country Musi...

Page 41: ...eard while PTY is blinking If the desired program type cannot be found NO PROG is displayed then after several seconds the display returns to the original display If the desired program type is found that program is received The program type display changes temporarily to the frequency display and then to the station name display Goes out B B C 1 F M TUNED ST AUTO RDS Station name display Blinks P...

Page 42: ...ugh an RDS station is received that station is not transmitting EON data Please select a different station RDS and EON are lit Wait for the desired information 3 CD or tape playback also may be started As long as the power is ON standby condition will exist Tobeabletolistentothedesiredinformationatanytime EONreservation Select a station where RDS and EON are lit ByusingtheEONfunction whichmanagest...

Page 43: ...o suppress the distortion occurring with this amplification amplifiers with class A operation or class AB operationalwayshavecurrentflowingthroughthecircuitsforcurrentamplification Thisiscalledtheidlingcircuit Especially an amplifier with class A operation has a high idling current in comparison to an amplifier with class AB operation which is used by many units As the result class A operation has...

Page 44: ...ts to blink 2 2 Ensure that the power is OFF 1 2 3 Example Adjustmentto8 45 The time display starts to blink If you make a mistake restart from the beginning To adjust correct time press the enter key at the same moment as a time announcement The time display blinks after a power failure or when the power cord has been unplugged from the AC outlet and plugged again In such a case adjust the clock ...

Page 45: ...ed and set the volume 2 SwitchOFFthepowersupply 3 Press the tuning fi key 4 Set the ON time 5 Press the enter key The program timer does not operate during playback by the O T T timer When the tuning fi key is pressed the input source will be displayed and after a few seconds the ON time will be displayed The ON time can be set in steps of 5 minutes In case of combination with another timer the in...

Page 46: ...Program playback is not possible The station should be preset prior to the above To listen to radio Timer programming This is a 24 hour timer Select the time and duration for the operation and the contents and select operation or no operation as required 1 2 3 4 The PROG indicator lights When a timer reservation already has been made the contents will change to the new settings 1 2 Adjust the cloc...

Page 47: ...t source 3 Select the broadcast station only when TUNER is selected Select PLAY or AI PLAY AI REC Select REC Enter it Select the preset station No 3 Select the broadcast station only when TUNER is selected Enter it Enter it PROG T U N E R PROG 1 5 For timer playback or AI timer playback Timer recording of radio broadcasts 1 Select the mode R SG7 R SG7 PROG P L A Y 4 Select the recording unit TAPE ...

Page 48: ...ange the reserved contents The reserved contents will be displayed for 3 seconds per item After this the previous display content appears again Restarttheprocedureof Timerprogramming from the beginning y The reservation contents are held in memory Also prepare the disc or tape and adjust the listening volume Note Note Note 8Set the program The timer does not operate when no program is set The PROG...

Page 49: ...g side or the label side of the discs Sticker Sticky paste Never play a cracked or warped disc During playback the disc rotates at high speed in the player Therefore to avoid danger never use a cracked or deformed disc or a disc repaired with tape or adhesive agent Please do not use discs which are not round because they may cause a malfunction 2 Endless tapes Do not use an endless tape as this co...

Page 50: ...y deform the plastic component When your unit needs to be repaired bring the entire set Speakers excluded to your dealer Demagnetizing the head When the recording playback head is magnetized the sound quality will deteriorate In such a case demagnetize the head using a commercially available demagnetizer head eraser Cleaning the head section Cleaning the heads and peripheral components For maintai...

Page 51: ... may occur inside the unit when there is a great difference in temperature between this unit and the outside This unit may not function properly if condensation oc curs In this case leave the unit for a few hours with the power left ON and restart the operation after the conden sation has dride up Be specially cautious against condensatin in a following circumsatance When this unit is carried from...

Page 52: ... key to set up the execution Connect antennas Select a band Tune to the frequency of the de sired station Install the outdoor antenna in an apart position from the road Switch the suspected electric ap pliance OFF Install the TV or the system at an increaseddistancebetweenthem Sound is not produced All digits of the display section show flashing indication of and no sound is put out Sound is not p...

Page 53: ...key is pressed Sound is harsh or high frequencies are not reproduced Sound is distorted Noise is noticeable Sound fluctuates p W p p p The head is dirty The tape is wound too tight due to irregular winding A nonrecorded tape is played Theoperationkeyispressedinlessthan 4 seconds after turning the power ON A tape is not inserted in the unit The tape is wound too tight due to irregular winding The t...

Page 54: ... vibration o Q o o 1 With some tapes a squeaky noise is produced when the tape is stopped automatically This is due to the tape protection function and not a malfunction 2 Do not use longer than 100 minutes tapes for the tape is too thin and gets easily tangled Notes Notes Remedy Cause Symptom Cassette deck unit Use a cassette with an unbroken re cording protect tab or block the hole Select the so...

Page 55: ...sumption 45 W Dimensions W 200 mm H 77 mm D 278 mm Weight net 3 0 kg Notes Notes Notes 1 KENWOOD follows a policy of continuous advancements in development For this reason specifications may be changed without notice 2 Sufficient performance may not be possible at very low temperatures under a water freezing temperature CD player DP SG7 Laser Semiconductor laser Playing rotation 200 rpm 500 rpm CL...

Page 56: ...ge section For your records Record the serial number found on the back of the unit in the spacesdesignatedonthewarrantycard andinthespaceprovided below Refer to the model and serial numbers whenever you call upon your dealer for information or service on this product Model Serial Number ...

Reviews: