background image

48

Application section

CURSOR

SET

CURSOR

SET

TV

VIDEO1
VIDEO2

CD

TUNER

TAPE

FUNCTION

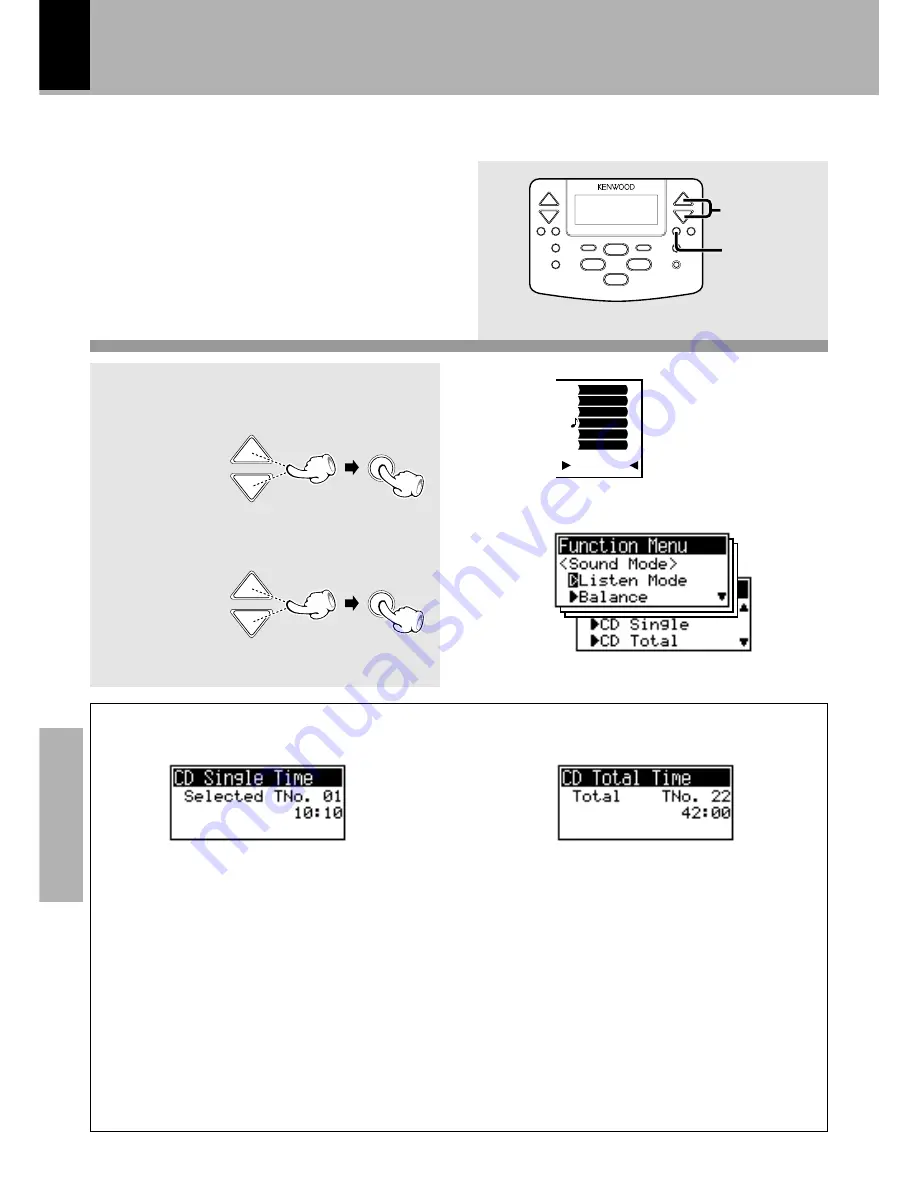
Checking the time information display of CD

The remote control unit can display the time
information of CD such as the playing time and
total time.
The time information can be checked while the
CD is playing or stopped.

1

Display the "Function" menu.

2

Select the information
item to be displayed.

The items as shown below can
be selected.

CD Single Time display

During stop in normal mode:

Playing time of the first track.

During playback in normal mode:

Playing time of the track being played.

During stop in program mode:

Playing time of the first programmed
track.

During playback in program mode:

Playing time of the track being played.

In normal mode:

Total playing time of the disc.

In program mode:

Total playing time of the programmed
tracks.

CD Total Time display

CURSOR

SET

Summary of Contents for NV-500

Page 1: ...instruction manual is used to describe multiple models listed above Model availability and features functions may differ depending on the country and sales area INSTRUCTION MANUAL KENWOOD CORPORATION B60 4290 00 DIGITAL AUDIO COMPACT TEXT EN ...

Page 2: ...ion to the mains sup ply IMPORTANT The wires in the mains lead are coloured in ac cordance with the following code Blue Neutral Brown Live Do not connect those leads to the earth terminal of a three pin plug Europe and U K AC 230 V only Other countries AC 110 120 220 240 V switchable AC voltage selection The AC voltage selector switches on the rear panel are set to the voltage that prevails in the...

Page 3: ...lying power Knowledge section Basic section Preparation section Application section R D S Radio Data System for Europe and U K 28 Searching for a desired program type PTY search 29 To be able to listen to the desired information at any time EON 30 Playback of CD 32 Listening in the desired sequence program playback 32 Repeated playback 34 Listening to an unexpected title sequence random playback 3...

Page 4: ...ce and in the instruction manual Follow all the safety and operating instructions These safety and operating instructions should be retained for future reference 1 Power sources The appliance should be connected to a power supply only of the type described in the instruction manual or as marked on the appliance If you are not sure of the type of power supply to your home consult your appliance dea...

Page 5: ...on of antenna discharge unit connection to grounding electrodes and requirements for the grounding electrode See Figure 18 Power lines An outside antenna system should not be located in the vicinity of overhead power lines or other electric light or power circuits or where it can fall into such power lines or circuits When installing an outside antenna system extreme care should be taken to keep f...

Page 6: ... Remote control unit 1 Batteries R6 AA 6 Please confirm that the following accessories are present AC plug adaptor 1 Use to adapt the plug on the power cord to the shape of the wall outlet Accessory only for regions where use is necessary To switch over the demonstration Switch power ON before the following operation To cancel the demonstration mode Press the CONFIRM DEMO key To start the demonstr...

Page 7: ...into the room and connect it to the FM 75Ω terminal Antenna adapter Commercially available MONITOR OUT REC OUT PLAY IN PLAY IN VIDEO 1 VIDEO AUDIO REC OUT FRONT SPEAKERS 6 16Ω SUBWOOFER 4 16Ω PLAY IN PLAY IN FM 75Ω GND AM VIDEO 1 AC 110 120V VIDEO 2 VIDEO 2 L R L R ANTENNA DIGITAL OUT OPTICAL AC 220 240V AC 110 120V AC 220 240V FM 75Ω GND AM ANTENNA MONITOR OUT REC OUT PLAY IN PLAY IN VIDEO 1 VIDE...

Page 8: ... IN PLAY IN VIDEO 1 VIDEO AUDIO REC OUT PLAY IN PLAY IN FM 75Ω GND AM VIDEO 1 AC 110 120V VIDEO 2 VIDEO 2 L R ANTENNA DIGITAL OUT OPTICAL AC 220 240V AC 110 120V AC 220 240V FRONT SPEAKERS 6 16Ω SUPER WOOFER PRE OUT L R R L FRONT SPEAKER 6 16Ω B a s s r e f l e x s p e a k e r s y s t e m B a s s r e f l e x s p e a k e r s y s t e m Do not plug the power cord into the power outlet until all of th...

Page 9: ...Optical fiber cable Optical fiber cable MD recorder or DAT etc MonitorTV Video Input Video deck DVD player or LD player Audio output Video output Video output Video input Audio input Audio output Powered subwoofer Only for NV 500 System connection CAUTION Be sure to adhere followings Or proper ventilation will be blocked causing damage or fire hazard Do not place any objects impairing heat radiati...

Page 10: ...ting in accordance with your area by refer ring to the following table CHANNEL SPACE setting Except for the U S A Canada U K Europe and Australia CHANNEL SPACE freq Area 1 2 USA Canada and South American countries Other countries FM 100 kHz AM 10 kHz FM 50 kHz AM 9 kHz CURSOR SET STOP 1 Attach the remote control unit to the main unit 2 Switching the power ON 3 Select the TUNER input 4 Press and ho...

Page 11: ...ignal trans mitter 8 STOP key 9 VOLUME keys 0 Input selector keys MUTE key Input indicators Communication indicator Blinks during communication with the remote control unit ACTIVE indicator Lights during CD MD or tape playback or tuner reception Selector display icon Shows the operations selected with the remote control Menu recording editing selec tion display Shows the selection menu type of rec...

Page 12: ...ies are intended for use in operation checking and their service life may be short 2 When the batteries are nearly exhausted Low Battery appears and the remote controllable distance decreases In this case replace all of the 6 batteries with new ones It is recommended to replace batteries with alkaline batteries 3 If direct sunlight or the light of a high frequency fluorescent lamp inverter type et...

Page 13: ...he presence of previous page Press the CURSOR keys to select a menu item Press the SET key to go to the next screen SelectanitemwiththeCURSORkey and press the SET key to set the selection Menu screen Selection screen Item being selected with the CURSOR keys Item that can be selected Item that cannot be selected under the current condition How to use the HOME key Pressing the HOME key in the mid dl...

Page 14: ...ly To stop the playback press the 7 key 2 Display the Clock display 3 Display the Clock Adjust screen The displayed time of the day blinks whentheclockhasnotbeenadjusted 4 Adjust the time 5 Set the time After setting the correct time of the day press the SET key To display the time Press the CLOCK LIGHT key The LCD display shows the time for abut 5 seconds then returns to the previ ous display In ...

Page 15: ...15 Preparation section ...

Page 16: ...een loaded in the unit simply pressing the play key 6 turns power ON and starts playback automatically 2 Select the desired source If CD or TAPE is selected and a disc or tape has already been loaded in the main unit its playback starts now 3 Volume adjustment The volume decreases The volume increases Let s put out some sound Basic use method ...

Page 17: ...switched ON automatically When the CD or TAPE input selected while a disc or tape has already been loaded its playback also starts automatically STANDBY TIMER indicator When power is STANDBY Lights in red When power is ON Lights in green During timer standby Lights in amber When timer standby is initiated without set ting the current time of the day Blinks in green When the protection circuitry is...

Page 18: ...eset radio stations in advance Every time the key 4 or is pressed the preset stations are switched over as follows Press for the order of 1 2 3 38 39 40 1 Press 4 for the order of 40 39 38 3 2 1 40 When the key is held depressed for more than 2 seconds Seek of preset stations starts and stops automatically when a station is detected Main unit Main unit Remote control only Receiving broadcast stati...

Page 19: ...r menu SET 2 Select Stereo Mono 3 Select Stereo or Mono and press the SET key to set the selection To receive a station that has not been preset 1 Select the TUNER input and the receiving band 2 Press the SET key to display the Tuner menu 3 Select the Direct Tuning Select with the CURSOR key and press the SET key 4 Select the receiving fre quency Select the frequency with one of the P CALL keys an...

Page 20: ...e presetting manual preset 1 Select the TUNER input 2 Display the Tuner menu 3 Select Auto Preset or Auto Memory 1 VIDEO1 2 VIDEO2 3 CD 4 TUNER 5 TAPE CURSOR SET Collective presetting of stations auto preset Except for Europe and U K Presetting R D S stations RDS auto memory for Europe and U K The displayed information is variable depending on areas It takes a certain period of time before presett...

Page 21: ...ive a station that has not been preset 2 With the TUNER input selected press the SET key to display the Tuner menu 3 Select Manual Memory with the CURSOR key and press the SET key 4 Select one of preset numbers 1 to 40 CURSOR SET One by one presetting manual preset To preset another station repeat steps 1 to 4 above Let s put out some sound SET CURSOR SET CURSOR SET ...

Page 22: ...it Track No being played Displayed with a CD TEXT compatible disc Elapsed play time of the track being played Track No being played Display during playback During stop Stop During pause Pause When a CD disc has been loaded in the CD tray in advance simply pressing the CD 6 key on the main unit turns power ON and starts playback automatically Playback of CD Skipping tracks Start playback to pause p...

Page 23: ...o stop playback To eject the disc The CD tray opens 1 Press the INPUT key to select the CD input 1 VIDEO1 2 VIDEO2 3 CD 4 TUNER 5 TAPE 2 Press 6 BAND key Remote control operation In regard to CD TEXT When discs conforming to CD TEXT are played with this unit the text information recorded on the CD disc name or titles is displayed automatically During stop The disc title is displayed During playbac...

Page 24: ...advances when playback or recording is started automatically by the one touch opera tion feature etc is indicated by an indicator The indicated tape direction it that used when the tape was stopped last To switch the direction press the DIRECTION key on the remote control unit To stop playback Do not take out the cassette tape untilthetapetransporthasstopped completely The tape counter is set to 0...

Page 25: ...1 VIDEO1 2 VIDEO2 3 CD 4 TUNER 5 TAPE 2 Press 6 BAND key Remote control operation Displayed when Dolby NR is selected Reverse mode indicator tape transport direction indicator When the remote control unit is attached to the main unit Tape counter When it is detached from the main unit Stop for stop Play for playback Selecting Dolby NR Using the Dolby NR in recording allows you to reduce tape hiss ...

Page 26: ...dental erasure pre vention is not broken T TUNER Broadcasts VIDEO1 VIDEO2 2 Select the source to be recorded To record sound from a CD use the dedicated recording function by referring to CD synchro nized recording or Convenient record ing methods fl The present procedure described the most general recording method 3 Select the tape transport direction When recording is started the tape is transpo...

Page 27: ...ic 3Put the cassette deck in record pause mode 4Start playback of the CD Sync recording starts Press the stop key 7 of the CD player to stop recording 4 Set the recording condition 1 Performsteps2to4of Selectingthereversemode onpage25 2 Perform steps 2 to 4 of Selecting Dolby NR on page 25 5 Start recording Displayed when Dolby NR is selected Reverse mode indicator tape transport direction indicat...

Page 28: ...tion which is currently broadcasting a specified program type genre PS Program Service Name Display When an RDS broadcast is received the station name is automatically displayed EON Enhanced Other Network When the information to be received is set in advance and any RDS station in the same network starts broad casting of such information the reception automatically will be switched to that station...

Page 29: ...urrently broadcasting a program of the specified type Searching for a desired program type PTY search shows the currently selected PTY display When an RDS broadcast is received the program type is shown on the display If no PTY data is avail able or if the station is not an RDS station NONE is displayed R D S Radio Data System TV VIDEO1 VIDEO2 CD TUNER TAPE FUNCTION 1 VIDEO1 2 VIDEO2 3 CD 4 TUNER ...

Page 30: ...ng to a station with the EON display lit and another station of the same network starts to broadcast an information program for which a reservation has been made then that station will be selected automatically When the desired information program ends return is made to the original program 1 Select the TUNER input 2 Display the Tuner menu 3 Select EON 4 Select the desired EON mode shows the curre...

Page 31: ... infor mation is selected in advance waiting for the desired information will be done only with the presently received RDS station In regard to TP Traffic Program indicator When the TP indicator is lit this indicates that the station or another station in the same net work is broadcasting traffic information Even without an EON reservation traffic information can be heard from the station when TP ...

Page 32: ...e CD menu 3 Select the message to be displayed Program On or Program Off 4 Select the Set 5 Select a track number and press the SET key 6 To program other tracks repeat step 5 for each track 7 Press the ENTER key to quit programming When Clear is selected the program being dis played will be cleared Up to 32 tracks can be programmed When Pro gram Full is displayed no more track can be pro grammed ...

Page 33: ...e tracks programmed before or after the current track Pressing the 4 key once during playback returns to the beginning of the current track Checking the program In stop mode only Use the following procedure to check the pro grammed tracks Clearing the program In stop mode only Use the following procedure to clear all the pro grammed tracks from the program 1 Select the CD input 2 Display the CD me...

Page 34: ...yback 1 Select the CD input 2 Display the CD menu 3 Select the message to be displayed Repeat Off or Repeat On 4 Select On 5 Start playback The entire disc will be played repeatedly When both repeat playback and random playback fi are used simultaneously all tracks in the disc will be played in a random order and this random playback will be repeated To cancel repeat playback Select Off in step 4 ...

Page 35: ...ce random playback As the titles each time are selected randomly the music can be enjoyed without getting tired of it It is not possible to perform random playback of programmed tracks Random repeat playback When repeat playback is set before starting random playback the random playback of the disc will be repeated Cancel the program mode The tracks in the entire disc will be played in a ran dom o...

Page 36: ...to tape CD one track recording CD one track recording Records the CD track being played onto a tape This is convenient when you play a CD for thefirsttimebutwanttoselectandrecord only the desired tracks Recording desired CD tracks in a desired order onto tape CD program recording CD program recording Records the programmed CD tracks in the programmed order This is convenient when you want to progr...

Page 37: ...am mode is activated This function is available only when the CD player is in stop mode Convenient Recording Methods Total number of tracks in CD total play time CURSOR SET CURSOR SET CURSOR SET ENTER Preparation Perform step 3 Select the tape transport direc tion on page 26 Perform steps 2 to 4 of Selecting the reverse mode on page 25 To stop operation in the middle Press the HOME key to abort an...

Page 38: ...eing played can be selected and recorded from the beginning CD random playback cannot be recorded Convenient Recording Methods CDtrackNo beingplayed elapsed playtimeofthetrackbeingplayed CURSOR SET CURSOR SET CURSOR SET ENTER To stop operation in the middle Press the HOME key to abort and cancel the operation and return to the basic screen Preparation Perform step 3 Select the tape transport direc...

Page 39: ...esired order and recorded Convenient Recording Methods Number of programmed CD tracks total play time of the program This function is available only when the CD player is in stop mode Follow 5 to 7 in step 1 on page 32 CURSOR SET CURSOR SET CURSOR SET ENTER To stop operation in the middle Press the HOME key to abort and cancel the operation and return to the basic screen Preparation Perform step 3...

Page 40: ...e message to be displayed Input Level 3 Select the Video1 or Video2 4 Adjust the input level of the selected input 5 Press the ENTER key The adjustment range is be tween 3 and 4 CURSOR Adjusting the subwoofer output level NV 600 only 1 Display the Function menu 2 Select the S W Level 3 Adjust the level of the subwoofer output 4 Press the ENTER key The adjustment range is be tween 1 and 5 CURSOR SE...

Page 41: ... Off and press the SET key Tone adjustment The lowest and highest frequency bands can be adjusted independently 1 Display the Function menu 2 Select the Tone Control 3 Select the message to be displayed Bass or Treble 4 Adjust the level of the selected tone 5 Press the ENTER key The adjustment range is be tween 4 and 4 Tone control and sound field effect adjustment The sound field effects of Bass ...

Page 42: ... is canceled when Dolby Vir tual is set 1 Display the Function menu 2 Select the Listen Mode 3 Select the message to be displayed Virtual On or Virtual Off 4 Select On or Off Setting ON or OFF Select level 1 Display the Function menu 2 Select the Listen Mode 3 Select the message to be displayed Virtual On 4 Select the Effect Level 5 Select the Level 1 Level 2 or Level 3 6 Press the ENTER key CURSO...

Page 43: ... built into this unit provides appropriate tone patterns equalizing patterns for major musical categories DSP mode setting 1 Display the Function menu 2 Select the Listen Mode 3 Select the message to be displayed DSP On or DSP Off 4 Select the desired DSP pattern The Dolby Virtual function is canceled when the DSP mode is set Off Stadium Arena Live house CURSOR SET CURSOR SET CURSOR SET CURSOR SET...

Page 44: ... overlaps in a certain pe riod the timer functions are activated in the fol lowing priority order 1 O T T 2 Timer playback 3 Timer recording Setting the O T T 1 Display the Function menu 2 Select the message to be displayed O T T Off or O T T On 3 Select the message to be displayed On 4 Set the timer start time 5 After setting the start time press the ENTER key 6 After completing the set ting set ...

Page 45: ...the Function menu 2 Select the message to be displayed Timer Play Off or Timer Play On 3 Select the message to be displayed On 4 Set the on time 5 Set the off time 6 Select the input to be played by timer Select Off when you want to cancel the timer It is not permitted to set the same time of day as the on time and off time To return to the previous operation step in the middle select Back with th...

Page 46: ...Display the Function menu 2 Select the message to be displayed Sleep On or Sleep OFF 3 Set the time period until the power is to be turned OFF The time period can be set in 10 minute steps from Off up to 90 minutes Selecting Off cancels the sleep timer setting The back light of the remote control unit turns off while the sleep timer is active The power will turn off when the set time period has el...

Page 47: ...ting set the power OFF Select Off when you want to cancel the timer Tuner Video1 or Video2 can be selected To return to the previous operation step in the middle select Back with the CURSOR key and press the SET key Select Next to advance to the next step Timer recording is used to record a source onto a tape The TUNER or the component connected to the Video1 or Video 2 input can be selected as th...

Page 48: ...n menu 2 Select the information item to be displayed The items as shown below can be selected CD Single Time display During stop in normal mode Playing time of the first track During playback in normal mode Playing time of the track being played During stop in program mode Playing time of the first programmed track During playback in program mode Playing time of the track being played In normal mo...

Page 49: ...Adjusting the display contrast Use the following procedure to adjust the density of the display on the remote control unit 1 Display the Function menu 2 Select the message to be displayed Contrast 3 Adjust the contrast 4 Press the ENTER key CURSOR SET CURSOR SET ...

Page 50: ...ontrol the major functions of externally connected components such as a TV VCR and DVD player To make the control possible it is required to select the manufacturer and type VCR DVD etc of each com ponent and register it in the memory of the remote control unit Note that with components from certain manufactur ers or of certain types remote control may not be available or the controllable function...

Page 51: ... 7 If the operations are nor mal press the ENTER key to set it Press the SET key and ensure that the component is turned ON If normal operation cannot be performed place the cursor on Back and re select the code type Be sure to check the results later The cable tuner and DSS operations are not avail able in other areas than the U S A and Canada The displayed information is variable depending on ar...

Page 52: ...a TV VCR and DVD player in the remote control unit it can be used to control the major functions of the external components Selecttheinputcorrespondingtothecom ponent to be remote controlled The display show the function names and or sym bols of the 7 available remote control keys The correspondence between the displayed keys and panel keys is as shown below If the remote control keys are provided...

Page 53: ...d Ch5 Channel Up 4 1 Fastreverse Ch Channel Down ENTER PWR Power PWR Power DIRECTION PAUSE Pause AUDIO Audioswitching REC REC Record INPUT Input selection Symbol on the Display Function remote control 6 BAND Vol 5 Volume up 7 Vol Volume down Ch 5 Channel up 4 Ch Channel down ENTER PWR Power DIRECTION REC Symbol on the Display Function Display Function remote control 6BAND Cursor 7 Cursor Ch5 Chann...

Page 54: ...ensation in a fol lowing circumstance When this unit is carried from a place to another across a large difference in temperature when the humidity in the room where this unit is installed increases etc Reference Maintenance of the Set When the front panel the case etc becomes dirty wipe with a soft dry cloth Do not use thinner alcohol etc as these can cause discoloration In regard to contact clean...

Page 55: ... matter be come attached to the disc lightly wipe the disc with a soft cotton cloth or similar from the center of the disc outwards in a radial manner Storage When a disc is not to be played for a long period of time remove it from the player and store it in its case Handling Hold the discs so that you do not touch the playing surface Discs which can be played with this unit CD 12 cm 8 cm and the ...

Page 56: ... reasonable protection against harmful interference in a residential installation This equipment may cause harmful interference to radio communications if it is not installed and used in accordance with the instructions However there is no guarantee that interference will not occur in a particular installation If this equipment does cause harmful interference to radio or television reception which...

Page 57: ...witched ON The headphone plug is inserted into the jack The speaker cords are short circuited Imperfect insertion The speaker cords are disconnected The BALANCE is set completely to the left or right channel Remedy Cause Symptom Adjust the present time again Adjust the present time again Adjust the present time referring to Clock adjustment Set the timer ON time and OFF time Press the ON STANDBY k...

Page 58: ... disc is placed upside down The disc position is displaced The disc is extremely dirty The disc is scratched Dew is condensed on the optics lens The disc has not been placed The player is not put to the play mode The disc is extremely dirty The disc is scratched The disc is dirty The disc is scratched The player is subject to vibration Too much text data has been stored T R T T Remote control unit...

Page 59: ... pressed The cassette holders cannot be opened by pressing the PUSH OPEN area Sound is harsh or high frequencies are not repro duced Sound is distorted Noise is noticeable Sound vibrates Recording cannot be started by pressing the record key R U R R R T The head is dirty The tape is wound too tight due to irregular winding A nonrecorded tape is played The cassette holder is not closed com pletely ...

Page 60: ...H HOME key 13 I In regard to CD TEXT 23 M Maintenance 54 Manual preset 21 N Normal timer playback 45 Notes on cassette tape 55 O O T T 44 One touch operation 17 P Playback of CD 22 Playback of tape 24 Program playback 32 PTY search 29 R R D S 28 Random playback 35 RDS auto memory 20 Receiving broadcast station 18 Recording on TAPE 26 Reference 54 Remote control of external components 50 Repeated p...

Page 61: ...ol Bass Treble Input Level Video1 Video2 S W Level NV 600 only Time INFO CD Single CD Single Time CD Total CD Total Time Timer Mode Sleep O T T On Off Timer Play On Source Select Off Rec Options CD Tape Rec One Track Rec Direct Rec Program Rec Timer Rec On Off On Source Select Off Setup IR TV manufacturer list type of codes Video 1 VCR manufacturer list type of codes Cable 1 manufacturer list type...

Page 62: ...em Enclosure Bass reflex type magnetically shielded Speaker configuration Woofer 80 mm 3 1 8 cone type Tweeter 19 mm 3 4 dome type Impedance 8 Ω Maximum input level 40 W Dimensions W 158 mm 6 1 4 H 257 mm 10 1 8 D 152 mm 6 Weight net 2 0 kg 1 piece including the speaker stand Subwoofer system Enclosure Bass reflex type magnetically shielded Speaker configuration Woofer 160 mm 6 1 2 cone type Imped...

Page 63: ...closure Bass reflex type Speaker configuration Woofer 160 mm 6 1 2 cone type Tweeter 25 mm 1 dome type Impedance 6 Ω Maximum input level 100 W Dimensions W 225 mm 8 7 8 H 350 mm 13 3 4 D 263 mm 10 3 8 Weight net 5 0 kg 1 piece KENWOOD follows a policy of continuous advancements in development For this reason specifications may be changed without notice Sufficient performance may not be exhibited a...

Page 64: ...found on the back of the unit in the spaces designated on the warranty card and in the space provided below Refer to the model and serial numbers whenever you call upon your dealer for informa tion or service on this product Model Serial Number ...

Reviews: