background image

43

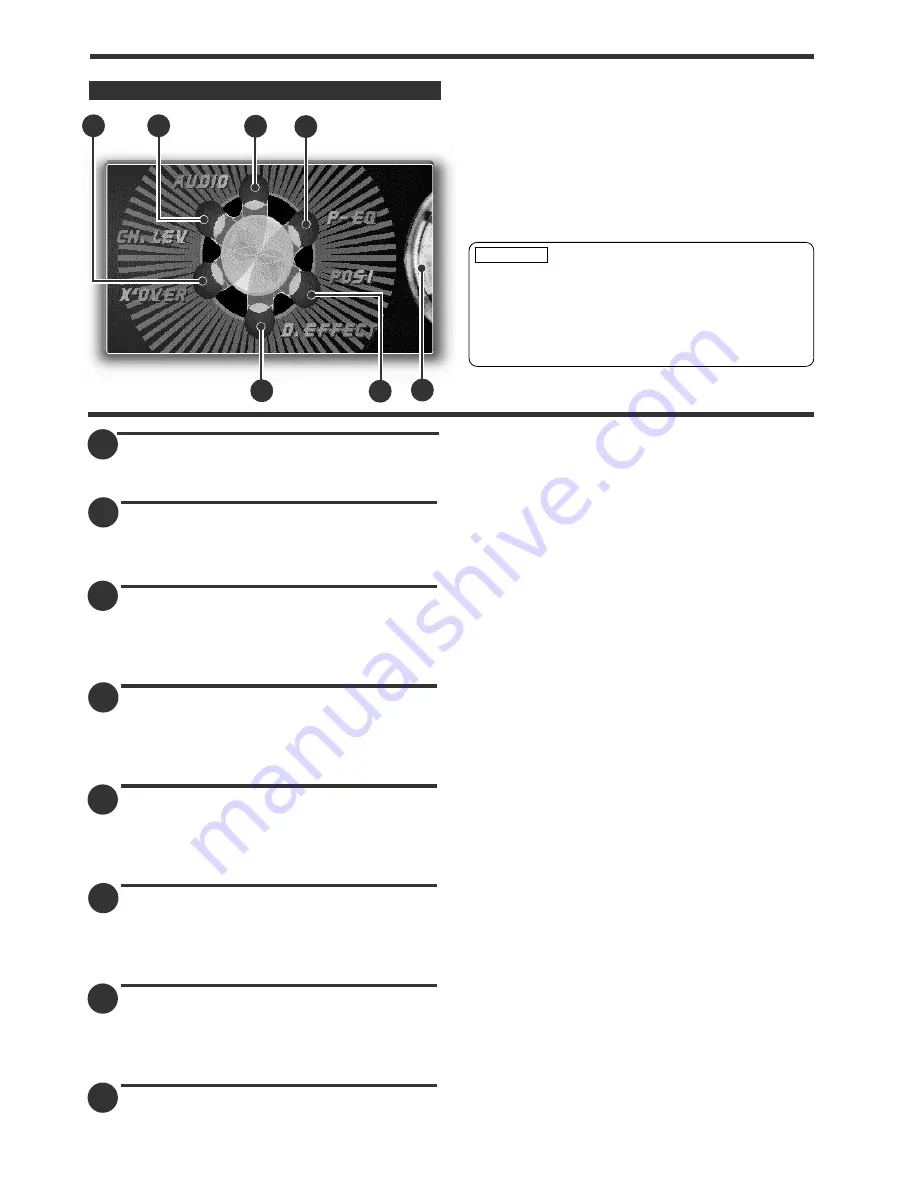
Sound Effect Menu Function 

Switching to the Audio Control Screen 

Touch [ Audio ] to switch to the Audio Control
Screen (Page 44). 

Switching to the Crossover Network
Setting Screen 

Touch [ X'OVER ] to switch to Crossover Network
Setting Screen (Page 46).

Switching to the Crossover Setting
Screen 

<When the KDS-P900 is connected>

Touch [ X'OVER ] to switch to Crossover Network
Setting Screen (Page 50).

Switching to the Position Setting
Screen 

<When the KDS-P900 is connected>

Touch [ POSI ] to switch to the Position Setting
Screen (Page 48).

Switching to the Channel Level Setting
Screen

<When the KDS-P900 is connected>

Touch [ CH.LEV ] to switch to the Channel Level
Setting screen (Page 49).

Switching to the Digital Effect Setting
Screen

<When the KDS-P900 is connected>

Touch [ D.EFFECT ] to switch to the Digital Effect
Setting Screen (Page 47).

Switching to the Parametric Equaliser
Screen

<When the KDS-P900 is connected>

Touch [ P-EQ ] to switch to the Parametric
Equaliser Screen (Page 52).

Ending the Sound Effect Menu Screen

Touch this icon to return to the Menu Screen.

C

B

D

E

A

F

G

D

E

B

A

C

G

F

You cannot operate the Digital Effect Setting
Screen, Position Setting Screen, Crossover
Network Setting Screen and Parametric Equaliser
Screen when the "2zone" function is set to "ON"
on the System Setup Screen (see page 12) or the
"Noise" function is set to "ON" on the Channel
Level Setting Screen (see page 49).

CAUTION

Sound Effect Menu Screen

A

Summary of Contents for KVT-920DVD

Page 1: ...r has been designed to play back the DVD software which has been encoded for specific region areas It cannot play back the DVD software encoded for other region areas than the region areas for which it has been designed DIGITAL VIDEO COMPACT COMPACT TEXT TEXT DIGITAL AUDIO DIGITAL AUDIO COMPACT COMPACT â ...

Page 2: ...usting the Time Manually Setting the Minutes to 00 TV Area Setup Function 22 Selecting the Preset Bands Selecting the Reception Area Touch Panel Adjustment Function 22 Code Security Function 23 Operating the Buttons for Basic Function 24 Adjusting the Volume Turning Attenuator On Off Switching Source Mode Inserting Discs Seeking Searching Fast Forwarding and Reversing Disc Play Ejecting Discs Basi...

Page 3: ...ct Setting Function 47 Selecting the Digital Input Mode Using the DOLBY PRO LOGIC Selecting the Acoustic Image Turning the Centre Output On Off Turning the Sub Woofer Output On Off Selecting the Dynamic Range Selecting the Multi Channel Defeat Returning to the Sound Effect Menu Screen Position Setting Screen 48 Selecting the Position Mode Adjusting the Room Size Mode Returning to the Sound Effect ...

Page 4: ...u cannot view video pictures whilst the vehicle is moving To enjoy TV video pictures find a safe place to park and engage the parking brake If you experience problems during installation consult your Kenwood dealer If the unit does not seem to be working right try pressing the reset button first If that does not solve the problem consult your Kenwood dealer Mask key If you have transmitted the Mas...

Page 5: ...nd put them back in their cases Do not pile up discs that are removed from their cases or prop them against something Cleaning discs If a disc has become dirty wipe it off gently using a commercially available cleaning cloth or a soft cotton cloth starting from the centre of the disc and moving outward Do not clean discs with conventional record cleaners anti static formulas or chemicals such as p...

Page 6: ...icates that the disc being played is under the restriction as described above Unplayable discs This player cannot play back any of the following discs MP3 recorded CD DVD ROM discs SVCD HQVCD discs DVD R DVD RW DVD RAM discs VSD discs CDV discs Only the audio part can be reproduced CD G CD EG CD EXTRA discs Only the audio can be reproduced Photo CD discs Never attempt to play them Icons on the DVD...

Page 7: ...Chapter number DVD The chapter is a section of video and audio recorded in a DVD A title is composed of several chapters The numbers assigned to individual chapters are referred to as the chapter numbers Subtitles DVD Some DVD discs contains the recording of more than one subtitle language This player allow you to select one of the recorded subtitle languages during playback If the subtitle langua...

Page 8: ...s turned on can be set Refer to the angle control screen Page 9 Power Off Hold down the OPEN button for one second or more to turn the set s power off Press the OPEN button to turn the power on Switching the Monitor s Picture Each time you press the V SEL button the monitor s picture switches as follows Source control screen DVD VCD or CD picture TV or Video picture Navigation picture When the AV ...

Page 9: ...e button to decrease the volume NOTE Selecting the TV Video Screen Mode Each time you press the SCREEN button for one second or more the screen mode switches as follows FULL Full picture mode JUST Just picture mode CINEMA Cinema picture mode ZOOM Zoom picture mode NORMAL Normal picture mode You cannot operate when the navigation picture is displayed Adjusting the Picture Quality Slide Position Pre...

Page 10: ...icons to switch the source control screen as follows Switching to the FM AM tuner control screen see p 28 Switching to the TV or video control screen see p 26 Switching to the built in DVD VCD CD player control screen see p 36 Switching to the external CD player control screen see p 39 When the CD player is connected Switching to the disc CD changer control screen see p 39 When the CD changer is c...

Page 11: ... switch the Clock Adjustment Screen see p 21 Selecting to the System Setup Screen Touch System to switch the System Setup Screen see p 12 Selecting to the TV Area Setting Screen Touch TV Area to switch to the TV Area Setting Screen Page 22 Selecting to the Code Security Screen Touch Security to switch to the Code Security Screen see p 23 Selecting to the Touch Panel Adjustment Screen Touch Touch t...

Page 12: ...mitted Each time you touch Scroll the mode switches as follows Auto Automatic scrolling Manual Manual scrolling NOTE Setting the AV Input 1 Mode Each time you touch AV IN1 the mode switches as follows Navigation When the Navigation unit is connected to the AV INPUT1 terminal Video When the Video Deck is connected to the AV INPUT1 terminal Setting the AV Input 2 Mode Each time you touch AV IN2 the ...

Page 13: ... remote control unit is pressed or the disc track is changed the information is temporarily superimposed on the picture Manual When the lower centre of the screen is touched whilst a TV video picture is displayed the information is temporarily superimposed on the picture Setting the Information on the Graphic Screen You can set whether or not to display the information on the graphic screen Each t...

Page 14: ...ogrammes such as network information being transmitted from radio stations When listening to an RDS station ie a station with RDS capability the programme service name of the station is displayed along with the frequency advising you quickly which station is being received RDS Radio Data System stations also transmit frequency data for the same station When you are making long trips this function ...

Page 15: ... function is on when unit is first powered on Each time you touch ATPS the mode switches as follows ON Auto TP seek function is turned on OFF Auto TP seek function is turned off Restricting RDS Region On Off You can choose whether or not to restrict the RDS channels received with the AF function for a particular network to a specific region Each time you touch Regional the mode switches as follows...

Page 16: ...r box screen with black stripes on the top and bottom 4 3 PS Wide screen software with pan scan specification is played in a panned scanned screen with the left and right sides cut off 16 9 Set the picture mode of the wide screen monitor to FULL Setting the Priority Language for Menu Set the language used for the menus title menu etc Touch Menu Lang to switch the language select screen see p 18 Se...

Page 17: ...n the analog stereo outputs of the DVD player is connected to an amplification system To enjoy DTS Digital Surround TM playback an external 5 1 channel DTS Digital Surround TM decoder KDS P900 system must be connected to the digital output S PDIF AES EBU or TosLink of the DVD player Switching to the Rating Level parental lock Setting Screen Use this function to restrict the viewing of movies to ch...

Page 18: ...you enter the wrong letter touch Clear The last entered letter is cleared Returning to the Original Language Audio language only Touch Original or to return to the original language Returning to the DVD setup Screen Touch RTN to return to the DVD setup screen NOTE C B C B A Language Select Screen ...

Page 19: ...u rm rn ro ru rw sa sd sg sh si sk Hebrew Japanese Yiddish Javanese Georgian Kazakh Greenlandic Cambodian Kannada Korean Kashmiri Kurdish Kirghiz Latin Lingala Laotian Lithuanian Latvian Lettish Malagasy Maori Macedonian Malayalam Mongolian Moldavian Marathi Malay Maltese Burmese Nauru Nepali Dutch Norwegian Occitan Afan Oromo Oriya Punjabi Polish Pashto Pushto Portuguese Quechua Rhaeto Romance Ki...

Page 20: ...etup Screen Touch RTN to return to the DVD setup screen NOTE NOTE 2 NOTE 1 B C A Parental Setup Screen C B C Some discs may request that you change the rating level set in the default settings during playback In this case the rating level setup screen is displayed if you do not input the correct password either playback does not continue or a picture for a different rating level is played Write do...

Page 21: ...tment function is turned off The factory default is automatic time adjustment Touch SYNC to switch the function on and off ON Tune into an RDS station for 3 or 4 minutes The time adjusts automatically to the correct local time OFF Manual adjusting The time is not adjusted when the RDS station you are tuned to be not transmitting a time signal Choose another RDS station in such a case Adjusting the...

Page 22: ...ht is touched the adjustment is completed and the system setup menu screen reappears If CANCEL is touched without touching the button at the lower left the adjustment is cancelled and the screen that was set before switching to the system setup menu reappears If CANCEL is touched after touching the button at the lower left the button at the lower left reappears If RESET is touched the settings are...

Page 23: ...ce to the unit in advance you will have to transmit it once again if the unit has been removed from the battery This function helps prevent theft When using the unit for the first time Hold down the transmit button on the Mask key until the full transmit level indicator lights up in the display 1st will be displayed Keep the Mask Key close to the signal sensor when you transmit the Mask Key signal...

Page 24: ...f the volume returns to the original level Turning the volume up or turning it all the way down deactivates the attenuator function Switching Source Mode Each time you press the SOURCE button to switch source mode Inserting Discs Holding the disc with the labelled side facing up insert it in the disc slot The disc will start playing Do not insert other disks when a disk is already inserted It may ...

Page 25: ...ume Decreasing the volume Touch d to decrease the volume Switching to the Next Source Mode Touch the source icon to switch to the next source control screen Switching to the Previous Source Mode Touch the source icon to switch to the previous source control screen Switching to the Menu Screen Touch this icon to switch to the menu screen Displaying the Quick Effect Control Screen Touch this icon to...

Page 26: ...ls down the band Preset station Seek Mode AUTO2 Touch the right side part to move to the next preset station Touch the left side part to move to the last preset station Manual Seek Mode MANU Touch the right side part to increase the channel by one step Touch the left side part to decrease the channel by one step Displaying the Information Touch the lower centre part to display the information for ...

Page 27: ...reset station number 1 6 for the desired station The number of the recalled station is displayed Switching to the TV List Screen Touch LIST to switch to the TV list screen see p 28 3 2 1 NOTE 2 1 Selecting the Preset Bands Touch TV to select the TV preset band Each time you touch TV the preset band switches between the TV1 and TV2 Selecting the Video Inputs Each time you touch VD the video input s...

Page 28: ...Switching the List Each time you touch or the list switches between the TV1 and TV2 bands Recalling a Preset Station Touch the preset station number 1 6 for the desired station The number of the recalled station is displayed Returning to the Source Control Screen Touch MAIN to return to the TV control screen NOTE K J I H K A G C B E D F H TV Control Screen I D C E J TV List Screen ...

Page 29: ... be preset in FM2 or FM3 When the local seek function is turned whilst auto memory entry takes place stations with poor reception are not stored When the Traffic Information function is on only the local traffic information station frequency will be stored NOTE 3 2 1 NOTE 2 1 Selecting the FM Bands Touch FM to select the FM band Each time you touch FM the band switches between the FM1 FM2 and FM3 ...

Page 30: ...ch LO S to switch the local seek function on and off The LO S indicator is displayed when the local seek function is on Switching to the PTY Search Screen Touch PTY to switch the PTY search screen Page 32 Turning the Monaural Reception On Off When poor stereo reception is experienced this function will reduce noise and improve listening conditions Touch MONO to switch the monaural reception on and...

Page 31: ...n Use the 4 button to make an auto seek of the TI stations in a certain band When you are listening to a disc you cannot change to another TI station When the auto TP seek function is turned on and reception starts to weaken the tuner automatically seeks stations with better reception If you are tuned to a station that is not a traffic information station itself but which provides Enhanced Other N...

Page 32: ...rn to the tuner control screen 2 1 NOTE B C A C A News Current Affairs Information Sport Education Drama Culture Science Varied Speech Pop Music Rock Music Easy Listening M Light Classic M Serious Classics Other Music Weather Metr Finance Children s Prog Social Affairs Religion Phone In Travel Touring Leisure Hobby Jazz Music Country Music National Music Oldies Music Folk Music Documentary All Spe...

Page 33: ...33 ...

Page 34: ...e of two ways Seamless The angle switches smoothly Non seamless When the angle is switched a still picture is displayed first after which the angle switches NOTE NOTE Displaying the DVD Picture Press the V SEL button see page 8 Chapter Search Search forwards or backwards through the chapters on the disc until you reach the one that you want to look to Making a Forward Search Touch the right part o...

Page 35: ...ions may not work as intended by you Please be sure to read the instructions provided with each disc When an inhibition icon is displayed it indicates that the disc being played is under the restriction as described above Inhibition icon Displaying the VCD Picture Press the V SEL button see page 8 Next Play Previous Play When the PBC function is set to ON To Next Play Touch the right part To Previ...

Page 36: ...rse Search Disc Play Forward search Touch Reverse search Touch 1 Cancelling the search Touch 38 to resume normal playback Touch once to start and continue forward or reverse search at a low speed Each time you touch the search speed goes from 1 times x 1 to 2 times x 2 to 3 times x 3 Audio is not output during forward or reverse search DVD VCD The video may be disturbed during forward or reverse s...

Page 37: ...dom play is cancelled when you eject the disc NOTE 2 1 NOTE Pausing and Restarting Disc Play Touch 38 to make the disc pause Touch 38 again to start play again Track Search Search forwards or backwards through the tracks on the disc until you reach the one that you want to listen to Making a Forward Search Touch once to fast forward to the next track twice to fast forward to the track after that a...

Page 38: ... one No Text is displayed instead To Scroll Manually Touch to display the disc title or the track title The titles will be displayed in one scrolling display Selecting the Time Display Each time you touch TIME the time display during disc play switches as follows P Elapsed time of track being played A Elapsed time of entire disc Switching to the Name Set Screen Touch for at least two seconds to sw...

Page 39: ... NOTE Pausing and Restarting Disc Play Touch 38 to make the disc pause Touch 38 again to start play again When one disc has finished playing its last track the next disc in the changer starts playing When the last disc in the changer has finished the player returns to the first disc and starts playing it Track Search Search forwards or backwards through the tracks on the disc until you reach the o...

Page 40: ...isten to Making a Forward Disc Search Touch D to display the desired disc number Each time D is touched the displayed disc number increases by one Play starts at the beginning of the displayed disc Making a Reverse Disc Search Touch D to display the desired disc number Each time D is touched the displayed disc number decreases by one Play starts at the beginning of the displayed disc Disc loading ...

Page 41: ...h or the disc list switches between the disc1 6 and disc 7 10 Switching the Display for Discs Each time you touch DNPS or TEXT to the list switches between the DNPS and CD text Selecting the Disc Touch the disc number 1 10 in the list for the desired disc The number of the changed disc is displayed The 3 1MD changer cannot be operated when 4 disks are inserted Returning to the Source Control Scree...

Page 42: ...Name Preset SNPS Disc Name Preset DNPS If the cursor is in the desired character input position go on to step 4 If not touch either 2 or 3 to move the cursor to the desired position Touching 2 moves the cursor to the left and touching 3 moves it to the right Touch or to switch the character lists Touch a character Continue steps 1 and 3 until all the characters have been input for the name You can...

Page 43: ...ch CH LEV to switch to the Channel Level Setting screen Page 49 Switching to the Digital Effect Setting Screen When the KDS P900 is connected Touch D EFFECT to switch to the Digital Effect Setting Screen Page 47 Switching to the Parametric Equaliser Screen When the KDS P900 is connected Touch P EQ to switch to the Parametric Equaliser Screen Page 52 Ending the Sound Effect Menu Screen Touch this i...

Page 44: ...the basic sound level and the required level Each time you touch 3 the level is increased Each time you touch 2 the level is decreased NOTE NOTE Adjusting the Bass Level Each time you touch the bass level is increased Each time you touch the bass level is decreased No display this item when the KDS P900 is connected Adjusting the Treble Level Each time you touch the treble level is increased Each ...

Page 45: ... Screen Touch RTN to return to the audio control screen NOTE Ending the Audio Control Screen Touch RTN to return to the sound effect menu screen Switching to the Sound Preset Screen Touch PRO to switch to the Sound preset screen No display PRO when the KDS P900 is connected Recalling the Kenwood Preset Sound Each time you touch or the preset sound setting switches between the Flat Easy Jazz Pops T...

Page 46: ... adjust the frequency as follows THR through 40Hz 60Hz 80Hz 100Hz 120Hz 150Hz 180Hz 220Hz Adjust the frequency of the Low pass filter for Non Fading output Adjust the frequency of the Low pass filter Each time you touch or to adjust the frequency as follows 50 Hz 80 Hz 120 Hz THR through Setting the phase for Non Fading output Each time you touch N F Phase to switch the phase as follows NORMAL 0 R...

Page 47: ...ut Mode Each time you touch Input Select to switch the digital input mode as follows Digital Optical digital input Analog Analog input When playing DTS encoded CDs DVDs excessive noise may be exhibited from the analog stereo outputs To avoid possible damage to audio system the consumer should take proper pro cautions when the analog stereo outputs of the DVD player is connected to an amplification...

Page 48: ... Mode Touch the Small Middle or Large the room size can be adjusted as follows Small For compact cars where front and rear speakers are close to each other Middle For sedans Large For large vans or RVs where front and rear speakers are far apart from each other Room size cannot be adjusted when position select mode is set to ALL Returning to the Sound Effect Menu Screen Touch RTN to return to the ...

Page 49: ...nce between channels Each time you touch Noise to switch the test signal function on and off Adjusting the Front Left Speaker Each time you touch or to adjust the front left output level Adjusting the Front Right Speaker Each time you touch or to adjust the front right output level Adjusting the Rear Left Speaker Each time you touch or to adjust the rear left output level You cannot operate when t...

Page 50: ...er for Front output Adjust the frequency Each time you touch or to Adjust the frequency as follows THR through 30Hz 60Hz 90Hz 120Hz 150Hz 180Hz 250Hz Adjust the slope Each time you touch or to adjust the slope 12dB 18dB and 24dB Adjust the frequency of the Low pass filter for Sub Woofer output Adjust the frequency of the Low pass filter Each time you touch or to adjust the frequency as follows 30H...

Page 51: ...er Touch the or to adjust the delay time for front right output Adjusting the Rear Left Speaker Touch the or to adjust the delay time for rear left output You cannot operate when the Multi channel is set to 3 0 or 2 0 see P 47 When playing with multi channels Adjusting the Rear Right Speaker Touch the or to adjust the delay time for rear right output You cannot operate when the Multi channel is se...

Page 52: ... you touch the frequency is decreased A1 60Hz 80Hz 100Hz 120Hz 160Hz 200Hz 250Hz A2 315Hz 400Hz 500Hz 630Hz 800Hz 1kHz A3 1 25kHz 1 6kHz 2kHz 2 5kHz 3 15kHz 4kHz A4 5kHz 6 3kHz 8kHz 10kHz 12 5kHz 16kHz Adjusting the Quality Factor Each time you touch or to switch the Bass quality factor as follows 1 0 25 2 0 5 3 1 0 4 2 0 Adjusting the Gain Each time you touch the gain is increased Each time you t...

Page 53: ...ch 1 6 for the desired Crossover network and delay time setting Recalling Your Sound Settings When the KDS P900 is not connected Touch 1 5 for the desired sound preset setting When the KDS P900 is connected Touch 1 3 for the desired parametric equaliser setting External Amp Control Adjust the bass boost level of the external amplifier using the main unit Each time you touch Amp Ctrl to switch the ...

Page 54: ...eo1 and video2 3Selecting the Channels Move the Joystick to right side to seek up Move the Joystick to left side to see down 3Selecting the Tuning Mode Each time you press the Joystick the tuning mode switches to auto 1 auto 2 and manual 3Recalling Preset Station Press either 1 6 for the desired station 3Direct Search Press the DIRECT button to switch the direct search mode Press the 0 9 buttons a...

Page 55: ... to change the voice language 3Switching Multiple Audio Mode VCD The audio output mode switches in the following order when the 4 AUDIO LANG is pressed while playing CDs 3 L R 3 L L 3 R R 3Chapter Title Time and Number Search DVD Each time you press the DIRECT button the direct search mode switches between the chapter title time and number Press the 0 9 buttons and enter the number or time Press t...

Page 56: ...ion connect the ignition cable to a power source that can be turned on and off with the ignition key If the fuse blows first make sure that the cables have not caused a short circuit then replace the old fuse with one with the same rating Do not let unconnected cables or terminals touch metal on the car or anything else conducting electricity To prevent short circuits do not remove the caps from u...

Page 57: ... unit is installed securely in place If the unit is unstable it may malfunction NOTE 2 CAUTION Metal mounting strap commercially available Self tapping screw commercially available Firewall or metal support Screw M4X8 commercially available Bend the tabs of the mounting sleeve with a screwdriver or similar utensil and attach it in place Optical cable Provided with the KDS P900 When handling an opt...

Page 58: ...on the removal tool Pull the unit all the way out with your hands being careful not to drop it 5 2 CAUTION 4 3 2 1 Removing the Unit Peel the protective strips off of the velcro strips attach them to the bottom of the hideaway unit and secure to the pile carpet Please do not install the unit near the dashboard the rear tray or other important components Doing so could lead to injury or accident sh...

Page 59: ...area with water and allow to dry Clean the glass thoroughly as failure to clean the glass can not only weaken the adhesive strength of the double sided tape but may also cause it to come loose Remove the protective strips from the antenna parts and the back of the antenna unit Attach the double sided tape of the antenna parts and the antenna unit to the rear windshield glass Attach the double side...

Page 60: ...ol cable Orange Accessory C Audio cable Accessory E Antenna Cord Accessory F Route wiring away from power circuitry to avoid noise NOTE Receiver unit front side Monitor unit To parking brake detection switch harness of car For the sake of safety be sure to connect the parking sensor 2 CAUTION Parking sensor cable Green Battery cable Yellow Ignition cable Red FM AM antenna input Antenna Cord ISO An...

Page 61: ... from the tab NOTE Connect to the terminal that is grounded when either the telephone rings or during conversation Connect either to the power control terminal when using the optional power amplifier or to the antenna control terminal in the vehicle TEL mute cable Brown To connect the KENWOOD navigation system consult your navigation manual NOTE External amplifier control cable Pink Black To EXT A...

Page 62: ...the constant power supply 2 The A 7 pin red of the vehicle s ISO connector is connected to the constant power supply and the A 4 pin yellow is linked to the ignition 3 The A 7 pin red of the vehicle s ISO connector is not connected to anything whilst the A 4 pin yellow is connected to the constant power supply or both the A 7 red and A 4 yellow pins are connected to the constant power supply ACC A...

Page 63: ...ONITOR UNIT L R L R VIDEO L L L R R R Audio Visual input 1 Visual input Yellow Audio left input White Audio right input Red Audio Visual input 2 Visual input Yellow Audio left input White Audio right input Red Audio Visual Output Visual output Yellow Audio left output White Audio right output Red Rear Preout Left White Right Red Front Preout Left White Right Red Non fading Preout Left White Right ...

Page 64: ...D D400 DASC R 11BAND SPECTRUM ANALYZER 500 750 1k 2k 4k 8k 16k DISP MENU 24BIT RESOLUTION D A CONVERTER KMD D400 DASC R 11BAND SPECTRUM ANALYZER 500 750 1k 2k 4k 8k 16k DISP MENU 24BIT RESOLUTION D A CONVERTER KMD D400 DASC R 11BAND SPECTRUM ANALYZER 500 750 1k 2k 4k 8k 16k DISP MENU N O N O N N O N O N O N O N N TO MZ BUS TO 5L I F TO 5L I F TO 5L I F Example 1 Example 2 Example 3 Receiver unit R...

Page 65: ...s not darken when the vehicle s lights are turned on The unit is set to auto dimmer When the unit is set to auto dimmer it is not linked to the vehicle s light switch The illumination wire has not been connected If manual dimmer is set Make proper connections according to Connection See page 60 AM FM radio reception is poor and or there is noise The TV antenna and vehicle s radio antenna are too c...

Page 66: ...eing played does not contain the recording of the selected voice or subtitle language Menu playback is available only with VCD discs recorded with P B C The subtitle cannot be displayed when the DVD disc being played does not contain the recording of subtitles The voice or subtitle language cannot be changed when the DVD disc being played does not contain the recording of more than one voice or su...

Page 67: ...normally Press the reset button on the unit see page 4 The disc control mode cannot be selected No cable has been connected to the disc changer input terminal on the unit Connect the cable to the disc changer input terminal on the unit The specified disc does not play but another one plays instead The specified CD is very dirty Clean the CD The CD is upside down Load the CD with the labelled side ...

Page 68: ...ivity 28 dB µ LW tuner section Frequency range 153 kHz 281 kHz UUsable sensitivity 28 dB µ TV Tuner Section Colour system PAL SECAM TV NTSC PAL Video Channel selection system PLL frequency synthesiser system Television system PAL B G PAL I SECAM L SECAM D K SECAM B G Channel converge VHF PAL B G 2 12 ch A H ch PAL I A J ch SECAM L 2 12 ch SECAM D K 1 2 ch SECAM B G 2 12 ch UHF 14 69 ch Demodulatio...

Reviews: