


21
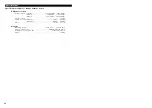
What might appear to be a malfunction in your unit may just be the result of
slight misoperation or miswiring. Before calling service, first check the following
table for possible problems.
SOLUTION
POSSIBLE CAUSE
PROBLEM
No sound can be heard, or
the volume is low.
Nothing happens when the
buttons are pressed.
The computer chip in the unit is not
functioning normally.
Press the reset button on the Control
unit .
The fuse has blown.
After checking for short circuits in the
cables, replace the fuse with one
having the same rating.
The input/output cables or wiring
harness are connected incorrectly.
Reconnect the input/output cables
and/or the wiring harness correctly.
See the section on "Connecting Cables
to Terminals".
Troubleshooting Guide
The DAB mode cannot be
selected.
The DAB connection cable is not
connected.
Use the DAB connection cable to
connect the control unit and the DAB
hideaway tuner.
Connect the power supply of the DAB
hideaway tuner.
Connect the battery cable and ground
cable to the DAB hideaway tuner.
The unit is connected to the CD
changer.
Connect directly to the control unit.
The frequency is displayed,
but no sound can be heard.
The DAB antenna is not connected.
Connect it properly by referring to
"Connecting Cables to Terminals".
The Ensemble frequency is not
matched. The unit is outside the
reception area.
Check the reception area for the
Ensemble frequency and match the
frequency. Try receiving after you have
entered the receiving area.
The following messages are displayed when certain problems are occurring in
your system. Take the recommended actions.
NO CNT
The power supply to the DAB hideaway tuner is not connected to its power supply
terminal.
Connect the power supply terminal of the DAB hideaway tuner properly. After
connection, press the reset button on the Control unit.
]
20
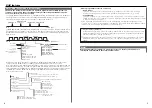
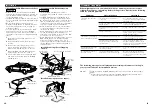
Installation
■
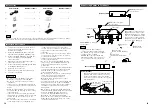
Mounting the DAB Antenna to the Roof
• Make a hole in the roof and mount the DAB
antenna. Specialized knowledge is required for
this job and an installer should be requested
for the installation work.
• The DAB antenna should be mounted so that it
does not protrude beyond the width and length
of the car.
• Do not install at a spot where the roof is
markedly curved. Doing so will allow water to
enter from a gap between the roof and the
waterproof rubber.
• Securely fasten the screws that fix the DAB
antenna as well as the screws of the DAB
antenna itself. Screws that loosen introduce
the danger of the antenna coming apart during
travel.
Determine the mounting position of the
DAB antenna.
Wipe away any dirt from the mounting
position.
Remove the inner lining at the position
where the hole will be made in the roof.
Make a 16 mm diameter hole in the roof.
Mount the DAB antenna and fasten it by
tightening the nut from the inside.U
Use a cable clamp to fix the antenna cable
and perform the wiring as far as the DAB
hideaway unit.
5
4
3
2
1
2
CAUTION
,,,,,,
,,,,,,
DAB
HID
EAW
AY
TUN
ER
KT
C-95
9DA
B
CEN
TER
UN
IT
TO
DAB
AN
TEN
NA
TO
FUS
E
3A
BAT
T
GND
DISC
CH
ANG
ER
TO
Accessory
2
Accessory
4
(ø4
×
16 mm)
Accessory
4
(ø4
×
16 mm)
Accessory
3
(M5
×
6 mm)
Accessory
3
(M5
×
6 mm)
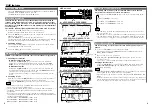
Audio board,
etc.
Carpet
• Installation using the self-tapping
screws
4
• Installation using the velcro tapes
8
Carpet
Accessory
8
Separable sheet
Bottom case of the
DAB hideaway unit
DAB antenna
(Accessory
7
)
ø16
DAB antenna cable
■
Mounting the DAB Hideaway Unit
• Install the DAB hideaway unit in a well-
ventilated location and do not place objects on
top of it.
• The DAB hideaway unit is equipped with a
cooling fan to lower the internal temperature.
Do not block the holes of the cooling fan at the
time of installation. Blocking the holes of the
cooling fan will cease to allow the temperature
to be lowered and will cause breakdown.
• When installing to the car, the unit should be
securely fastened at a location that will not
interfere with driving.
• When making a hole in the chassis, check that
the gas tank, break pipe, wire harness, or
other part is not located on the other side, and
be careful not to cause scratches.
• When attaching the mounting fittings
2
to the
DAB hideaway unit, use only the supplied
mounting screws
3
(M5 x 6 mm). Use of
screws other than those supplied may result in
internal damage or insecure mounting and is
very dangerous.
2
CAUTION
Car roof
Nut
DAB antenna cable
Accessory
6