


19
18
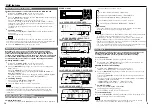
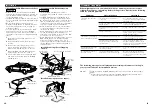
The use of any accessories except for those provided might result in damage to the unit. Make
sure only to use the accessories shipped with the unit, as shown above.
NOTE
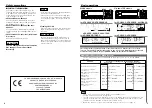
Accessories
External view
Number of items
......................1
1
......................2
2
......................4
3
......................4
4
......................1
5
......................5
6
......................1
7
......................1
8
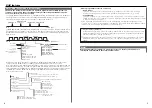
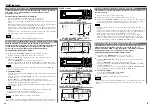
Installation Procedure
1. To prevent short circuits, remove the key
from the ignition and disconnect the
-
terminal of the battery.
2. Install the DAB antenna and connect the
antenna cable to the DAB hideaway tuner.
3. Connect the DAB hideaway tuner and the
control unit using the provided DAB
connection cable.
4. Make the proper input and output cable
connections for each unit.
5. Connect the battery cable and ground cable
to the DAB hideaway tuner.
6. Install the unit in your car.
7. Reconnect the
-
terminal of the battery.
8. Press the reset button.
•
Do not connect the DAB control cable
whilst the control unit is turned ON.
•
Be sure to press the reset button after
installation.
•
If your car is not prepared for this special
connection-system, consult your kenwood
dealer.
•
Make sure that all cable connections are
securely made by inserting jacks until they
lock completely.
•
If the fuse blows, first make sure that the
cables have not caused a short circuit, then
replace the old fuse with one with the
same rating.
•
Do not let unconnected cables or terminals
touch metal on the car or anything else
CAUTION
conducting electricity. To prevent short
circuits, also do not remove the caps on the
ends of the unconnected cables or the
terminals.
•
Some disc changers need conversion cables
for connection. See the section on "Safety
Precautions" for details.
•
Insulate unconnected cables with vinyl tape
or other similar material.
•
Be sure to use the provided DAB antenna
(Accessory
7
) as the DAB antenna. Using
other antenna than provide may lead to
malfunction.
•
Take care so that the antenna cable and other
connection cables are not caught by mobile
parts. Otherwise cable disconnection or
other trouble may result.
•
Do not apply too much force on the antenna
cable, other connection cables and
connectors by bending a cable, etc.
Otherwise cable disconnection or other
trouble may result.
•
Securely fasten the screws that fix the DAB
antenna as well as the screws of the DAB
antenna itself. Screws that loosen introduce
the danger of the antenna coming apart
during travel.
•
DC voltage is output from the DAB antenna
terminal of the DAB hideaway tuner to supply
power to the DAB antenna. Be sure to
connect the supplied DAB antenna only.
Otherwise, the unit may be damaged.
•
After the unit is installed, check whether the
brake lamps, indicators, wipers, etc. on the
car are working properly.
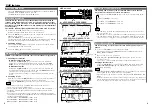
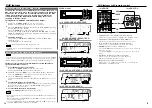
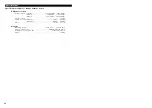
External view
Number of items
Connecting Cables to Terminals
+ -
KENWOOD disc changer
control input
•
To connect the Disc changer,
consult your Disc changer manual.
•
Be always sure to connect the Disc
changer to the "To DISC
CHANGER" terminal of the DAB
hideaway unit. Do not connect it to
a connection terminal of the Main
unit.
NOTE
Fuse (3A)
DAB connection cable
(Accessory
1
)
Battery
DAB antenna
cable
DAB antenna
(Accessory
7
)
Battery cable
(Commercially available)
Ground cable
(Commercially available)
Power terminal
Pass battery and ground cables through
supplied terminal cover and connect to
respective terminals. After completing
connections, fasten terminal cover
5
over
terminal bracket.
Terminal cover
(Accessory
5
)
Lead terminal
(Commercially
available)
DAB hideaway tuner
control input
Control unit
DAB
hideaway
tuner
DC voltage is output from the
DAB antenna terminal of the
DAB hideaway tuner to supply
power to the DAB antenna. Be
sure to connect the supplied
DAB antenna only. Otherwise,
the unit may be damaged.
2
CAUTION
Disc changer
To control unit


