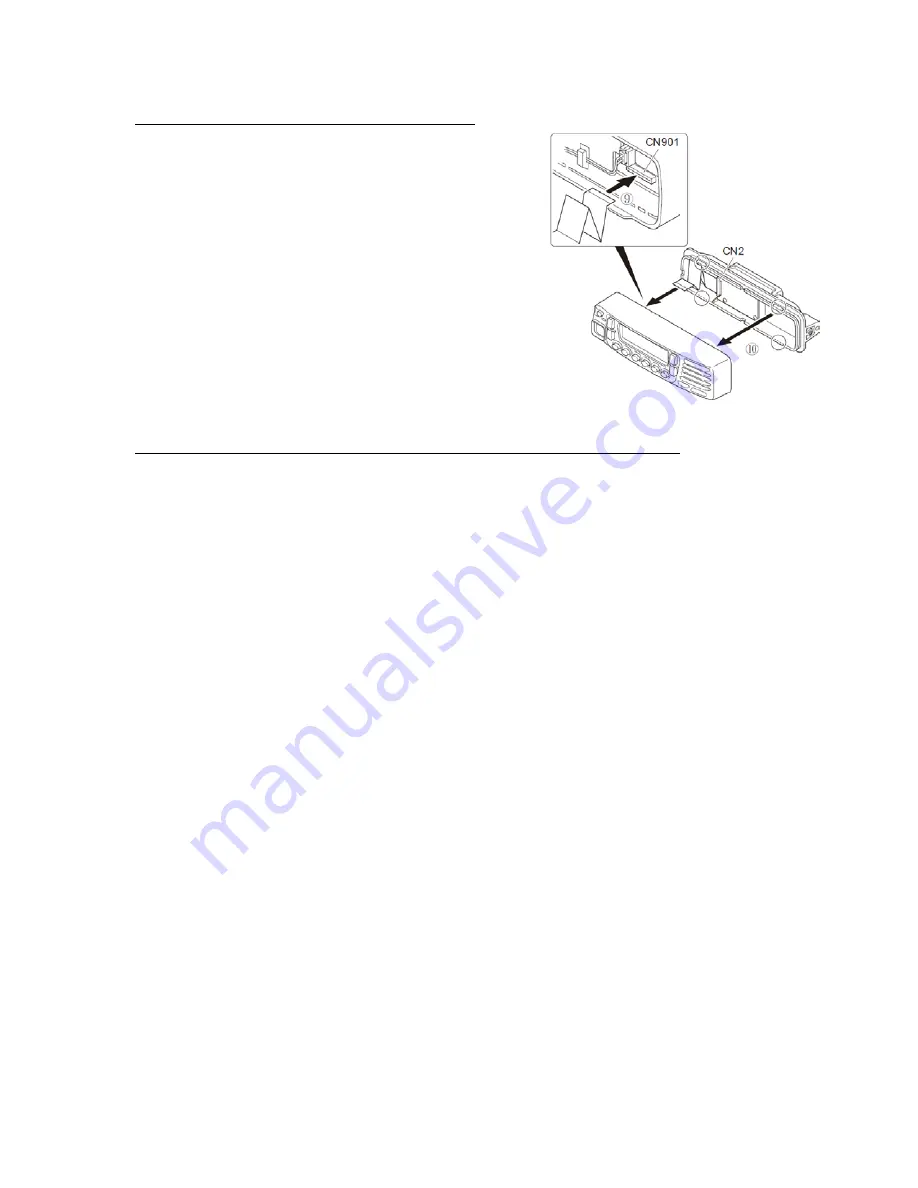
background image

2-3. Install the 

Rear panel

 onto the 

Display Unit


Step 6: Insert the flat cable attached to the interface unit 

of one of the 

Rear panels

 into the connector 

(CN901) of the 

Display unit

 which was removed 

in Step 2 

.


(The flat cable has been pre-

inserted in the connector (CN2) of the rear panel 
at the time of shipping.)  

Step 7: Similarly, insert the flat cable attached to the 

interface unit of the other Rear panel into the 
connector (CN901) of the Display unit included 
with the KRK-13.

Note: The terminal side of the flat cable must face down 

towards the PCB when inserting the flat cable into the 

connector.


Step 8: Fit the four tabs of the rear panel into each 

Display Unit


2-4. Connect the 

Dual Mobile Head Adapter

 to the 

Rear panel

 with the cable 

Step 9: Insert one 14-pin connector of the 

Trunk cable

 (labeled with a sticker) into the 

connector (J1 Primary) of the interface unit of the 

Dual Mobile Head Adapter


Note: Insert the connector that has a sticker on the Trunk cable into the connector of the Dual 

Mobile Head Adapter. 

Step10: Secure the cable bush on the 

Dual Mobile Head Adapter

 and fit the waterproof 

covering (orange) 

 securely over top. 

Step11: Install the 

Molding cover


 over the connector on the 

Dual Mobile Head Adapter


and secure it with two screws 

Step12: Insert the other 14-pin connector of the cable into the connector of the interface unit  

of the 

Rear panel


Step13: Secure the cable bush on the 

Rear panel

 and fit the waterproof covering (orange) 

 securely over top. 

Note: A Trunk cable may be connected from the left side or from the right side. However the 14-pin 

connector must be inserted in the proper direction.


Step14: Install the 

Molding cover


 over the connector on the 

Rear panel

 and secure it 

with two screws 

Step15: Insert one 14-pin connector of the 

Trunk cable

 into the connector (J2 secondary) of 

the interface unit of the 

Dual Mobile Head Adapter


Note: Insert the connector that has a sticker on the Trunk cable into the connector of the Dual 

Mobile Head Adapter. 

Step16: Secure the cable bush on the 

Dual Mobile Head Adapter

 and fit the waterproof 

covering (orange) 

 securely over top. 

Step17: Install the 

Molding cover 

 over the connector on the 

Dual Mobile Head Adapter


and secure it with two screws

Step18: Insert the other 14-pin connector of the 

Trunk cable

 into the connector of the 

interface unit of the 

Rear panel


Step19: Secure the cable bush on the 

Rear panel

 and fit the waterproof covering (orange) 

 securely over top. 

Note: A Trunk cable may be connected from the left side or from the right side. However the 14-pin 

connector must be inserted in the proper direction.


Step20: Install the 

Molding cover


 over the connector on the 

Rear panel

 and secure it 

with two screws 


Fig. 2-3 


Summary of Contents for KRK-13

Page 1: ...KRK 13 Dual Control Head For TK 5720 5820 NX 700 H 800 H 900 901 Application Note Version 1 3 Last Update 16 April 2014 ...

Page 2: ...PPLIED ACCESSORIES KRK 13 Dual Control Head consists of three parts These are the KUT KRK 12 Dual Mobile Head Adapter the KUT KRK 13 Dual Control Head Kit and the KMC 35 Standard dynamic mobile microphone 1 ...

Page 3: ...mooth out the flat cable and fold it as shown in Figure 2 1 2 2 2 Install the Dual Mobile Head Adapter onto the transceiver Step 4 Insert the flat cable that was removed in step 2 above into the connector J3 of the interface unit of the Dual Mobile Head Adapter Note The terminal side of the flat cable must face down towards the PCB when inserting the flat cable into the connector Step 5 Fit the Du...

Page 4: ...rews Step12 Insert the other 14 pin connector of the cable into the connector of the interface unit of the Rear panel Step13 Secure the cable bush on the Rear panel and fit the waterproof covering orange securely over top Note A Trunk cable may be connected from the left side or from the right side However the 14 pin connector must be inserted in the proper direction Step14 Install the Molding cov...

Page 5: ...tep21 Plug the female end of the Y cable to the male end of the Dual Mobile Head Adapter Step22 Plug the other female connector into the male connector on the back of the transceiver Step23 Plug the last female end of the Y cable into the male end of the DC power cable Fig 2 4 4 ...

Page 6: ...e information presented in 3 2 Important Operational Notes for KRK 13 Dual Head Configured Mobiles NEXEDGE NX 700 NX 800 Series NX 900 NX 901 INSTRUCTION MANUAL P25 TK 5720 TK 5820 INSTRUCTION MANUAL 3 2 Important User Operation Notes for KRK 13 Dual Head Configured Mobiles The text of 3 2 follows on the next few pages should be provided to the user along with the mobile Instruction Manual This sp...

Page 7: ... 2 how Head 1 Head 2 affect each other under certain conditions and how a few features operate differently in general It is important that all operators be advised and trained on this information 1 Primary Head 1 operates the same as the dash or single head remote mount configuration 2 Operations limited to ONLY Head 1 a Programming both data file and firmware b Key Loading c Test Mode d Clone Mod...

Page 8: ...ide of the LCD normal factory default position These keys cannot be reprogrammed to any other function nor can the Volume Up Down functions be assigned to any other PF keys on the control head Volume key 7 PA Mode a Volume i While in RX the Audio Level are independent between Head 1 and Head 2 for both Local SP PA ii If the radio is not actively receiving a signal adjusting the audio level will tr...

Page 9: ...ransmit audio from both Head 1 and Head 2 is passed regardless of PTT key state hot mic c While Emergency Mode is active i Head 1 volume control does not work normal behavior ii Head 2 volume control works 16 Programmable control and supervisory tone levels under Optional Features apply to the audio output level of Head 1 ONLY Head 2 is not affected 17 Use of the programmable SQUELCH key will outp...

Reviews: