background image

50


KRF-V9300D/KRF-V8300D/KRF-V7300D

S

u

rround ef

fe

c

ts

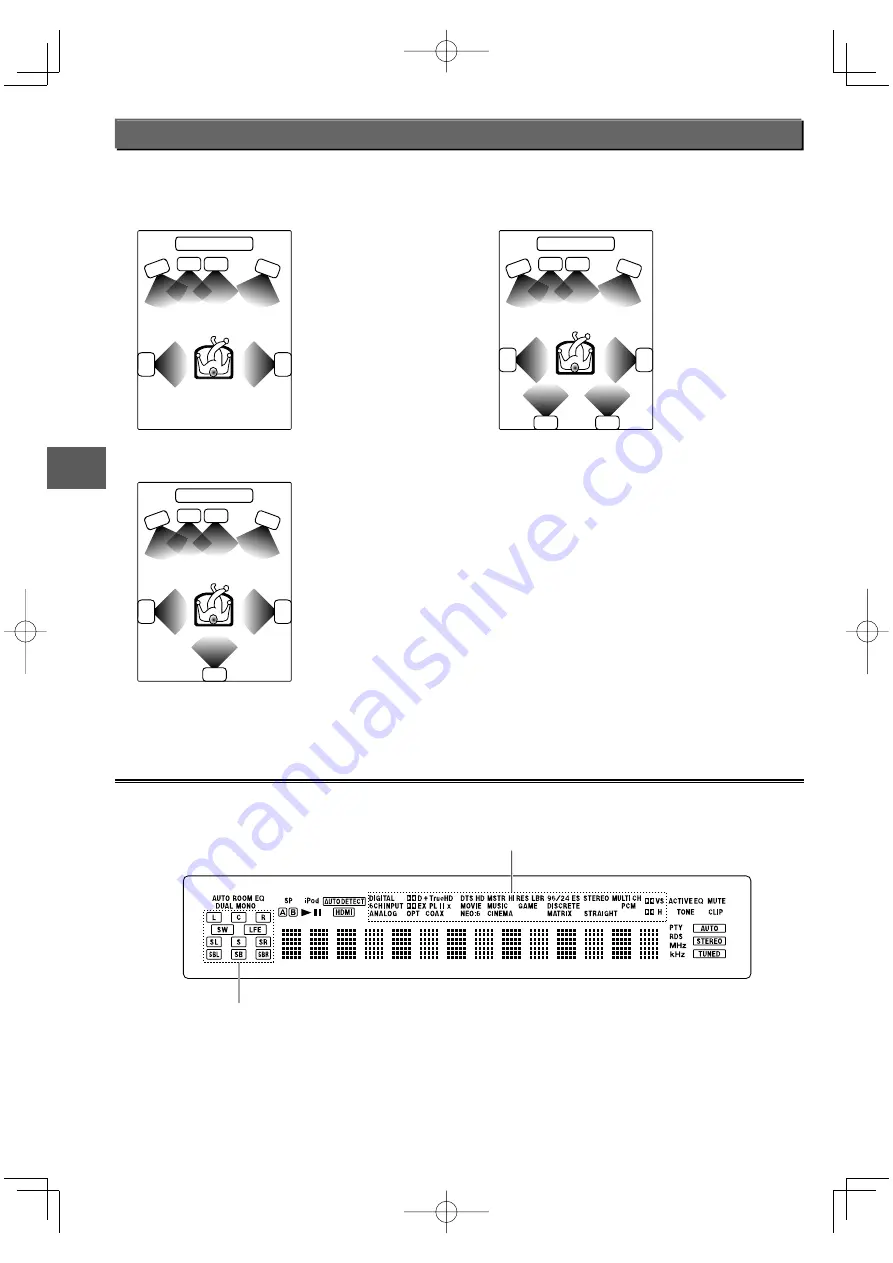
Listen mode

The listen modes provided with this unit allow you to enjoy various surround effects with various video software. To enjoy the surround 
audio in the best condition, it is required to set up the speakers in advance.

5.1ch surround sound system


SR

SL

C

L

R

SW

TV / SCREEN

6.1ch surround sound system


SB

SR

SL

C

L

R

SW

TV / SCREEN

7.1ch surround sound system


SBR

SBL

SR

SL

C

L

R

SW

TV / SCREEN

L :  

Front Left speaker 

SW :  Subwoofer

C : Center speaker

R :  

Front Right speaker

SL : 

Surround Left speaker

SR : 

Surround Right speaker

SB : 

Surround Back speaker

SBL :  Surround Back Left speaker

SBR :  Surround Back Right speaker

About indicators

About indicators

Input channel indicators

These indicators show the input channels used with the 
playing music and video.

•  These indicators do not show the channels selected in the 

current listen mode.

The "LFE" indicator lights when the LFE channel signal 
is input. The LFE level can be adjusted. (See <LFE (Low 
Frequency Effect) level –"LFE Level"–> 

°

.)

The "S" indicator lights when the surround signal consists of 
a single channel.

Listen mode/Input signal format indicators

The indicator for the selected listen mode lights up.

The "DIGITAL" indicator also lights up when the input is a digital 
signal.

B60-5740-00̲00̲EN.indd   50

B60-5740-00̲00̲EN.indd   50

08.7.17   3:30:15 PM

08.7.17   3:30:15 PM

Summary of Contents for KRF-V7300D

Page 1: ...ty with regard to the EMC Directive 2004 108 EC Manufacturer Kenwood Corporation 2967 3 Ishikawa machi Hachioji shi Tokyo 192 8525 Japan EU Representative s Kenwood Electronics Europe BV Amsterdamseweg 37 1422 AC UITHOORN The Netherlands B60 5740 00 00 EN indd 1 B60 5740 00 00 EN indd 1 08 7 17 3 29 20 PM 08 7 17 3 29 20 PM ...

Page 2: ...ucts and batteries with the symbol crossed out wheeled bin cannot be disposed as household waste Old electrical and electronic equipment and batteries should be recycled at a facility capable of handling these items and their waste byproducts Contact your local authority for details in locating a recycle facility nearest to you Proper recycling and waste disposal will help conserve resources whils...

Page 3: ...e adhered to Follow Instructions All operating and use instructions should be followed 1 Cleaning Unplug this product from the wall outlet before cleaning Do not use liquid cleaners or aerosol cleaners Use a damp cloth for cleaning 2 Attachments Do not use attachments not recommended by the product manufacturer as they may cause hazards 3 Water and Moisture This product shall not be exposed to dri...

Page 4: ...DIO MODE 46 KRF V9300D Switching the video resolution 47 Checking the HDMI audio input signal which output from the connected component 47 iPod control 48 Using the menus iPod operation 49 Play and pause File skip Fast forward and backward Repeat play Shuffle play Switching the display Switching the time information Surround effects Listen mode 50 About indicators Surround play using the listen mo...

Page 5: ...sten mode is selected according to the input music signal iPod control iPod control This unit can control an iPod connected to it using the PNC iP120 iPod connection cable optional The music can be reproduced from the speakers connected to this unit and the video can be reproduced on the TV connected to this unit Auto Room EQ KRF V9300D and KRF V8300D Auto Room EQ KRF V9300D and KRF V8300D A setup...

Page 6: ...t See iPod control i 3 Use VOLUME fi to adjust the volume 4 Enjoy various surround effects You can enjoy a variety of listen modes See Surround play using the listen mode Q The surround effects can be fine tuned according to the selected input source See Adjustments according to the playing source The AV AUX and iPod inputs cannot be selected with the INPUT SELECTOR knob of this unit These inputs s...

Page 7: ...o output setting of iPod such as TV OUT and TV Signal needs to be set on your iPod Handling precautions Be sure to read the instruction manual that comes with the iPod you are using Certain conditions while using an iPod can cause contents stored on the iPod to be lost Note that Kenwood will not be held liable for any losses arising out of loss of stored contests Displayble characters This unit ca...

Page 8: ... or Dolby Headphones function ON OFF KRF V7300D DIMMER key ˇ Press to switch the brightness of the display and indicators STRAIGHT DECODE key t Press to switch the STRAIGHT DECODE mode ON OFF Main unit Main unit BAND key Y Press to select the broadcasting band 6 key o Press to play pause the music video playback of iPod AUTO MONO key Press to switch the radio tuning mode between auto tuning and ma...

Page 9: ...MI are recognized Listen mode Input signal format indicators TONE Lights up when the tone setting is on ACTIVE EQ Lights up when ACTIVE EQ is on MUTE Blinks when muting is on CLIP Lights up when the input level is too high AUTO Lights up when the tuning mode is Auto STEREO Lights up when stereo broadcasting is tuned TUNED Lights up when a radio station is tuned Character display Input channel indi...

Page 10: ...I CONTROL TOP MENU RETURN ON SCREEN AUTO MEMORY MENU DVD ENTER BAND MEMORY MUTE TUNER CD MD TAPE AV AUX VIDEO MUSIC BASS BOOST ACTIVE EQ REPEAT RANDOM SHUFFLE AUDIO PTY RESOLUTION iPod DIMMER DISPLAY TIME RECEIVER iPod KRF V7300D EASY SETUP KRF V7300D PTY KRF V8300D KRF V7300D SUBTITLE KRF V7300D AUDIO Names and functions of parts B60 5740 00 00 EN indd 10 B60 5740 00 00 EN indd 10 08 7 17 3 29 30...

Page 11: ...unit ON RECEIVER STANDBY key Press to put this unit to standby 2 KRF V9300D KRF V8300D DOLBY VIRTUAL key T Press to switch the Dolby Virtual Speaker function or Dolby Headphone function ON OFF KRF V7300D PTY key I Press to search a radio station by program type 3 STRAIGHT DECODE key t Press to switch the STRAIGHT DECODE mode ON OFF 4 Numeric keys Also used to recall a preset radio station I Use to...

Page 12: ...d DVD player REPEAT key Press to switch the repeat play of the iPod o Use to operate the Kenwood DVD player For how to be able to use the keys to operate the Kenwood DVD player see Remote control operations for Kenwood DVD players Á Loading batteries Loading batteries 1 Remove the cover 2 Insert batteries Insert two R03 batteries following the polarity indications 3 Close the cover The supplied ba...

Page 13: ... Pressing the STANDBY key turns this unit OFF standby mode When operating the connected components always press the input source key of the component you need to operate first to swith the remote control unit to the selected input source mode and then press the keys of the corresponding operation Operating range Approx Remote sensor ON STANDBY Standby indicator B60 5740 00 00 EN indd 13 B60 5740 0...

Page 14: ... height ideally one meter above the height of the listener s ears Symmetrical installation is ideal The surround speakers reproduce the feeling of movement and presence of sound Subwoofer In general install on the front center position near the front speakers The subwoofer reproduces the powerful bass effects As it is less directional to other speakers it can be installed so that the bass can be r...

Page 15: ...h HDCP High bandwidth Digital Contents Protection Note that the video may be unable to be monitored depending on the combined components Use an HDMI certified category 2 cable High Speed HDMI Cable for the connection When components are connected through the HDMI connection it takes a certain period before the video audio are output because they need mutual authentication If the video and or audio...

Page 16: ...MI connection connection B any video signal input to this unit can be output at the HDMI monitor output terminal For KRF V8300D VIDEO and S VIDEO signal can be converted to COMPONENT VIDEO signal connection C For details see Video up conversion function 2 To output the audio of the TV monitor from the speakers connected to this unit Use connection A digital or F analog Use the digital connection c...

Page 17: ...UE GREEN TAN BROWN AM SPEAKER A SPEAKER B CENTER SURROUND SURROUND BACK GND FM 75 5V 500mA iPod Y CB CR VIDEO2 IN Y CB CR L R L R L R L R SURROUND SPEAKERS 6 16 VIDEO1 IN VIDEO1 IN MONITOROUT MONITOR OUT DVDIN DVDIN VIDEO2 IN VIDEO1 OUT Y CB CR VIDEO2 IN Y CB CR S VIDEO VIDEO COMPONENT VIDEO CD ASSIGNABLE VIDEO2 OPTICAL OPTICAL COAXIAL DVD DIGITAL IN DVD IN VIDEO2 IN MONITOR OUT HDMI R L PLAY IN P...

Page 18: ...video signal from the TV monitor output terminal for the same format as the video input terminal used This unit is compatible with the PAL and NTSC TV formats KRF V9300D only When the video signal input from the VIDEO S VIDEO or COMPONENT VIDEO terminal is converted and output at the HDMI output the resolution of the video signal can be selected See Switching the video resolution u Video player co...

Page 19: ...IN REC OUT SUB WOOFER OPTICAL COAXIAL VIDEO2 IN MONITOR OUT HDMI DIGITAL IN S VIDEO VIDEO COMPONENT VIDEO RED WHITE GRAY BLUE GREEN TAN BROWN AM SPEAKER A SPEAKER B CENTER SURROUND SURROUND BACK GND FM 75 5V 500mA iPod Y CB CR VIDEO2 IN Y CB CR L R L R L R L R SURROUND SPEAKERS 6 16 CD ASSIGNABLE VIDEO2 OPTICAL OPTICAL COAXIAL DVD DIGITAL IN R L PLAY IN PLAY IN REC OUT PLAY IN AUX CD MD TAPE If co...

Page 20: ...SIGNABLE VIDEO2 OPTICAL OPTICAL COAXIAL DVD DIGITAL IN DVD 6CH IN CENTER SURROUND FRONT SUB WOOFER DVD 6CH IN VIDEO1 IN VIDEO1 IN MONITOROUT MONITOR OUT DVDIN DVDIN VIDEO2 IN VIDEO1 OUT Y CB CR VIDEO2 IN Y CB CR S VIDEO VIDEO COMPONENT VIDEO A B C D E AUDIO OUT Analog VIDEO OUT S VIDEO OUT COMPONENT VIDEO OUT COAXIAL DIGITAL OUT AUDIO DVD player Disable the HDMI input if making the connection abov...

Page 21: ... R L R DVD 6CH IN CENTER SURROUND FRONT SUB WOOFER DVD 6CH IN Connecting a DVD player with multi channel audio output terminal Connecting a DVD player with multi channel audio output terminal FRONT OUT SURROUND OUT SUBWOOFEROUT CENTER OUT Disable the HDMI input if making the connection above See HDMI input setup HDMI Input For the VIDEO line connection see Connecting a DVD player B60 5740 00 00 EN...

Page 22: ...TE GRAY BLUE GREEN TAN BROWN AM SPEAKER A SPEAKER B CENTER SURROUND SURROUND BACK GND FM 75 5V 500mA iPod Y CB CR VIDEO2 IN Y CB CR L R L R L R L R SURROUND SPEAKERS 6 16 AUDIO REC OUT PLAY IN PLAY IN VIDEO1 VIDEO2 VIDEO1 IN VIDEO1 IN MONITOROUT MONITOR OUT DVDIN DVDIN VIDEO2 IN VIDEO1 OUT Y CB CR VIDEO2 IN Y CB CR S VIDEO VIDEO COMPONENT VIDEO CD ASSIGNABLE VIDEO2 OPTICAL OPTICAL COAXIAL DVD DIGI...

Page 23: ...AY IN PLAY IN REC OUT PLAY IN PLAY IN PLAY IN REC OUT SUB WOOFER OPTICAL COAXIAL VIDEO2 IN MONITOR OUT HDMI DIGITAL IN S VIDEO VIDEO COMPONENT VIDEO RED WHITE GRAY BLUE GREEN TAN BROWN AM SPEAKER A SPEAKER B CENTER SURROUND SURROUND BACK GND FM 75 5V 500mA iPod Y CB CR VIDEO2 IN Y CB CR L R L R L R L R SURROUND SPEAKERS 6 16 AUDIO REC OUT PLAY IN PLAY IN VIDEO1 VIDEO2 VIDEO1 IN VIDEO1 IN MONITOROU...

Page 24: ...The connection is erroneous Disconnect the iPod and connect it again The iPod in use is not compatible with this unit Connect an iPod compatible with this unit by referring to iPod models usable with this unit 7 The software version of the iPod may be obsolete Update the software version of the iPod by referring to iPod models usable with this unit 7 The battery is low Wait until the battery is ch...

Page 25: ...N REC OUT PLAY IN AUX CD MD TAPE MD recorder or cassette deck AUDIO IN AUDIO OUT Connection B is not necessary if the connected component is not used for recording A B Connecting to the AV AUX jacks A component that is usually not connected to this unit such as a portable video camera can be connected to the AV AUX jacks on the front panel of this unit Portable video camera game player and etc VOL...

Page 26: ...T MONITOR OUT DVDIN DVDIN VIDEO2 IN VIDEO1 OUT CD ASSIGNABLE SUB WOOFER PRE OUT VIDEO2 DVD DVD IN OPTICAL CENTER SURROUND FRONT PLAY IN PLAY IN REC OUT PLAY IN PLAY IN PLAY IN REC OUT SUB WOOFER OPTICAL COAXIAL VIDEO2 IN MONITOR OUT HDMI DIGITAL IN S VIDEO VIDEO COMPONENT VIDEO RED WHITE GRAY BLUE GREEN TAN BROWN AM SPEAKER A SPEAKER B CENTER SURROUND SURROUND BACK GND FM 75 5V 500mA iPod Y CB CR ...

Page 27: ...wire to terminals 1 Strip the vinyl coating of the wire by a length of about 1 cm 2 Loosen the knob 3 Insert the wire Insert until the metallic conductor becomes invisible 4 Tighten the knob B60 5740 00 00 EN indd 27 B60 5740 00 00 EN indd 27 08 7 17 3 29 48 PM 08 7 17 3 29 48 PM ...

Page 28: ...ientation that can offer the best reception condition FM indoor antenna Fix on a wall etc with a good reception condition The provided antenna is intended for temporary use in indoors To obtain stable FM reception it is recommended to use an outdoor antenna Be sure to disconnect the indoor antenna when an outdoor antenna is installed Twist the conductors into a single bundle before connection FM i...

Page 29: ...dicate the standby mode 2 Press the Power key of this unit or the ON key of the remote control unit to turn this unit ON The standby indicator on the front panel goes out and the display panel lights up To turn this unit OFF standby mode Press the Power key of this unit or the STANDBY key of the remote control unit ON STANDBY Do not remove this part for your safety B60 5740 00 00 EN indd 29 B60 57...

Page 30: ...he bass frequencies reproduced from the speakers set to Normal in the SP Setup The frequencies below the frequency set here are distributed to other speakers those set to Large and the subwoofer LFE Level Adjusts the bass tone in reproduction of Dolby Digital and DTS sources Assignment Assigns the input source to the signal output at the CD ASSIGNABLE terminal on the rear panel Audio Delay Adjusts...

Page 31: ... listening position Front Center Rear The speakers are set up as shown below Subwoofer ON Front speaker FRNT Normal in Speaker configuration SP Setup of manual setup Center speaker CNTR Normal in Speaker configuration SP Setup of manual setup Surround speaker SURR Normalx2 in Speaker configuration SP Setup of manual setup Surround Back speaker SB Normal in Speaker configuration SP Setup of manual ...

Page 32: ...O VIDEO COMPONENT VIDEO RED WHITE GRAY BLUE GREEN TAN BROWN AM SPEAKER A SPEAKER B CENTER SURROUND SURROUND BACK GND FM 75 5V 500mA iPod Y CB CR VIDEO2 IN Y CB CR L R L R L R L R SURROUND SPEAKERS 6 16 AUTO ROOM EQ MIC IN CENTER SUB WOOFER SUB WOOFER PRE OUT If headphones are plugged in unplug them 2 Place the microphone in the listening position Place the microphone at the height of the listener ...

Page 33: ...eaker setup Manual Setup fl If the speakers or speaker placement have changed after auto setup perform the auto setup again To confirm the measurement data 1 Select Confirm and press ENTER in step 3 2 Use MULTI CONTROL 2 3 to select the item to be confirmed and press ENTER And then use MULTI CONTROL 2 3 to confirm its data The following setting data can be confirmed Speaker configuration SP Setup S...

Page 34: ... the surround back speakers is not connected If the system is a 7 1 channel system connect both the surround back left and right speakers If it is a 6 1 channel system connect the surround back speaker to the SURROUND BACK L terminal E3 SB w o S The surround left and right speakers are not connected Connect the surround left and right speakers properly E4 Noisy The measurement environment is too n...

Page 35: ...eaker is connected with correct polarity C1 Phase SBL C1 Phase SBR The connection polarity of the surround back left or right speaker is inverted Ensure that the surround back left or right speaker is connected with correct polarity C1 Phase C The connection polarity of the center speaker is inverted Ensure that the center speaker is connected with correct polarity C2 No Sp C The center speaker is...

Page 36: ...ex1 Large size surround back speaker left only is connected 6 1ch SB Normalx2 Average size surround back speakers left and right are connected 7 1ch SB Normalx1 Average size surround back speaker left only is connected 6 1ch SB Off Surround back speakers are not connected Return Returns to Setup Menu 4 Press ENTER to enter the setting Reference for speaker size Large A speaker with a sufficient ba...

Page 37: ... noise level is 75 dB The adjustment should be performed in the listening position Speaker Distance SP Distance Speaker Distance SP Distance Sets the distance between each speaker and the listening position The actual distances should be measured before starting this setup Distances of speakers Speaker Input channel indicator Distance from the listening position Front speaker left L meters feet Ce...

Page 38: ... frequencies reproduced from the speakers set to Normal in the Speaker configuration SP Setup The frequencies below the set crossover frequency are output from other speakers those set to Large and the subwoofer 1 Select Crossover SETUP MULTI CONTROL 2 3 ENTER 2 Set the crossover frequency Use MULTI CONTROL 5 to select crossover frequency ENTER The frequency is selected from 40Hz to 200Hz in10Hz s...

Page 39: ...as the input source OPT1VIDEO1 AssignVIDEO1 as the input source OPT1 AUX Assign AUX as the input source Audio delay Audio Delay Audio delay Audio Delay If the monitored video is delayed in time with respect to the audio from the speakers the audio output timing can be delayed 1 Select Audio Delay SETUP MULTI CONTROL 2 3 ENTER 2 Set the delay time Use MULTI CONTROL 5 to select the delay time ENTER ...

Page 40: ...only for video The audio input becomes the digital optical or coaxial or analog audio input DVD Off VIDEO2 Off The video input becomes the analog video input VIDEO S VIDEO or COMPONENTVIDEO terminal and the audio input becomes the digital optical or coaxial or analog audio input HDMI setup HDMI Setup HDMI setup HDMI Setup The HDMI control functions can be set 1 Enter the HDMI Setup mode SETUP Use ...

Page 41: ...rected When DELAY Manual is selected use MULTI CONTROL 5 to select the audio delay time and press ENTER to enter the setting The delay time is adjusted from 0ms to 300ms in 10ms step If the TV in use is not compatible with DELAY Auto select DELAY Manual HDMI Link HDMI Link This function selects whether or not the volume control and input selection of this unit are interlocked with the operations o...

Page 42: ...nnected to this unit This makes it possible to enjoy digital surround audio broadcasting etc in the surround environment set with this unit 1 Select TV Audio In SETUP MULTI CONTROL 2 3 ENTER 2 Select an item to set MULTI CONTROL 5 ENTER Display Setting TV AUDIO On The audio input can be switched automatically to output the TV audio from the speakers connected to this unit The input selector of thi...

Page 43: ...mponents ON 2 Adjusts the volume with the remote control unit of the TV Is the volume of this unit adjusted accordingly HDMI Control confirmation 3 Turn the TV OFF standby with its remote control unit Are all of the components turned OFF Power Control confirmation 4 With all of the HDMI connected components OFF start playing a player component Are all of the components turned ON and the inputs of ...

Page 44: ...switched automatically according to the input signal When a digital input is detected the decode mode is also switched according to the signal type PCM Dolby Digital DTS Digital Manual The input mode is fixed at digital to accelerate the input signal processing and eliminate lack of audio at the beginning of playback The decode mode is also fixed according to the type of the signal to be played 6c...

Page 45: ...the AV AUX or iPod key on the remote control unit Monitoring the input source in the original sound STRAIGHT DECODE mode The signal input from a source can be output directly without any sound field effect added to it STRAIGHT DECODE STRAIGHT DECODE 1 Select the source 2 Start playback from the selected source 3 Press STRAIGHT DECODE When STRAIGHT DECODE mode is enabled the listen mode is selected...

Page 46: ...IO MODE indicator lights up the display will be turned off and no video signal is output to the TV monitor PURE AUDIO MODE indicator lights up The display is turned off No video signal to the TV monitor Except the HDMI video signal To cancel Press PURE AUDIO MODE PURE AUDIO MODE is also canceled when the LISTEN MODE or STRAIGHT DECODE key is operated When the input mode is 6ch Input the listen mod...

Page 47: ...input can be checked DISPLAY 1 Press DISPLAY The type and number of channels of the HDMI input signal are displayed for a few seconds Example Display with DTS HD Master Audio 5 1 channel input There are some video contents which have more audio signals recoreded than the input channel indicator on this unit are shown This is because at the recording studio the audio sometime is produced with a dif...

Page 48: ... its playback To select a menu in a different category Video compatible iPod only Press MUSIC or VIDEO on the remote control unit To return to the higher level in the hierarchy Press RETURN on the remote control unit Pressing the 6 key after selecting a playlist an album an artist or a genre etc will play all the tracks in the selected item For the iPod models usable with this unit see iPod models...

Page 49: ...ol unit Press SHUFFLE Each press switches the mode as follows Display Mode Shuffle Track Plays tracks files in a random order Shuffle Album Plays albums in a random order Shuffle Off Disables the shuffle play Switching the display Switching the display Operation available only on the remote control unit The displayed text information can be switched as follows Press DISPLAY during play or pause Ea...

Page 50: ...B Surround Back speaker SBL Surround Back Left speaker SBR Surround Back Right speaker About indicators About indicators Input channel indicators These indicators show the input channels used with the playing music and video These indicators do not show the channels selected in the current listen mode The LFE indicator lights when the LFE channel signal is input The LFE level can be adjusted See L...

Page 51: ...when the AUTO DETECT indicator is lit the listen mode matching the input signal type and speaker setups is selected automatically Noise may be produced when a DTS source is played by selecting the analog input 1 Start playing the selected source 2 Use LISTEN MODE to select the listen mode Each press switches the listen mode For the types of listen modes see Input signals and corresponding listen m...

Page 52: ...ers are connected 7 1 channels 2 Pro Logic II is selected if no surround back speakers are connected 3 Can be selected when one or more surround back speakers are connected Certain listen modes may not be selected depending on the input signal type and speaker setup If the surround effect cannot be obtained or the desirable listen mode cannot be selected check the following setups Speaker setup In...

Page 53: ...dio DTS HDHighResolutionAudioandDTS HDLowBitRateAudiosource Connected audio input jack HDMI DTS HD Master Audio 96kHz and lower DTS HD Master Audio 176 4kHz 192kHz DTS HD High Resolution Audio DTS HD Low Bit Rate Audio 2 3 4 2ch Others 2 3 4 2ch Others 2 3 4 2ch Others DTS HD Master Audio DTS HD Maser Audio Neo 6 3 DTS HD High Resolution Audio DTS HD High Resolution Audio Neo 6 3 DTS HD Low Bit Ra...

Page 54: ...er Over 96kHz Pro Logic IIx Movie Pro Logic II Movie 2 Pro Logic IIx Music Pro Logic II Music 2 Pro Logic IIx Game Pro Logic II Game 2 Pro Logic Neo 6 Cinema Neo 6 Music PCM Stereo 4 4 Input signal Listen mode 2 Pro Logic II is selected if no surround back speakers are connected 4 Cannot be selected depending on the DVD Audio content B60 5740 00 00 EN indd 54 B60 5740 00 00 EN indd 54 08 7 17 3 30...

Page 55: ...s cannot be selected depending on the reproduced signal The virtual modes are set to off when the sampling frequency is either 176 4 kHz or 196 kHz DVD 6 channel analog input Surround play is possible if you use a DVD player with 6 5 1 channel output INPUT MODE INPUT SELECTOR DVD Preparations Connect your DVD player to the DVD 6CH IN terminals of this unit Turn the components to be used ON 1 Set t...

Page 56: ...e use to select a station Using RDS Radio Data System RDS is a system that transmits useful information in the form of digital data for FM broadcasts along with the broadcast signal Tuners and receivers designed for RDS reception can extract the information from the broadcast signal for use with various functions such as automatic display of the station name Before using a function utilizing the R...

Page 57: ...e RDS stations Presetting radio stations manually The RDS auto memory function assigns preset numbers to RDS stations starting from preset number 1 Therefore be sure to execute the RDS auto memory function before using the following operations to manually store AM stations and other FM stations and RDS stations See RDS Auto Memory MEMORY MULTI CONTROL ENTER 1 Tune in the station you want to store ...

Page 58: ... lets you skip through the presets receiving each preset station at 0 5 second intervals MULTI CONTROL 2 3 can also be used to select the preset station Tuning by program type PTY search This function lets you set the tuner to automatically search for stations which are currently broadcasting the type of program genre you want to listen to Under certain receiving conditions it may take more than 1...

Page 59: ...station is received Goes out Station name display No sound is heard while PTY is blinking If the desired program type cannot be found No Program is displayed then after several seconds the display returns to the original display To select another program type Repeat steps 1 2 and 3 MULTI CONTROL 2 3 can also be use to select a station Using the DISPLAY key Operation available only on the remote co...

Page 60: ...ent this mode is selected is held throughout this mode and the signal is converted into stereo signals But once the digital signal is changed to other signal no signal is output When the A REC mode is selected the digital input signal is converted to stereo signals even if the digital signal is changed When the digital mode changes during recording in the A REC mode the audio input source may be i...

Page 61: ...whether or not the tone level is to be adjusted Use MULTI CONTROL 5 to select Tone On or Tone Off ENTER Display Setting Tone On The tone level can be adjusted Go to step 3 after setting Tone Off The tone level is not adjusted 3 Adjust the level of Bass low frequencies Use MULTI CONTROL 5 to adjust the level ENTER The level is adjusted from 10 to 10 4 Adjust the level of Treble high frequencies Use...

Page 62: ...II Music mode and Pro Logic IIx Music mode only 4 Neo 6 Music mode only 5 For Auto Dolby TrueHD source only 3 Use MULTI CONTROL 5 to adjust the desired item For detailed adjustment method see the explanation of each item To exit the sound adjustment mode Press SOUND Speaker level adjustment Speaker level adjustment The output level from the desired speaker channels can be fine adjusted according t...

Page 63: ... II Music mode only The center channel audio can be distributed to the front left and right speakers to enhance the width of the sound in front of the listener 1 Use MULTI CONTROL 2 3 to select Center Width 2 Press ENTER 3 Use MULTI CONTROL 5 to move the acoustic field to the left or right Center width indicator When the indicator extends to the left and right wider more part of the center channel...

Page 64: ...Use MULTI CONTROL 5 to select the level Display Setting NIGHT Auto Midnight mode auto NIGHT 1 Midnight mode level 1 NIGHT 2 Midnight mode level 2 NIGHT Off Midnight mode off NIGHT Auto can be selected only when TrueHD is selected in step 3 Some Dolby Digital or DTS software may not be compatible with the Midnight mode Switching the main and sub audio Switching the main and sub audio Dolby Digital ...

Page 65: ...s level you find most pleasing 1Slightly dark 2Dark 3Normal The brightness of the LED indicators changes in 2 levels Listening with headphones Listening with headphones 1 Connect headphones to the PHONES jack PHONES 2 Adjust volume The speaker system will be turned off as the headphones are connected No sound is output from the speakers connected to this unit Muting the sound Muting the sound Oper...

Page 66: ...ssing DVD allows you to control the connected Kenwood DVD player with this remote control unit 3 Press each key for DVD player operation Refer to the operation manual of the DVD players for the detailed operating instructions To return to the receiver operation mode press other Input source key DVD player operation keys STANDBY ON DOLBY VIRTUAL STRAIGHT DECODE LISTEN MODE DVD PURE AUDIO MODE DVD V...

Page 67: ... fl Some speakers do not output audio depending on the listen mode Sound is not output from the surround speakers and or the center speaker or their sound is very soft The surround speaker cords and or the center speaker cord is disconnected Connect it properly referring to Connecting speakers The audio cannot be played in the desired signal format Dolby Digital or DTS Digital connection is necessa...

Page 68: ...tall the outdoor antenna away from the road Noise due to interference from an electric appliance Turn off the power to the appliance Noise due to a nearbyTV set Install the unit farther away from theTV Remote control unit Symptom Cause Remedy Remote control operation is not possible The remote control is not set to the source operation mode you wish to control Press the appropriate Input Source ke...

Page 69: ...bility with existing home theater systems incorporating the Dolby Digital technology is also secured Dolby True HD This loss less reversible audio technology has been developed by Dolby Laboratories and reproduces high quality studio mastered audio data perfectly with bit order accuracy It is compatible with up to 7 1 channels when the sampling frequency is 95 kHz and up to 5 1 channels when the s...

Page 70: ...S HD audio formats It is the low bit rate for use in communications including the Internet communications HDMI HDMI High Definition Multimedia Interface is a standard developed based on DVI Digital Visual Interface and features the capability of transferring both non compressed digital video and multi channel digital audio through a single cable This unit is compatible with the HDMI optional funct...

Page 71: ... VIDEO input sensitivity impedance DVD VIDEO 1 VIDEO 2 AV AUX Composite 1Vp p 75 Ω VIDEO output level impedance VIDEO 1 MONITOR Composite 1Vp p 75 Ω S VIDEO input sensitivity impedance DVD VIDEO 2 Y singal 1Vp p 75 Ω C singal 0 286Vp p 75 Ω S VIDEO output level impedance MONITOR Y singal 1Vp p 75 Ω C singal 0 286Vp p 75 Ω COMPONENTVIDEO input sensitivity impedance DVD VIDEO 1 VIDEO 2 Y signal 1Vp ...

Page 72: ...esignated on the warranty card and in the space provided below Refer to the model and serial numbers whenever you call upon your dealer for information or service on this product Model Serial Number B60 5740 00 00 EN indd 72 B60 5740 00 00 EN indd 72 08 7 17 3 30 40 PM 08 7 17 3 30 40 PM ...

Reviews: