background image

8


English

Setting up the system

Make connections as shown in the following pages.

When connecting the related system components, be sure to 
refer to the instruction manuals supplied with the components 
you are connecting.

Do not connect the power cord to a wall outlet until all 
connections are completed.

Notes:

1.  Be sure to insert all connection cords securely. If their connections 

are imperfect, the sound may not  be produced or there will be 
noise interference.

2.  Be sure to remove the power cord from the AC outlet before 

plugging or unplugging any connection cords. Plugging/
unplugging connection cords without disconnecting the power 
cord can cause malfunctions and may damage the unit.

Analog connections

Audio connections are made using RCA pin cords. These cables 
transfer stereo audio signal in an "analog" form. This means the 
audio signal corresponds to the actual audio of two channels. 
These cables usually have 2 plugs at each end, red for the right 
channel and white for the left channel. These cables are usually 
packed together with the source unit, or are available at your 
local electronics retailer.

Microcomputer malfunction 

If operation is not possible or an erroneous display appears, 
even though all connections have been made properly, reset the 
microcomputer by referring to <Troubleshooting>. 

¤

 CAUTION

The power of this equipment will not be completely cut off 
from the wall outlet when the power switch is turned off.
Install the equipment so that the wall outlet is easily 
accessible and, in case of emergency, immediately unplug the 
power cord from the wall outlet.

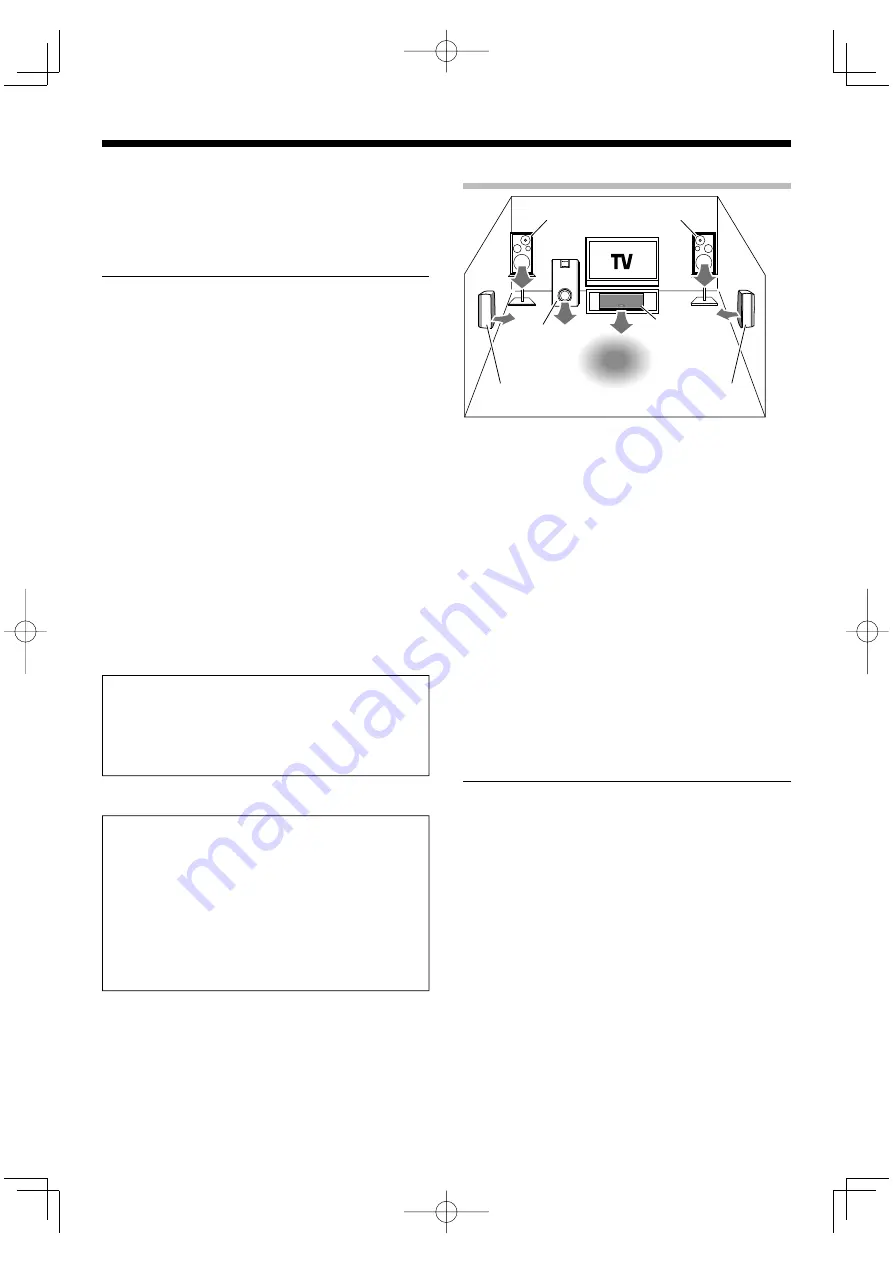
Speaker placement

Front speakers: 

Place the left and right speakers at each side of your TV. Angle the 
speakers towards the listening area to enhance the stereo effect.

Center speaker: 

Place the center speaker on the center between the front left and 
right speakers. Tilt the speaker upward or down-ward so that it is 
directly facing the listening area.

Surround speakers: 

Place the surround speakers as high as possible, either directly to 
the sides of the listening area or else slightly behind the listening 
area. Adjust the angles so that these speakers are facing directly 
towards the listeners.

Subwoofer: 

Usually, place the subwoofer in the front center position in 
the listening room, near one of the front speakers. (Since 
the subwoofer has less directivity than other speakers, it can 
be placed almost in any position that can offer the best low 
frequency reproduction according to the room layout.)

Note:

•  Although the ideal surround system consists of all the speakers 

listed above, if you don’t have a center speaker or a subwoofer, 
you can divide those signals between the available speakers in 
the speaker settings steps to obtain the best possible surround 
reproduction from the speakers you have available. 

Center speaker

Front speaker

Subwoofer

Listening 
position

Surround speaker

¤

 CAUTION

Be sure to adhere to the following, or proper ventilation 
will be blocked causing damage or fire hazard.

•  Leave some space around the unit (from the largest outside 

dimension including projection) equal to or greater than, 
shown below.

Side panel : 10 cm
Back panel : 10 cm

•  This unit is using the cooling fan. Do not place the unit 

onto a bed, a sofa, a carpet, or similar. Sucked-in dust can 
cause fire.

Front speaker

Surround speaker

B60-5676-00̲00.indd   8

B60-5676-00̲00.indd   8

07.4.12   9:57:07 AM

07.4.12   9:57:07 AM

Summary of Contents for KRF-V5200D

Page 1: ...AUDIO VIDEO CONTROL CENTER KRF V5200D INSTRUCTION MANUAL B60 5676 00 00 E X KW B60 5676 00 00 indd 1 B60 5676 00 00 indd 1 07 4 12 9 56 53 AM 07 4 12 9 56 53 AM ...

Page 2: ... INPUT SELECTOR knobs on the main unit are operated by turning the knobs clockwise or counterclockwise Example Getting into the setup mode The setup procedure is identical for all of the setting elements Once you remember the following procedure you can easily set up other setting elements MULTI CONTROL SETUP SETUP MULTI CONTROL O œ Press SETUP to enter the setup mode Use MULTI CONTROL 5 to select...

Page 3: ...ns should be adhered to Follow Instructions All operating and use instructions should be followed 1 Cleaning Unplug this product from the wall outlet before cleaning Do not use liquid cleaners or aerosol cleaners Use a damp cloth for cleaning 2 Attachments Do not use attachments not recommended by the product manufacturer as they may cause hazards 3 Water and Moisture This product shall not be exp...

Page 4: ... to radio broadcasts 27 Tuning non RDS radio stations 27 Using RDS Radio Data System 27 RDS Auto Memory 28 Presetting radio stations manually 28 Receiving preset stations 29 Receiving preset stations in order P CALL 29 Tuning by Program TYpe PTY search 30 Using the RDS DISP display key 30 Recording 31 Recording mode setting in digital audio source recording main unit only 31 Recording audio analog...

Page 5: ... AUDIO MODE key PURE AUDIO MODE indicator Use to select PURE AUDIO MODE When this mode is on the PURE AUDIO MODE indicator is lit Main unit VOLUME CONTROL AV AUX VIDEO L AUDIO R SPEAKERS ON OFF PHONES LISTEN MODE SETUP BAND AUTO MONO ACTIVE EQ INPUT MODE MULTI CONTROL INPUT SELECTOR PURE AUDIO MODE DOLBY DIGITAL DTS ACTIVE EQ PURE AUDIO MODE AV AUX key Use to select AV AUX source AV AUX jack Use t...

Page 6: ...t band 6 key Use to operate the Kenwood DVD player AUTO MONO key Use to select the auto tuning or manual tuning mode 7 key Use to operate the Kenwood DVD player 0 P CALL 4 keys Use to call preset channel ª Use to operate the Kenwood DVD player RECEIVER key Use to turn this unit on and off DVD key Use to turn on the Kenwood DVD player on and off ACTIVE EQ key Use to select ACTIVE EQ setting DIMMER ...

Page 7: ...hen pressing more than one remote control key successively press the keys securely by leaving an interval of 1 second or more between keys Notes 1 The supplied batteries may have shorter lives than ordinary batteries due to use during operation checks 2 When the remote controllable distance gets shorter than before replace both batteries with new ones 3 Placing the remote sensor in direct sunlight...

Page 8: ...er placement Front speakers Place the left and right speakers at each side of your TV Angle the speakers towards the listening area to enhance the stereo effect Center speaker Place the center speaker on the center between the front left and right speakers Tilt the speaker upward or down ward so that it is directly facing the listening area Surround speakers Place the surround speakers as high as ...

Page 9: ...nected any digital components to this unit be sure to read the Selecting the input mode carefully Optical fiber cable OPTICAL DIGITAL OUT AUDIO CD or DVD player Component with DTS Dolby Digital or PCM OPTICAL DIGITAL OUT OPTICAL DIGITAL OUT AUDIO Optical fiber cable Note Connect the video signal and analog audio signals to the VIDEO 2 jacks Connecting video components To AC wall outlet B60 5676 00...
Page 10: ...nit with digital connection be sure to read the Selecting the input mode carefully VIDEO OUT Yellow RCA pin cord FRONT OUT L R SURROUND OUT L R CENTER OUT SUBWOOFER OUT COAXIAL DIGITAL OUT AUDIO DVD player To AC wall outlet Note For Australia only If the DVD player has COMPONENT VIDEO OUT COMPONENT VIDEO connection is possible Connecting video components COMPONENT VIDEO B60 5676 00 00 indd 10 B60 ...

Page 11: ...X CD DVD REC OUT PLAY IN VIDEO 1 REC OUT PLAY IN MD TAPE L R AUDIO To AC wall outlet IN OUT OUT OUT Casette deck or MD player CD or DVD player Other component B60 5676 00 00 indd 11 B60 5676 00 00 indd 11 07 4 12 9 57 10 AM 07 4 12 9 57 10 AM ...

Page 12: ...IDEO 1 REC OUT PLAY IN MD TAPE L R AUDIO AUDIO IN VIDEO OUT Monitor TV DVD player Video component with recording function VIDEO IN AUDIO OUT AUDIO OUT VIDEO OUT VIDEO IN Note A video component with digital audio outputs should be connected to the VIDEO 2 jacks To AC wall outlet B60 5676 00 00 indd 12 B60 5676 00 00 indd 12 07 4 12 9 57 11 AM 07 4 12 9 57 11 AM ...

Page 13: ...ecting to DVD 6CH IN jacks is possible Connecting a DVD player 6 channel input 0 If some of the video equipment are connected to the COMPONENT jacks and the rest are connected to the normal composite VIDEO jacks make sure to connect the TV to the MONITOR OUT jacks of both COMPONENT VIDEO and VIDEO Depending on the type of TV it may be necessary to switch the input of the TV according to the type o...

Page 14: ...KERS 6 167 R RED L WHITE FRONT SPEAKERS 6 167 Connecting the speakers Setting up the system Front speakers Right Surround speakers Center speaker Powered subwoofer Left Right Left To AC wall outlet B60 5676 00 00 indd 14 B60 5676 00 00 indd 14 07 4 12 9 57 13 AM 07 4 12 9 57 13 AM ...

Page 15: ...d power cord Adjust the direction for best reception œ Attach to the stand Push the lever é Insert the antenna cord Release the lever Place the antenna and adjust the direction FM indoor antenna FM indoor antenna The supplied indoor antenna is for temporary use only For stable signal reception we recommend using an outdoor antenna Disconnect the indoor antenna when you connect one outdoors œ Inser...

Page 16: ...this case go through Speaker setup SP SETUP Speaker setup Easy Setup The speaker settings can be completed by simply selecting the room type and listening position The audio will be corrected automatically according to the characteristics of the speaker system in use If more detailed speaker settings are required use the procedure in Speaker setting flow MULTI CONTROL O EASY SETUP œ Press EASY SET...

Page 17: ...ow Frequency Effect channel delivers separate non directional bass signals to the subwoofer for more dynamic deep bass sound effects Speaker settings completed Getting into the setup mode The setup procedure is identical for all of the setting elements Once you remember the following procedure you can easily set up other setting elements MULTI CONTROL SETUP SETUP MULTI CONTROL O œ Press SETUP to e...

Page 18: ...matically set to FRNT LRG For FRNT LRG selection no sound will be heard from subwoofer even it is set to ON However if you select RMX ON you will be able to hear sound from the subwoofer When in STEREO mode the sound goes directly to front speakers If FRNT NML is selected CNTR LRG cannot be selected If CNTR NML or CNTR OFF is selected SURR LRG cannot be selected Adjusting the speaker level TEST TO...

Page 19: ...ont speaker Adjustment will start from front left speaker Indicator Press SETUP Repeat steps é to input the distance for the rest of the speaker Go to the next setting LFE LVL If you wish to exit the setup mode see To exit the setup mode Low frequency effects level LFE LVL Low frequency effect signal is used exclusively for giving the field effect of bass tone in the Dolby Digital and DTS signal œ...

Page 20: ...ch input DVD 6CH input ANALOG 3 Analog input Analog input 1 Factory setting 2 6CH INPT setting can be switched only when the input selector is set to DVD 6CH 3 This cannot be selected when in DTS play mode Full Auto F AUTO The unit detects the digital or analog input signal automatically The unit selects the input mode and listen mode automatically during playback to match the type of input signal...

Page 21: ...usic with PURE AUDIO MODE The PURE AUDIO MODE allows you to enjoy music sources in high quality stereo PURE AUDIO MODE PURE AUDIO MODE œ Select the music source you want to listen to Start playback from the selected source é Press PURE AUDIO MODE While in PURE AUDIO MODE the listen mode is set to stereo The display will be turned off and PURE AUDIO MODE indicator lights up PURE AUDIO MODE indicato...

Page 22: ... emphasis setting TONE will automatically be turned ON This key does not function when this unit is in the sound quality or ambience effects adjustment mode When the ACTIVE EQ mode is set to ON set it to OFF and then control the BASS BOOST setting To cancel Press BASS BOOST again Muting the sound remote control only Muting the sound remote control only Press MUTE to mute the sound of the speakers ...

Page 23: ...ignated audio standard for DVD worldwide The sound information contained in each of the six available channels is distinct and independent These six channels are described as a 5 1 channel system because there are five full bandwidth channels with 3 Hz to 20 kHz frequency range for Front Left and Right Center and Surround plus one Low Frequency Effects LFE subwoofer channel devoted to frequencies ...

Page 24: ...ng elements of sound echoing in various places The DSP modes produce the feeling of presence by using the DSP to create reverberation without spoiling the sound quality of the original signal DVD 6 channel mode Using a DVD player or the like equipped with six 5 1 output channels and this unit you can enjoy multi channel encoded DVD source material in all its splendor Since the source signals are d...

Page 25: ...ly 2 channels When Dolby Digital is selected DOLBY DIGITAL will scroll from right to left When the DTS signal is input Display Listen mode Indicator DTS DTS 5 1 channel surround mode DTS STEREO Stereo mode DTS When DTS is selected When the analog signal or digital signal except for Dolby Digital or DTS signal is input Display Listen mode Indicator PL II MOVIE Pro Logic II surround Movie mode PRO L...

Page 26: ...ll not be functional of the channels separately when this unit is in the 6CH INPUT mode Adjust the speaker level with the controls of the DVD player Refer to the Instruction manual of the DVD players for the detailed operating instructions For the powered subwoofer you can adjust the volume of the subwoofer using the subwoofer s own volume control 96kHz LPCM playback 96kHz LPCM playback This unit ...

Page 27: ...system that transmits useful information in the form of digital data for FM broadcasts along with the broadcast signal Tuners and receivers designed for RDS reception can extract the information from the broadcast signal for use with various functions such as automatic display of the station name Before using a function utilizing the RDS be sure to perform the RDS Auto Memory operation by referrin...

Page 28: ...s manually The RDS auto memory function assigns preset numbers to RDS stations starting from preset number 1 Therefore be sure to execute the RDS auto memory function before using the following operations to manually store AM stations and other FM stations and RDS stations See RDS Auto Memory MULTI CONTROL O MEMORY œ Tune to the station you want to store Press MEMORY while receiving the station Pr...

Page 29: ...ess 10 repeatedly to return to the original display and start again Preset number Receiving preset stations in order P CALL P CALL D TUNER œ Press TUNER to select tuner as the source Use P CALL 4 to select the desired station Each time you press the key another preset station is received in order Holding down the P CALL 4 lets you skip through the presets receiving each preset station at 0 5 secon...

Page 30: ...T Country Music COUNTRY Education EDUCATE National Music NATION M Drama DRAMA Oldies Music OLDIES Culture CULTURE Folk Music FOLK M Science SCIENCE Documentary DOCUMENT Varied Speech VARIED é Press PTY to start searching Example Searching for a Rock Music broadcast Display while searching Blinks Program type name display Display when a station is received Goes out Station name display No sound is ...

Page 31: ...d the digital input signal is converted to stereo signals down mix But once the digital signal is changed to other signal no signal is output When the A REC mode is selected the digital input signal is converted to stereo signals even if the digital signal is changed When the digital mode changes during recording in the A REC mode the audio input source may be interrupted momentarily For A REC mod...

Page 32: ...ly to the original setup value when the power is turned on off or when the input selection is changed œ Press SOUND repeatedly until the speaker to be adjusted appears on the display C RS LS or SW Use the MULTI CONTROL 5 to adjust the level Input level adjustment analog sources Input level adjustment analog sources only only If the input level of an analog source signal is too high the CLIP indica...

Page 33: ...NTROL 5 to adjust the soundfield towards the rear or the front Soundfield is adjusted towards the front Soundfield is in neutral position Soundfield is adjusted towards the rear Center Width mode Pro Logic II Music Center Width mode Pro Logic II Music mode only mode only Center Width adjustment allows you to enjoy an enhanced sound when listening to music through center image from only center spea...

Page 34: ...t the brightness level you find most pleasing The brightness of the LED indicators changes in 2 levels Listening with headphones main unit Listening with headphones main unit only only œ Press SPEAKERS ON OFF so that the speaker indicator goes off Make sure the SP indicator is turned off If you turn off all of the speakers when in surround mode the surround mode will be canceled as well resulting ...

Page 35: ...of the DVD player é Press each key for DVD player operation Refer to the operation manual of the DVD players for the detailed operating instructions To return to the receiver operation mode press other Input source key DVD player operation keys You can perform these basic operations using the keys described below when connected to Kenwood DVD player MEMORY REPEAT AUTO MEMORY ANGLE RDS DISP AUDIO P...

Page 36: ...e minimum level Adjust the speaker levels using the test tone When playing a Dolby Digital source signal using a DVD player the sound is cut off soon after it starts There are many possible causes for this problem depending on the type of DVD player used Set the input mode to digital manual before starting playback of the Dolby Digital source No sound is produced during playback from a DVD player ...

Page 37: ... return the unit to its normal operating condition While holding down key on the unit unplug the power cord and plug it back in Please note that resetting the microcomputer will clear the contents of the memory and return the unit to the state it was in when it left the factory Memory back up function Memory back up function Please note that the following items will be deleted from the unit s memo...

Page 38: ...utputs impedance VIDEO composite 1 Vp p 75 Ω COMPONENT VIDEO inputs impedance For Australia COMPONENT VIDEO Y signal 1 Vp p 75 Ω COMPONENT VIDEO CB CR signal 0 7 Vp p 75 Ω COMPONENT VIDEO outputs impedance For Australia COMPONENT VIDEO Y signal 1 Vp p 75 Ω COMPONENT VIDEO CB CR signal 0 7 Vp p 75 Ω FM tuner section Tuning frequency range 87 5 MHz 108 0 MHz Usable sensitivity DIN at 75 Ω MONO 1 3 μ...

Page 39: ...English 39 B60 5676 00 00 indd 39 B60 5676 00 00 indd 39 07 4 12 9 57 51 AM 07 4 12 9 57 51 AM ...

Page 40: ... spaces designated on the warranty card and in the space provided below Refer to the model and serial numbers whenever you call upon your dealer for information or service on this product Model Serial Number B60 5676 00 00 indd 40 B60 5676 00 00 indd 40 07 4 12 9 57 51 AM 07 4 12 9 57 51 AM ...

Reviews: